SAP has delivered a new transport check tool. Goal of the check tool is to make sure your imports are done successful. The tool is designed to answer the following questions:
- Do I import transports in the right sequence?
- Do I have dependency on other transports, which are not yet imported?
- Are there objects in the transport also used in other transports, which I should also import now, or when I do later make a downgrade?
- How long will the import time take?
SAP transport check tool
The transport check tool is a program with name /SDF/CMO_TR_CHECK, or tcode /SDF/TRCHECK. It is delivered in updates of ST-PI component. You can run this program in the normal system or from SAP solution manager.
If you start you get the following initial screen:
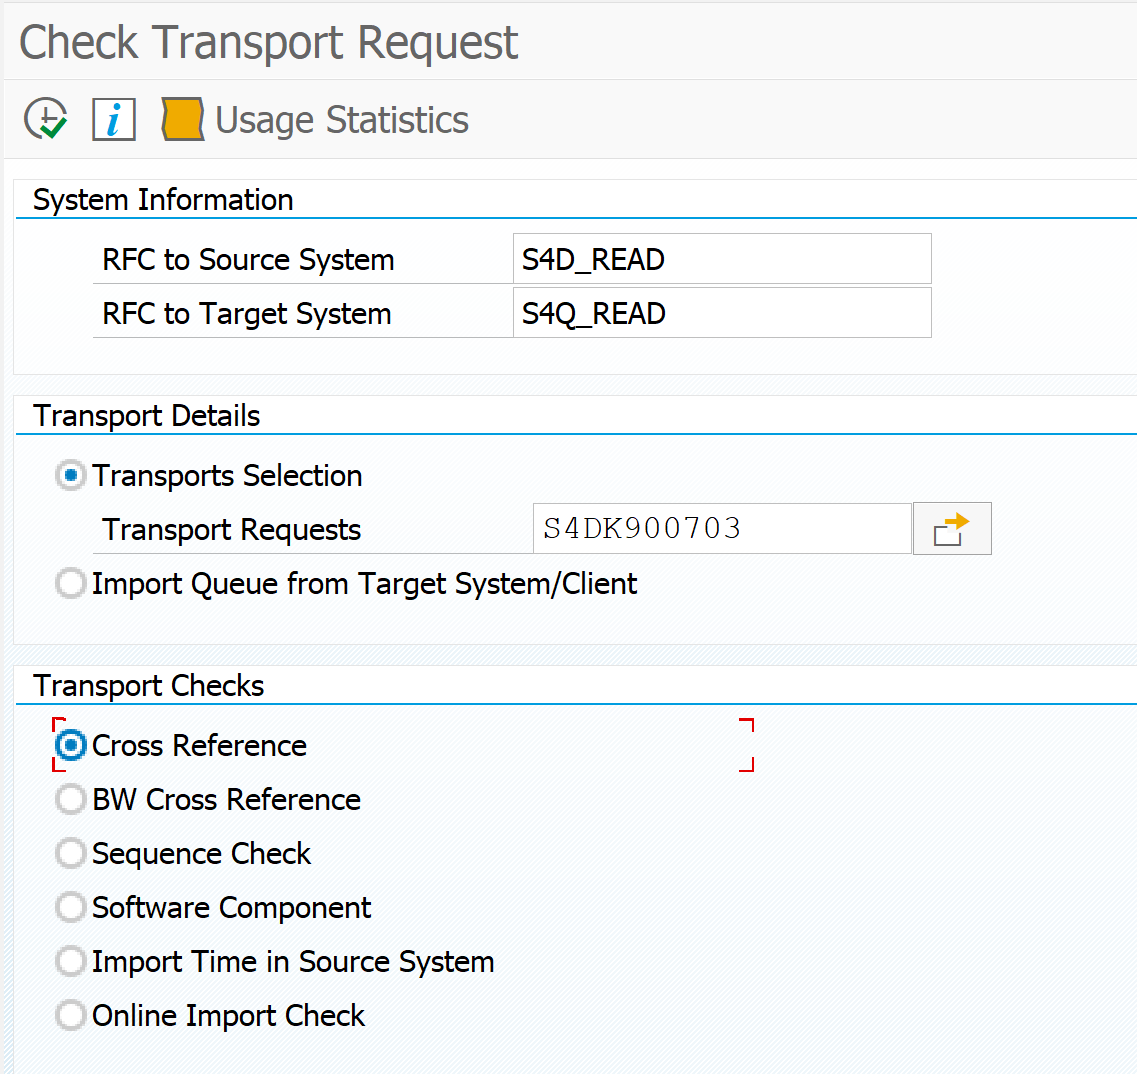
Here you see that you need 2 RFC’s: one to the source system where the current transports are and one to the target system where the imports will happen.
Tip: make 2 variants for this program. One is called quality import with RFC source is development and target is quality system. Second is called production import with source is quality and target is the productive system.
In the transport details you can enter 1 or more transport numbers you want to validate. Enter in the transport list the sequence of wanted import.
Important for multiple transports: sequence does matter! If you enter transports in sequence A1, A3, A2 this will give different result from A1, A2, A3.
Cross reference check
The cross reference check will take all the objects in the transport and will execute a where used list in the target system and will check their versions. If any strange thing is found in missing items, or potential version conflicts, you will be alerted. If check is ok the list of items will be empty.
For the cross reference check to work, the transports need to be released. See OSS note 3382914 – /SDF/TRCHECK Cross Reference Check error.
Sequence check
The sequence check will check the sequence of your transports if they are in the right order. It will also check other transports as well for containing the same objects, which have not yet been imported to the target system. If any strange thing is found in missing items or potential version conflicts you will be alerted. If check is ok the list of items will be empty.
Import time in source system
This check will add up the import times of the transport in the source system. This will be a good indication for import time needed in the target system. Example: if import to quality system took 2 minutes, you can expect productive import to be about 2 minutes as well. If the import to quality took 2 hours, you might want to decide more carefully on the exact time of import to productive system.
Online import check
The online import check is for checking critical objects inside the transports. This needs to be configure in the target system of the transport. Read more in this dedicated blog.
History of transport check tool runs
If you use the option Save Results, the results of the analysis will be saved for future reference. These can be retrieved via the History button on the first screen of the transport analysis tool or via program /SDF/CMO_TR_CHECK_HISTORY.
More information
More information on the check can be found by hitting the I (information) button on the program itself. Features of the tool including the PDF explaining the setup of the Online Import Check feature can be found in OSS note 2475591 – Transport Check Report.
Generic SAP blog on the transport tool and its usage can be found here and here.
Specific SAP blog on cross reference check can be found here.
Limitations of the cross reference check are listed in this OSS note: 2964512 – Limitations of the Cross Reference Check.
Bug fixes
This tool is also subject to having bug fixes. The bug fixes can be needed centrally on the SAP solution manager system and on the SAP systems that are being checked for transport imports.
List of bug fix OSS notes:
- 2745088 – /SDF/CMO_TR_CHECK and /SDF/CMO_TR_CHECK_HISTORY
- 2886592 – Corrections for transport checks in ST-PI
- 2911721 – Corrections for Transport Checks in ST-PI (until SP13/ SP23)
- 2950641 – SDF/CMO_TR_CHECK AND /SDF/CMO_TR_CHECK_HISTORY – 740 SP9 – 13 , 2008_1* SP19 – 23
- 2977902 – Corrections for Transport Checks in ST-PI (until SP14/ SP24)
- 3058470 – Corrections for Transport Checks in ST-PI (until SP15/ SP25)
- 3075230 – Extension for transport check result screen
- 3079085 – SYSTEM_ABAP_ACCESS_DENIED short dump during execution of cross reference check
- 3085477 – Corrections for navigation options in /SDF/CMO_TR_CHECK_HISTORY
- 3086353 – Timeout in function module /SDF/SWCM_GT620_GET_NOTES
- 3108562 – Remove buttons in Report /SDF/CMO_TR_CHECK
- 3111482 – Report /SDF/CMO_TR_CHECK_HISTORY:error when double Click on a object after eg sort or save the list after a eg sort
- 3120610 – Corrections for Report „/SDF/CMO_TR_CHECK in ST-PI (until SP16/ SP26)
- 3124614 – Corrections for Transport Checks in ST-PI (until SP16/ SP26)
- 3138706 – Corrections for Transport Checks in ST-PI (until SP17/ SP27)
- 3192008 – Corrections for Transport Checks in ST-PI (until SP20/ SP30)
- 3246251 – Run report /SDF/CMO_TR_CHECK parallel
- 3276606 – Use of SCMON for Online Import check
- 3281473 – Wrong counter “Online Import Check” in Report /SDF/CMO_TR_CHECK
- 3289900 – Corrections for Transport Checks in ST-PI (until SP21/ SP31)
- 3317698 – Corrections for Transport Checks in ST-PI (until SP22/ SP32)
- 3350313 – Corrections for Transport Checks in ST-PI (until SP23/ SP33)
- 3364251 – Use a specific weekday and hour for the online import check
- 3364298 – Improvements for transaction /SDF/TRCHECK
- 3364476 – Wrong factor for report executions in Online Import data collection
- 3374984 – Corrections for Transport Checks in ST-PI (until SP24/ SP34)
- 3411256 – Corrections for Transport Checks in ST-PI (until SP25/SP35)