Funny ABAP code blocks

Just for fun: funny ABAP code block comments….

When we cannot call our own function modules properly, we do deserve a short dump (program LSZA0F34):

Spaceship BERID, MRP area, has adventures (program LATPCFA6):

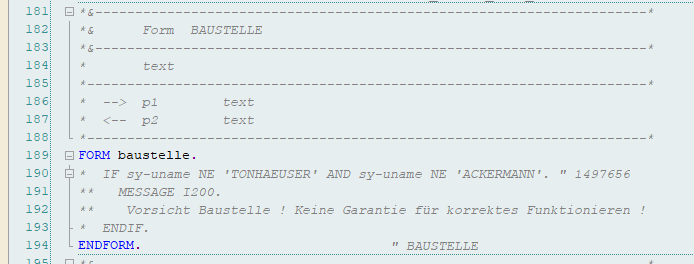
Program LSHI0F02 has road construction (Baustelle):

Trigger an error or end up in FI hell (program LWOST_CR_IMG01FNG):

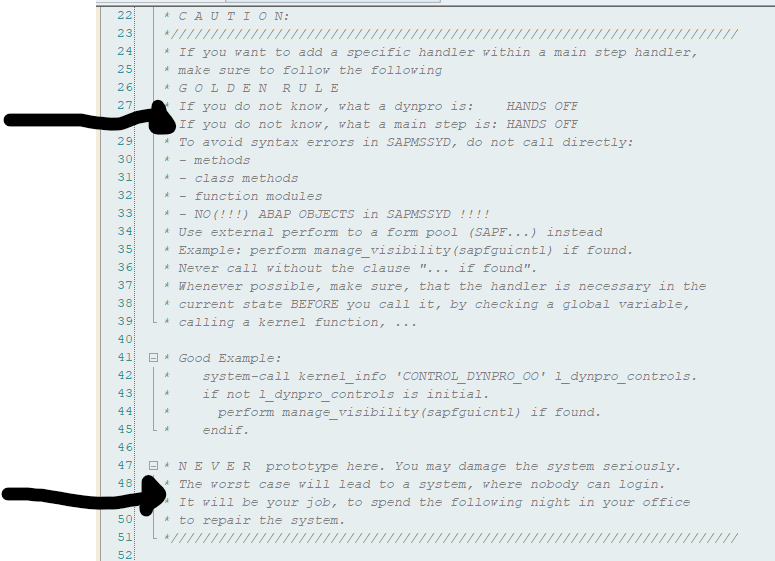
A nice golden rule: do not touch coding if you don’t know what you are doing, and if you do it is night work for you in the office to repair it (program SAPMSSYD):

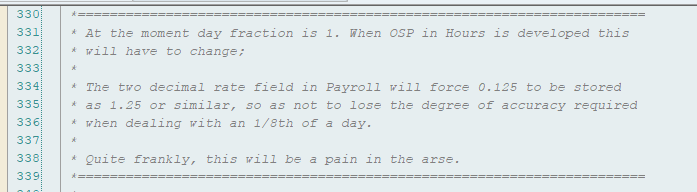
It will be painful (program RPCMSAG0PBS_FORMS):

Program RSORAF01 show life is sometimes terrible:

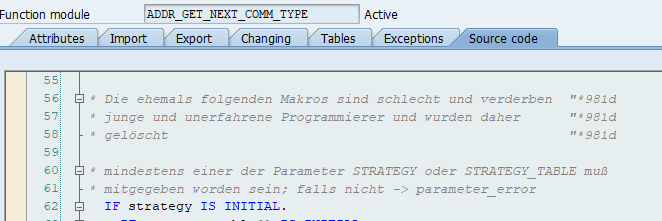
Complaints in function module ADDR_GET_NEXT_COMM_TYPE about junior programmers:

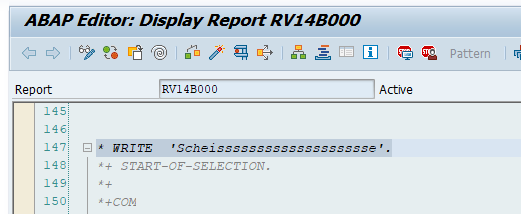
Some commented out Scheisse (shit in German) in program RV14B000:

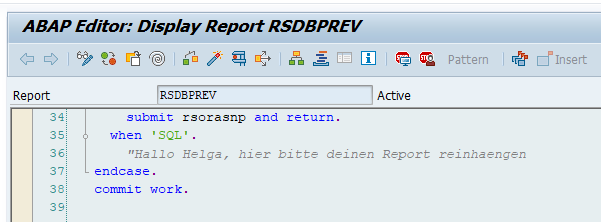
Program RSDBPREV calls out to Helga:

ADT-VS: ABAP development tools for visual studio

SAP ABAP on Eclipse will be replaced with ABAP on visual studio (background is explained in this blog). Developments in the RAP framework and AI Joule will be done in ADT-VS. If you are looking for Eclipse ADT installation, read this blog. Both Eclipse ADT and ADT-VS require the ABAP backend installation of the ADT tools, which is the same for both and described in this blog.

Installation and connection to backend

Frequently asked questions blog refers to the formal help.sap.com page on ADT for visual studio code.

Simple steps:

  1. Install Visual Studio Code on your laptop from this URL Download Visual Studio Code – Free AI Code Editor for Mac, Linux, Windows.
  2. Launch the newly installed tool
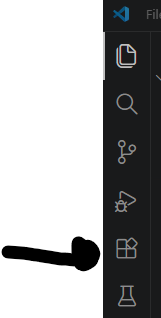
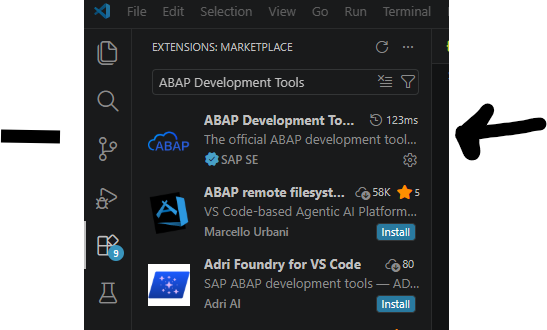
  3. Go to the Extension on the left hand side:

Search for the ABAP Development tools and install them:

4. Wait for the installation to finish and restart the Visual Studio

5. To add an ABAP destination, click in the menu View and select Command Pallette, and key here ABAP: New Destination

6. In the popup select on the right hand side the + button:

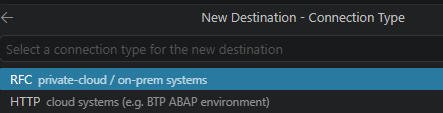
7. Select RFC to backend or HTTP to cloud system:

If you take RFC, the popup will show entries from your SAP GUI.

8. Enter User ID, password, client (be careful here: default it will give you 000, this is NOT what you want), language and password if SSO is not setup

Using the studio

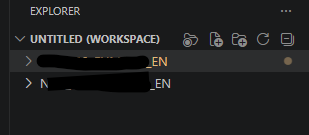
On the left hand side the connections are visible. Right click on any and select the option Logon to Destination:

Rest is same as ADT. Do realize that not all editors are yet working in Visual Studio.

Background references

ABAP AI Joule: read this blog, and this blog. Do realize AI ABAP Joule is licensed and not free of use.

All about ABAP for VS code: blog.

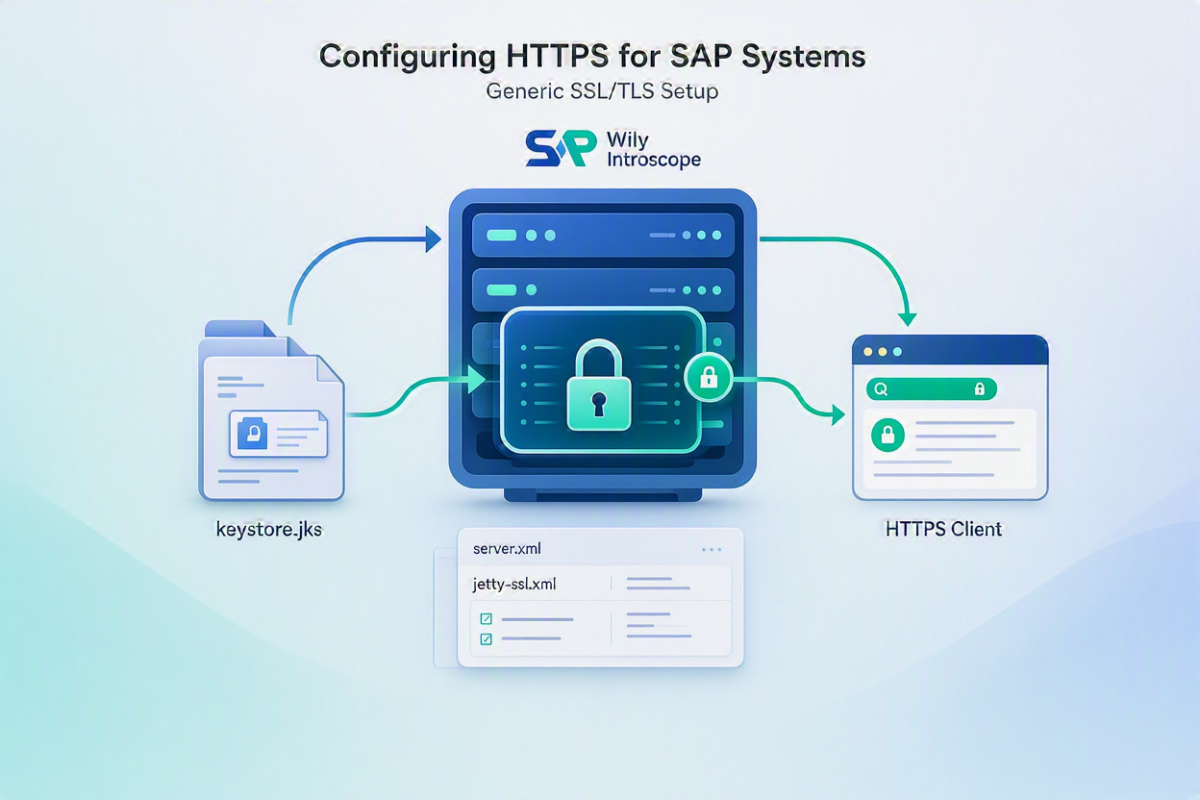
How to Configure HTTPS in SAP Wily Introscope (Jetty SSL Setup)

Introduction

SAP Wily Introscope (CA APM) Enterprise Manager (EM) plays a critical role in monitoring SAP system performance. By default, the EM web interface communicates over HTTP, which is not secure for enterprise environments.

For SAP reference page : https://support.sap.com/en/alm/solution-manager/expert-portal/introscope-enterprise-manager/enable-https-introscope.html?anchorId=section_956927644

To ensure secure communication, SAP recommends enabling HTTPS using the embedded Jetty web server.

This blog provides a step-by-step guide to:

  • Enable HTTPS in Introscope Enterprise Manager
  • Configure Jetty SSL settings
  • Use custom certificates (optional but recommended)

Goal

The objective of this configuration is to:

Convert all HTTP-based communication to HTTPS for the Introscope Enterprise Manager.

Overview of the Process

HTTPS setup typically involves the following steps:

  1. Enable Jetty configuration in Introscope
  2. Activate the HTTPS port
  3. (Optional) Configure a custom SSL certificate
  4. Restart EM and validate the setup
  5. (Optional) Update SAP Focused RUN (FRUN)

Step 1: Enable Jetty Configuration

Navigate to the following file: <EM_HOME>/config/IntroscopeEnterpriseManager.properties

Find and enable the parameter:

introscope.enterprisemanager.webserver.jetty.configurationFile=em-jetty-config.xml

✅ This activates Jetty customization using the em-jetty-config.xml file.

Step 2: Configure HTTPS Port in Jetty

Open the Jetty configuration file: <EM_HOME>/config/em-jetty-config.xml

Key Points:

  • Default ports:
    • HTTP → 8081
    • HTTPS → 8444
  • Ensure:
    • HTTPS section is enabled (not commented)
    • HTTP section can remain disabled (recommended)

Step 3: Maintain HTTPS Port in EM Properties

Even though Jetty handles the port internally, update this parameter:

introscope.enterprisemanager.webserver.port=8444

👉 This is important for integrations (like Solution Manager) to generate correct URLs.

Step 4: Restart the Enterprise Manager

Restart EM for changes to take effect:

./EMCtrl.sh stop

./EMCtrl.sh start

Step 5: Verify HTTPS Access

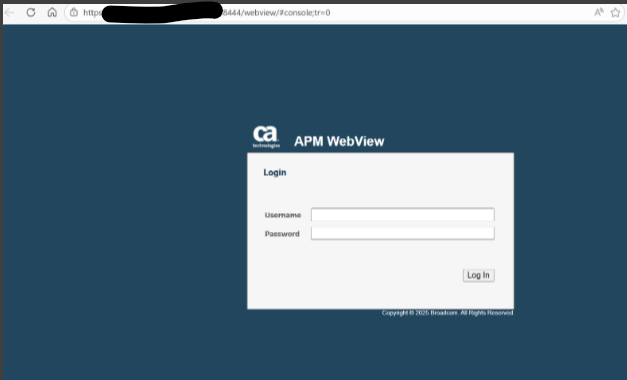
Access the Enterprise Manager via browser:

https://<hostname>:8444

Validation

Check the EM log file: <EM_HOME>/logs/IntroscopeEnterpriseManager.log

Expected entries:

  • HTTPS connector initialized
  • SSL certificate details (alias, chain)

✅ If these entries are missing, the SSL configuration is not active.

Configure Your Own SSL Certificate

Using a custom certificate avoids browser warnings and is recommended for production.

Step 5.1: Generate Keystore

keytool -keystore emhttps.jks -storepass <password>-alias emhttps -genkeypair -keyalg RSA -keysize <keylength>-keypass <password>-dname “CN=<hostname>& company details as per PKI>”

Step 5.2: Generate CSR

keytool -keystore emhttps.jks -storepass <password>-alias emhttps -certreq -file SID.csr -ext “SAN=DNS:<hostname>”

Step 5.3: Import Certificates

keytool -keystore emhttps.jks -storepass <password>-importcert -file SID.p7b -noprompt -alias emhttps -trustcacerts

Step 6: Update Jetty Configuration with Certificate

Edit: em-jetty-config.xml : update emhttps password

After applying SSL certificates, restart wily and launch https URL with 8444

Common Issues and Troubleshooting

HTTPS not working

  • Check whether the Jetty SSL configuration is actually enabled
  • In many cases, the HTTPS section in the configuration file is still commented out

Certificate not recognized

  • Verify that the correct alias is being used in the keystore
  • Ensure the full certificate chain is present, including any intermediate certificates

SSL errors in the browser

  • This often happens when using a self-signed certificate
  • Also check for CN/hostname mismatches between the certificate and the URL

Port not accessible

  • Confirm that the HTTPS port is open on the firewall
  • Make sure the port is properly exposed and the service is listening on it

Best Practices for HTTPS Configuration

  • Use certificates issued by a trusted Certificate Authority (CA) for any production environment. Self-signed certificates should be limited to testing only.
  • Wherever possible, disable plain HTTP access and enforce HTTPS across all endpoints to avoid unsecured communication.
  • Always maintain a secure backup of both the keystore and truststore files, along with their passwords, in case recovery is needed.

Conclusion

Enabling HTTPS in SAP Wily Introscope ensures secure communication between users and the Enterprise Manager. By leveraging Jetty SSL configuration and proper certificate management, organizations can significantly improve the security posture of their monitoring infrastructure.

This setup is a recommended best practice for all enterprise deployments of Introscope.

ALV with IDA (integrated data access)

Next to the classical ALV grid, SAP offers the ALV with IDA (integrated data access). This is especially useful with HANA as database and when having to process very large data sets in the ALV.

Formal documentation

The formal documentation of the ALV grid with IDA can be found at help.sap.com on this link.

This also contains a comparison between the classic ALV and ALV with IDA.

Blogs

Many blogs on this topic can be found. Some useful ones:

Using the ALV with IDA in coding

Using the ALV with IDA in ABAP coding can be done with a single statement:

cl_salv_gui_table_ida=>create(  iv_table_name = 'SFLIGHT' ) ->fullscreen( ) ->display( ).

In each ABAP system there is the demo program SALV_IDA_DISPLAY_DATA_SIMPLE which you can use to see how details can be prograamed.

Use of new ABAP 7.4 syntax

ABAP 7.4 has many nice syntax improvements. These enhancements increase the efficiency of the code written, making it easier for developers to use and to read the code.

Key features:

  • Inline Declarations
  • Table Expressions
  • Constructor Operator NEW
  • Value Operator VALUE
  • FOR operator
  • Reduction operator REDUCE
  • Conditional operators COND and SWITCH
  • CORRESPONDING operator
  • Strings
  • Filter

Inline Declaration(DATA)

Inline declarations are a new concept of declaring variables and field symbols. This enables programmer to declare the variable at the time of they used. With this new format the compiler knows that the data store the value in the form of string variable. No need to explicitly declare the string variable. So, the line of code got reduced.

Before 7.4

DATA zlv_text TYPE string. 
zlv_text = 'ABC’.

With 7.4

DATA(zlv_text) = 'ABC'.

Inline Declaration(Loop at into work area)

Every time we need to loop over an internal table we need work area . Many times this work area is not in use when loop processing is completed. Hence inline declaration make it easy to declare it and use it when it is required.

Before 7.40

Types: Begin of zlts_itab, 
Matnr type matnr,
            Sernr type gernr,
            end of zlts_itab,

DATA : zlt_itab type table of zlts_itab,  
             zls_wa type zlts_itab.
LOOP AT zlt_itab INTO zls_wa.
......
ENDLOOP. 

With 7.40

LOOP At zlt_ itab INTO DATA(zls_wa). 
…………
ENDLOOP.

Inline Declaration(Field Symbol)

Like work area we can use inline declaration for Field symbol. Here we can use angular bracket and FIELD_SYMBOL keyword as before. Read a line of internal table and assign it to a field symbol.

Before 7.40

FIELD_SYMBOLS <zls_test> type zlts_itab.
LOOP AT zlt_itab assigning <zls_test>
.....
ENDLOOP.

Read table zlt_ itab assigning <zls_test>.

With 7.40

LOOP At zlt_ itab assigning FIELD_SYMBOL (<zls_test>).
…………

ENDLOOP.
Read table zlt_itab assigning FIELD-SYMBOL(<zls_test>).

Inline Declaration(Select into table)

We need to put @symbol in front of the variables using in the select statement while using new feature. That helps compiler to understand that we are not referring the field of the database but the variable in the program.

No need to declare the internal table separately.

Please note when we use new feature we need to put comma between field while retrieving data from DB table, and also put into statement at the end.

Before 7.40

DATA : zlv_fld1 type matnr  value ‘number’,
zlt_itab TYPE TABLE OF mara.

SELECT * FROM mara
INTO TABLE zlt_itab
WHERE matnr = zlv_fld1.

With 7.40

SELECT * FROM mara 
INTO TABLE @DATA(zlt_itab)
WHERE matnr = @zlv_fld1.

Inline Declaration(Call Method)

Inline ABAP DATA declarations are a new concept introduced in release 7.4 which allows you to declare your internal table variables or work areas within the code that uses them.

No need to declare the internal table separately.

Before 7.40

DATA zlv_a1 TYPE ...
DATA zlv_a2 TYPE ...

zlo_oref->meth( IMPORTING p1 = zlv_a1
                             IMPORTING p2 = zlv_a2 ).

With 7.40

zlo_oref->meth( IMPORTING p1 =DATA(zlv_a1)
IMPORTING p2 = DATA(zlv_a2) ).

Table Expression(Read Table Index)

Previously we saw we can read the internal table to work area without declaring work area before the read statement.

In new feature we can see we might never have to use Read statement at all.

If we want to read 3rd line from Internal table we need to pass 3 into the variable idx = 3.

Before 7.40

READ TABLE zlt_itab INDEX zlv_indx  INTO zls_wa.

With 7.40

zls_wa =zlt_itab[ zlv_idx ].

Table Expression(Read Table using key and with key)

In this example we are reading internal table with key and if the passing parameter values and it satisfied then work area will be populated. If not then sy-subrc will not equal to 0.

But in new statement we can simply write work area equal to…it simple replace the read statement with direct assignment of table details to work area.

Before 7.40

1. READ TABLE zlt_itab INDEX zlv_idx
USING KEY key INTO zls_wa.

2. READ TABLE zlt_itab
               WITH KEY col1 =
                        col2 = …  INTO zls_wa.

3. READ TABLE zlt_itab WITH TABLE KEY key
COMPONENTS col1 = …
                              col2 = …INTO zls_wa.

With 7.40

zls_wa = zlt_itab[ KEY key INDEX zlv_idx ].

zls_wa = zlt_itab[ col1 = … col2 = … ].

zls_wa = zlt_itab[ KEY key col1 = …col2 = … ].

Table Expression (Does record exist?)

Whenever we have data in internal table it is very common practice to check the data which we require from table that is already exist or not?

We use here TRANSPORTING NO FIELDS statement  as we are not interested about the data but it is exist or not in the table.

In new statement we use line_exist statement to do this. We use the statement then internal table and the parameters if it is successful then compiler go inside.

Before 7.40

READ TABLE zlt_itab ... TRANSPORTING NO FIELDS.
IF sy-subrc = 0.   
...
ENDIF.

With 7.40

IF line_exists( zlt_itab[ ... ] ).      
...
ENDIF.

Table Expression(Get table index)

This example is used to read the index table index. We use line_index in the new statement.

Before 7.40

DATA zv_idx type sy-tabix.
READ TABLE ...
TRANSPORTING NO FIELDS.

zv_idx = sy-tabix.

With 7.40

DATA(zv_idx) = line_index(zlt _itab[ ... ] ).

String processing

This is frequently used in ABAP code. The data from the DB needs to be formatted before display and vice versa.

Concatenation of string: the changes are as followed:

  • String template: Create character string out of literals texts, expressions and control character, The goal is to display data in more human readable format.
  • We use pipe symbol and && operator to concatenate string.
  • To replace the write to statement.
  • A string template is defined by using the |(pipe) symbol at the beginning and end of a template.
  • If we add some value with string template like {expression} and control character.
  • Embedded expression are defined within the string template with curly brackets. Note a space between bracket and expression is obligatory.
  • An expression can be variable, functional method, predefined function or calculation expression.

Before 7.4

Data zlv_qmnum type string.
Data zlv_string type string.

zlv_qmnum = zls_qmel-qmnum.

Concatenate ‘Your notification no:’
                           zlv_qmnum
                           into zlv_string
                           separated by space.

Write :/ zlv_string.

With 7.4

Data zlv_qmnum type string.
Data zlv_string type string.

zlv_qmnum = zls_qmel-qmnum.
zlv_string = |’Your Notification No:’|&& zlv_qmnum.
zlv_string = ’Your Notification No:’.

Same as (as soon as we add pipe symbol it became string template).

zlv_string = |’Your Notification No:’.|.
zlv_string = |{ a numeric variable }|.
zlv_string = |’The return code is: ({ sy-subrc }|.
zlv_string = |’The length of text : {( text-001 )} is { strlen(text-001) }.

Chaining Operator: The chaining operator && can be used to create one character string out of multiple other strings  and string template.

In this example a number text , a space, an existing character string and a new string template are concatenated into new character string. The code convert the amount field in a display format as per user settings.

Character_string = ‘Text literal(002)’&& ‘ ’&& character_string && |{ amount_field NUMBER = USER }|.

Conversion operator

Conversion operator is used to convert value into specified type. It is suitable to avoid the declaration of helper variable.

For example :let us assume that a method expects string but we have data in character. We would need to move the  value to the string variable and then pass the helper variable to the method call. With CONV variable helper variable not required. The value can be converted directly during method call.

Before 7.40

Data zlv_cust_name type c length 20.
Data:zlv_helper type string.

zlv_helper = zlv_cust_name.

Cl_func->process_func(ziv_input = zlv_helper).

With 7.40

Data zlv_cust_name type c length 20.
Cl_func->process_func(ziv_input =CONV string( zlv_cust_name ).

Cl_func->process_func(ziv_input =CONV #(zlv_cust_name ).

Casting operator

The casting operator CAST is a constructor operator that performs a down cast or up cast for the object and create a reference variable as a result.

Syntax of casting operator is :

Cast #/type( [let_exp] dobj)

Type can be class or interface. The # character is a symbol for the operand type.

With 7.40

CLASS zcl1 DEFINITION.
ENDCLASS.
CLASS zcl2 DEFINITION INHERITING FROM    zcl1.
ENDCLASS.

DATA: zlo_oref1 TYPE REF TO zcl1,
      zlo_oref2 TYPE REF TO zcl2.

IF zlo_oref1 IS INSTANCE OF zcl2.
  zlo_oref2 ?= zlo_oref1.
  zlo_oref2 =  CAST #( zlo_oref1 ).
ENDIF.

Value operator

The VALUE operator in SAP ABAP 7.4 is used to create and initialize data objects of a specified type. It is particularly useful for constructing values for structured types, table types, and controlling the type of results in table expressions.

Initial Value for All Types:

The VALUE operator can be used to create initial values for any non-generic data types

DATA zlv_initial TYPE i
zlv_initial = VALUE i( )

Structures

For structures, the VALUE operator allows you to specify values for individual fields

TYPES: BEGIN OF zlts_struct,
field1 TYPE string,
field2 TYPE string,
END OF zlts_struct

DATA zls_struct TYPE zlts_struct

zls_struct = VALUE zlts_struct( field1 = 'Value1' field2 = 'Value2' )

Internal Tables

The VALUE operator can also be used to construct internal tables

DATA zlt_table TYPE TABLE OF string
zlt_table = VALUE #( ( 'Row1' ) ( 'Row2' ) ( 'Row3' ) )

For operator

For operator is used to loop at an internal table. For each loop the row is read and assigned to a work area or field symbol. This is similar to the same FOR loop in C language.

Transfer data from one internal table to another internal table:

New Syntax:

Data: zlt_r_equipment TYPE RANGE OF equnr,
zlt_r_equipment = VALUE #(  FOR zls_equipment IN zlt_r_equipment
                    ( sign   = zls_equipment-sign
                      option = zls_equipment-option
                      low    = |{ zls_equipment-low   ALPHA = IN }|
                      high   = |{ zls_equipment-high ALPHA = IN }| ) ).
).

Reduction operator

Reduce operator creates a results of specified data type after going through iteration. In Classical ABAP if we had to evaluate the data in an internal table then we had to loop through the internal table, evaluate the condition, and then take appropriate action. This could be done much simpler way using REDUCE.

Data(zlv_lines) = REDUCE i ( init x = 0 for wa_sales in lt_sales where ( salesoffice = ‘IN’) Next x= x+1 ) .

Conditional operator

It is an accepted practice in ABAP to use CASE statement instead of IF statement. CASE statement made the code readable but had an issue that it was not able to evaluate multiple condition.so we use if else statement. In 7.40 we use COND operator for the same.

Data(zlv_text) = COND # ( when zlv_qmtxt = ‘X1’and zlv_artpr = ‘XX’ then ‘Customer’
when zlv_qmtxt = ‘01’and zlv_artpr = ‘XX’ then ‘test1’
when zlv_qmtxt = ‘02’and zlv_artpr = ‘XX’ then ‘test2’).

Write:/zlv_text

Switch operator

Switch operator is a conditional operator like CASE but more powerful and less code. It is used to switch from one value to another based on condition.

Old syntax:

data: zlv_indicator like scal-indicator, zlv_day(10) type c.
    case zlv_indicator.
    when 1.
      zlv_day = 'Monday'.
    when 2.
      zlv_day = 'Tuesday'.
    when 3.
      zlv_day = 'Wednesday'.
    when 4.
      zlv_day = 'Thursday'.
    when 5.
      zlv_day = 'Friday'.
    when 6.
      zlv_day = 'Saturday'.
    when 7.
      zlv_day = 'Sunday'.
else.
     Raise exception type zcx_day_problem.
endcase.

New Syntax:

DATA(zlv_day) = SWITCH char10( zlv_indicator
when 1 THEN 'Monday'
   when 2 THEN 'Tuesday'
   when 3 THEN 'Wednesday'
   when 4 THEN 'Thursday'
   when 5 THEN 'Friday'
   when 6 THEN 'Saturday'
   when 7 THEN 'Sunday'
   ELSE THROW zcx_day_problem( ) ).

Corresponding operator

Corresponding operator allows the copy of data from one internal table to another internal table just like move corresponding but provides more options on which columns are copied.

TYPES : BEGIN OF zlts_demo1,
col1 TYPE c,
          col2 TYPE c,
        END OF zlts_demo1,

      BEGIN OF zlts_demo2,
          col1 TYPE c,
          col3 TYPE c,
          col4 TYPE c,
        END OF zlts_demo2.

Data: zlt_itab1 TYPE STANDARD TABLE OF zlts_demo1,
      zlt_itab2 TYPE STANDARD TABLE OF zlts_demo2.

zlt_itab1 = VALUE #( ( col1 = 'A' col2 = 'B' )
                 ( col1 = 'P' col2 = 'Q' )
                  ( col1 = 'N' col2 = 'P' ) ).

zlt_itab2 = CORRESPONDING #(zlt_itab1 ).

cl_demo_output=>write_data( zlt_itab1 ).
cl_demo_output=>write_data( zlt_itab2 ).

cl_demo_output=>display( ).

Filter

A new FILTER operator is available which can used on ABAP internal tables to filter the data (or) to retrieve subset of data into a new internal table. As of ABAP 7.4 this keyword is available to use in the system.

Old Syntax:

Data: zlt_qmel_all type standard table of qmel,
zlt_qmel_zz type standard table of qmel.

Select * from qmel into table @zlt_qmel_all.

If sy-subrc = 0.
Loop at zlt_qmel_all into data data(zls_qmel) where qmart = ‘00’.
Append zls_qmel to zlt_qmel_zz.
Clear : zls_qmel.
Endloop.
Endif.

New Syntax:

zlt_qmel_zz = FILTER #(zlt_qmel_all using key qmart where qmart = ‘00’)

ABAP Clean Core development

ABAP Clean Core is a development concept. It is not to be confused with ABAP clean code.

The ABAP Clean Core is fully explained in this very extensive SAP document: Extend SAP S/4HANA in the cloud and on premise with ABAP based extensions.

SAP has a positioning of development patterns and tools from the past. This is written in OSS note 3578329 – Frameworks, Technologies and Development Patterns in Context of Clean Core Extensibility.

This blog will focus on the initial phase to get insights into your existing code and to brief you on the main changes.

Prepare the ATC run for Clean Core

First step is to prepare the ATC runs by applying OSS note 3565942 – ATC Checks “Usage of APIs” and “Allowed Enhancement Technologies” (don’t forget this action After implementation, press ‘Import Parameters’ for the ATC check object SYCM_USAGE_OF_APIS (in ADT for Eclipse).).

Then use the Notes Analyzer to apply correction notes from OSS note 3627152 – SAP Note Analyzer Files for ATC Checks Related to Clean Core. And check OSS note 3605376 – ATC Findings for usage of not release APIs for key user items.

ABAP CVA security checks is part of this variant. If you run on SAP cloud this is part of license, on premise it is not (so you need separate license). If you don’t have the license use ABAP Eclipse ADT to remove the check from ATC variant ABAP_CLOUD_DEVELOPMENT_DEFAULT.

To make sure all new items are loaded, start transaction SCI and choose the option Utilities / Import Check Variants.

Check to apply OSS note 3568611 – Mass API for ABAP Language Version and Release Status as well.

ATC runs for Clean Core

Run the ATC for variant ABAP_CLOUD_DEVELOPMENT_DEFAULT.

Remark: please read the document Extend SAP S/4HANA in the cloud and on premise with ABAP based extensions if there a newer version defined!

Now run this one (or older ABAP_CLOUD_READINESS) on this simple test program:

REPORT ztest.

DATA: zlt_mara TYPE TABLE OF mara.
DATA: zls_mara TYPE mara.

SELECT * FROM mara INTO zls_mara.
ENDSELECT.

Result:

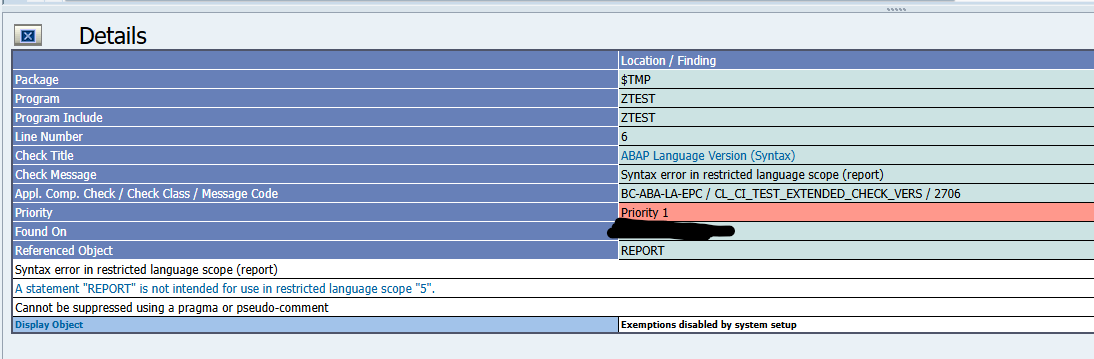
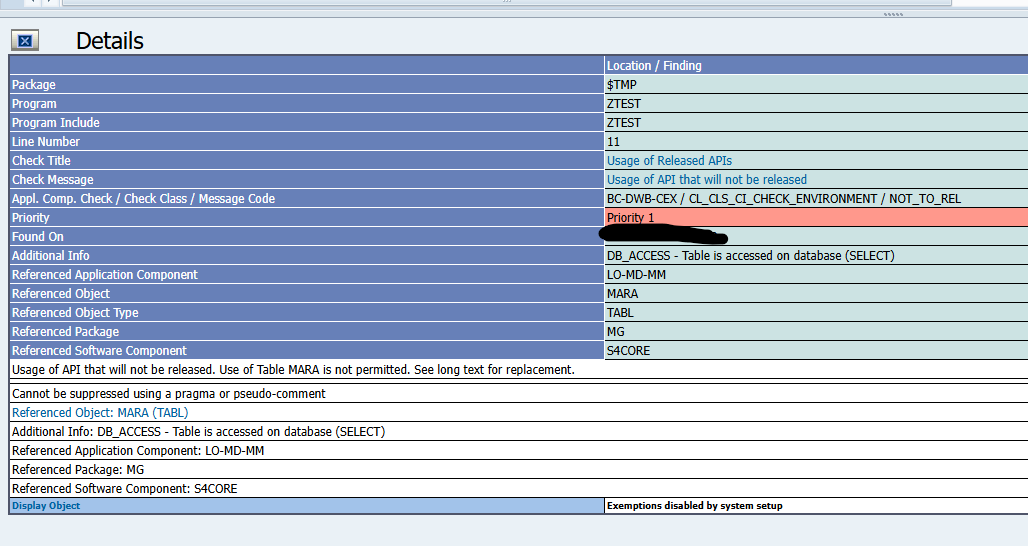
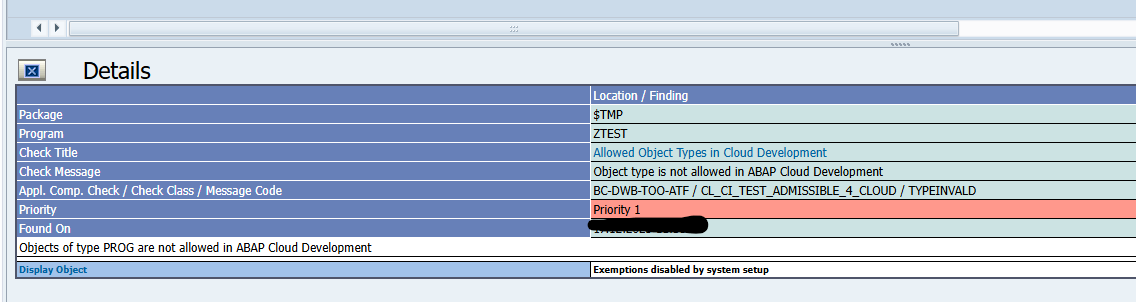
Already in this small piece of code 2 showstoppers:

  • You cannot use SE38 programs any more with REPORT statement
  • Direct table reads (in this case MARA) are forbidden in Clean Core

When you run on your existing code base, you will find many issues. On average a single old fashioned written ABAP code easily generates 100 clean core findings or more.

Forbidden to use in Clean Core

What else is not allowed?

Short list:

  • ALV grid output
  • Enjoy screens
  • SAP script
  • Smartforms
  • Webdynpro
  • Non released function modules
  • Batch input
  • Many more

New technology

So what do I need to use?

  • Data selection: CDS views
  • User interaction: FIORI (or FIORI elements) including FIORI key user extensibility
  • Data and processing logic: RAP (restful application programming) framework
  • Use released API’s (see the Cloudification Repository Viewer, link and explanation)
  • SAP extension points

BTP side by side developments

BTP side by side developments are an option. These developments are meant for loosely coupled scenarios. Also check if the BTP platform availability restrictions meet your SLA requirements.

Enforcing via SACF

The SACF switchable authorization framework can help to enforce. Switch on scenario ABAP_LANGUAGE_VERSION to activate authorization object S_ABPLNGVS. See OSS note 3488252 – SU53 reports S_ABPLNGVS missing when implementing SAP Note. More on ABAP language versions can be found in this SAP help link.

Kernseife extension

For the professionals, do have a look at the open source Kernseife project at https://github.com/SAP/project-kernseife/. Explanation is done in this blog Project Kernseife – improving the measurement of C… – SAP Community. It can help you further, but is off course without any official support.

Summary

Starting with a Green Field new SAP implementation, there is a good chance you will succeed in applying the Clean Core principles.

With an existing implementation there are a couple of bottlenecks:

  • Most likely skill set of you current ABAP developers is not up to par to meet the Clean Core development skill set
  • Small changes to existing code you will keep doing old style, since the effort to convert is out of balance with the effort of doing old style
  • The new style of coding is more structured and takes more initial effort (which will be regained at the end in the maintenance phase), but this can be a hard sell. Old fashioned ABAP with selection screen, direct SQL and ALV output is very effective and efficient to write in terms of man days work.
Tip: try the new development style for a completely new development. The chance of success will rise.

Upload data from file into Z table

With the coding below you can use a file to upload data into any Z table. The program below first deletes the full content first, then upload the content from the file. If you want different behavior, you can adjust the program to your own needs.

The program is to be protected with a proper authorization check. And it is for utility support only for non-productive systems. Do not use on productive systems.

Be careful: the program first deletes ALL the content of the current table. Then it inserts the entries from the file.

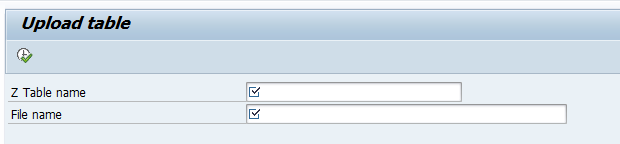
Program selection screen:

Coding:

*&--------------------------------------------------------------------*
*& Report Z_UPLOAD_TABLE
*&--------------------------------------------------------------------*
*& Description: Upload the data from a file and fill a Z table
*&--------------------------------------------------------------------*

REPORT z_upload_table.

PARAMETERS:
  p_table TYPE dd02l-tabname OBLIGATORY,
  p_file  TYPE ibipparms-path OBLIGATORY.

DATA: lt_file_data  TYPE STANDARD TABLE OF string,
      lt_table_data TYPE REF TO data,
      lt_fieldcat   TYPE lvc_t_fcat,
      lt_component  TYPE abap_component_tab,
      lv_separator  TYPE c LENGTH 1 VALUE ','.
DATA: lv_offset TYPE i VALUE 0,
      lv_until  TYPE i  VALUE 0,
      lv_field  TYPE string.
DATA: lv_filename TYPE string.

FIELD-SYMBOLS: <lt_table_data> TYPE STANDARD TABLE,
               <ls_table_data> TYPE any,
               <lv_field>      TYPE any.

DATA: new_line  TYPE REF TO data.

AT SELECTION-SCREEN.
  DATA: l_got_state TYPE  ddgotstate.
* Validate table name
  CALL FUNCTION 'DDIF_TABL_GET'
    EXPORTING
      name     = p_table
    IMPORTING
      gotstate = l_got_state
    EXCEPTIONS
      OTHERS   = 1.
  IF l_got_state <> 'A'.
    MESSAGE 'Table does not exist' TYPE 'E'.
  ENDIF.
  IF p_table+0(1) <> 'Z' AND
     p_table+0(1) <> 'Y'.
    MESSAGE 'Please use only Z or Y tables.' TYPE 'E'.
  ENDIF.

*----------------------------------------------------------------------*
*     AT SELECTION-SCREEN ON VALUE-REQUEST
*----------------------------------------------------------------------*
AT SELECTION-SCREEN ON VALUE-REQUEST FOR p_file.

  CALL FUNCTION 'F4_FILENAME'
    IMPORTING
      file_name = p_file.

START-OF-SELECTION.

* Dynamically create internal table
  CREATE DATA lt_table_data TYPE TABLE OF (p_table).
  ASSIGN lt_table_data->* TO <lt_table_data>.

  CREATE DATA new_line LIKE LINE OF <lt_table_data>.
  ASSIGN new_line->* TO <ls_table_data>.

* Generate field catalog for the table
  CALL FUNCTION 'LVC_FIELDCATALOG_MERGE'
    EXPORTING
      i_structure_name = p_table
    CHANGING
      ct_fieldcat      = lt_fieldcat
    EXCEPTIONS
      OTHERS           = 1.
  IF sy-subrc <> 0.
    MESSAGE 'Error generating field catalog' TYPE 'E'.
  ENDIF.

  lv_filename = p_file.
* Read file into internal table
  CALL FUNCTION 'GUI_UPLOAD'
    EXPORTING
      filename                = lv_filename
      filetype                = 'ASC'
    TABLES
      data_tab                = lt_file_data
    EXCEPTIONS
      file_open_error         = 1
      file_read_error         = 2
      no_batch                = 3
      gui_refuse_filetransfer = 4
      OTHERS                  = 5.
  IF sy-subrc <> 0.
    MESSAGE 'Error uploading file' TYPE 'E'.
  ENDIF.

* Delete all entries from the target table
  DELETE FROM (p_table).
  IF sy-subrc = 0.
    MESSAGE 'All entries deleted from table' TYPE 'I'.
  ENDIF.

* Parse and insert data into the table

  DESCRIBE TABLE lt_file_data LINES DATA(lv_idx).
  DELETE lt_file_data INDEX lv_idx.

  LOOP AT lt_file_data INTO DATA(ls_line) FROM 4.
    CLEAR <ls_table_data>.

    LOOP AT lt_fieldcat ASSIGNING FIELD-SYMBOL(<fs_fieldcat>).
      IF <fs_fieldcat>-fieldname = 'MANDT'.
        ASSIGN COMPONENT <fs_fieldcat>-fieldname OF STRUCTURE <ls_table_data> TO <lv_field>.
        IF sy-subrc = 0.
          <lv_field> = sy-mandt.
        ENDIF.
      ELSE.
        CLEAR lv_offset.
        DO strlen( ls_line ) TIMES.
          DATA(lv_index) = sy-index.

          DATA(lv_single) = substring( val = ls_line off = lv_index - 1 len = 1 ).
          IF lv_index = 1 AND lv_single = '|'.
            lv_offset = lv_offset + 1.
          ELSEIF lv_single = '|'.   "New field
            lv_until = lv_index - lv_offset - 1.
            lv_field = ls_line+lv_offset(lv_until).
            lv_offset = lv_offset + lv_until + 1.

            ASSIGN COMPONENT <fs_fieldcat>-fieldname OF STRUCTURE <ls_table_data> TO <lv_field>.
            IF sy-subrc = 0.
              <lv_field> = lv_field.
            ENDIF.
            ls_line = ls_line+lv_offset.
            EXIT.
          ENDIF.
        ENDDO.
      ENDIF.
    ENDLOOP.

    APPEND <ls_table_data> TO <lt_table_data>.

  ENDLOOP.

* Insert data into the database table
  INSERT (p_table) FROM TABLE <lt_table_data>.
  IF sy-subrc = 0.
    MESSAGE 'Data successfully inserted into table' TYPE 'S'.
  ELSE.
    MESSAGE 'Error inserting data into table' TYPE 'E'.
  ENDIF.

SE39 ABAP split screen editor

The SE39 transaction is used to compare two ABAP’s in split screen mode. This can be two ABAP programs in single system, or by clicking on the button Compare Different Systems between two systems. With the cross system comparison the tool will ask for which RFC to use.

Usage of SE39

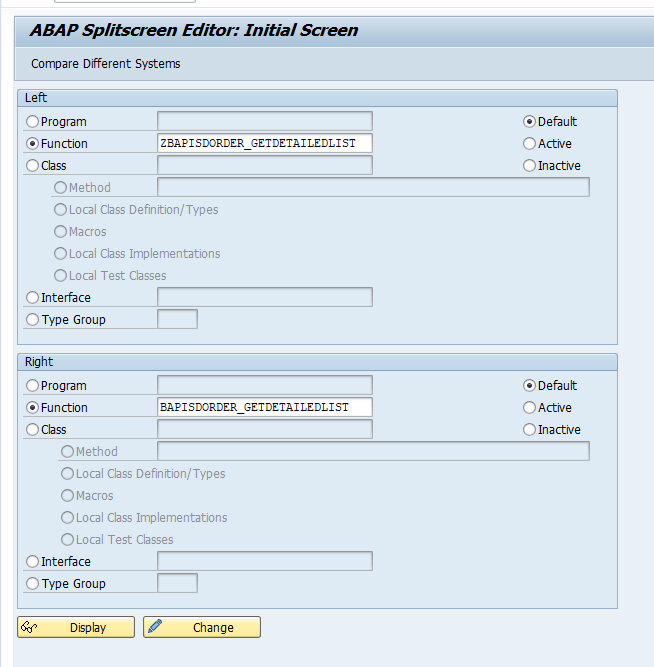
Start transaction SE39. In this example we will take a copy of a standard SAP BAPI and compare it with the original (to find clones, read this blog):

Press display to compare. Initially not much happens, except source code on the left and right.

Press the Comparison On button:

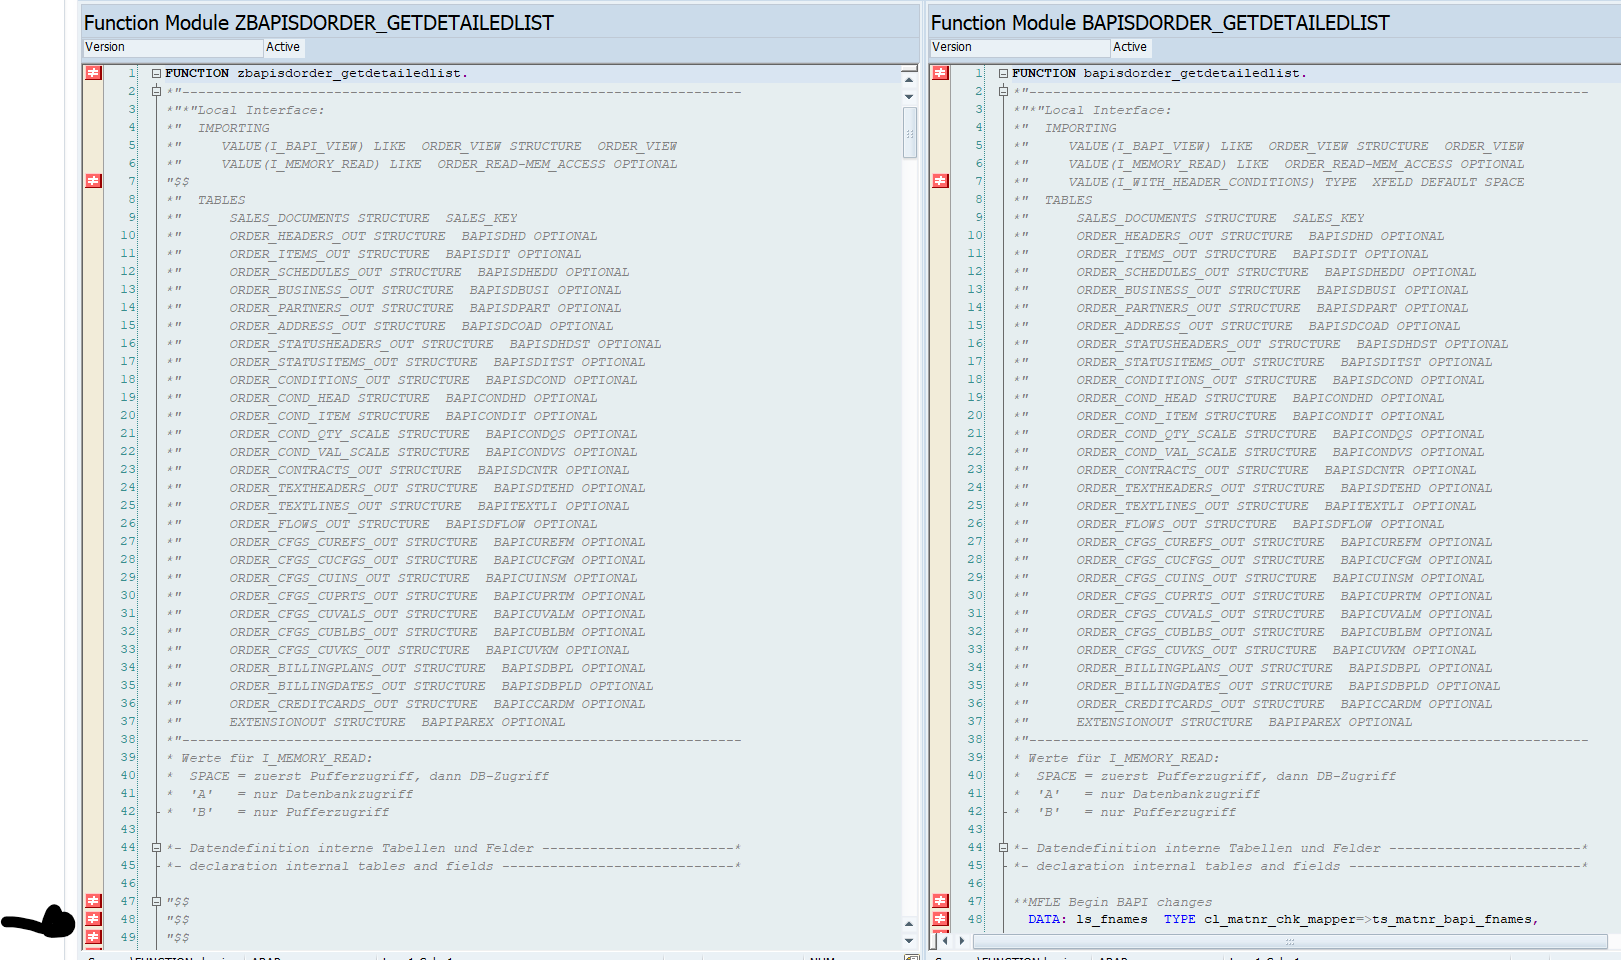
Result now shows the delta’s with indicators on the left side of the screen:

Use the buttons Next difference from cursor and the other button to quick jump through the code to find the differences.

References

Bug fix notes:

3539141 – Splitscreeneditor: Error for empty source in version management

3564002 – SE39: improve handling of inactive programs

3568037 – Enhancements are not being displayed in SE39 for remote systems

XPRA transport actions

XPRA actions can be a must to to trigger actions after import. The most know is to trigger the RV80HGEN program jointly with update of requirement or formula.

The XPRA can also be misused by hackers to execute actions right after transport import. Since XPRA is done with the DDIC user upon import, it will take the rights from DDIC as well. Very often DDIC has SAP_ALL assigned.

Correct usage of XPRA

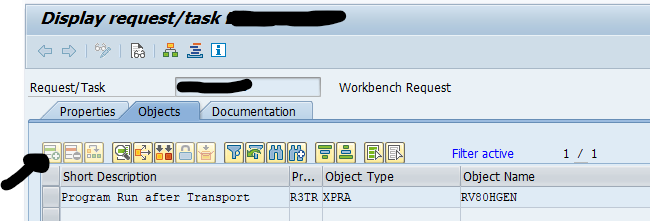
To add a XPRA action, go to the transport via SE10 or SE01 and press change. Then use the Insert Row button to manually add the XPRA action:

Add program ID R3TR, object type XPRA and object name the program to be executed. In this case the RV80HGEN program.

Now save the transport.

Upon import the program will be executed at the end of the import. This can be seen in the transport import log details:

Other XPRA programs

Next to RV80HGEN there are more known XPRA programs:

2400599 – List of Programs to regenerate CUSTOM fields after upgrade or patch update lists RGUGBR02, SAPFACCG and RFBIBLG0.

1365712 – Generating FI programs during posting after importing an SP lists program RGZZGLUX to regenerate the finance programs.

1855686 – Dump in XPRA phase because of FAGL_VIEWS_GENERATE_ALL lists program SAPLFAGL_VIEWS_GENERATE (and old program SAPFACCG).

Misuse of XPRA

Off course any developer can add a malicious XPRA statement to execute a program upon import.

What to do about this?

Prevention is not possible. Detection is possible. See the blog on adding a critical object check to the transport check tool. In this case add a check on R3TR XPRA and program *. This will detect any XPRA object.

Webdynpro tips & tricks

SAP web dynpro is still in use and is a good way for ABAP devevloper to create web screens for end users.

Tips and tricks for basis

Transactions:

  • SICF: activation or de-activation of web dynpro services (see blog for all SICF tips and tricks)
  • SICF_SESSIONS: Enable HTTP security session management at backend(ABAP) system
  • SMGW: gateway monitor
  • SMICM: HTTPs settings

General:

SAP help documentation on WebDynpro can be found here (very extensive).

Unified rendering

Web dynpro uses the unified rendering framework. This needs regular patching. See this blog for more information.