Mass cancellation of work items is possible with the SWIA transaction as explained in this blog.
This blog will explain how you can use Z program to mass close like SWIA, but then in batch job mode, and automatically without user interaction.
The custom program
The custom program ZRSWIWILS_WI_CANCEL is basically a copy of standard SAP program RSWIWILS.
You can copy and paste the code from below source code text and add the text symbols and selection screen parameter text.
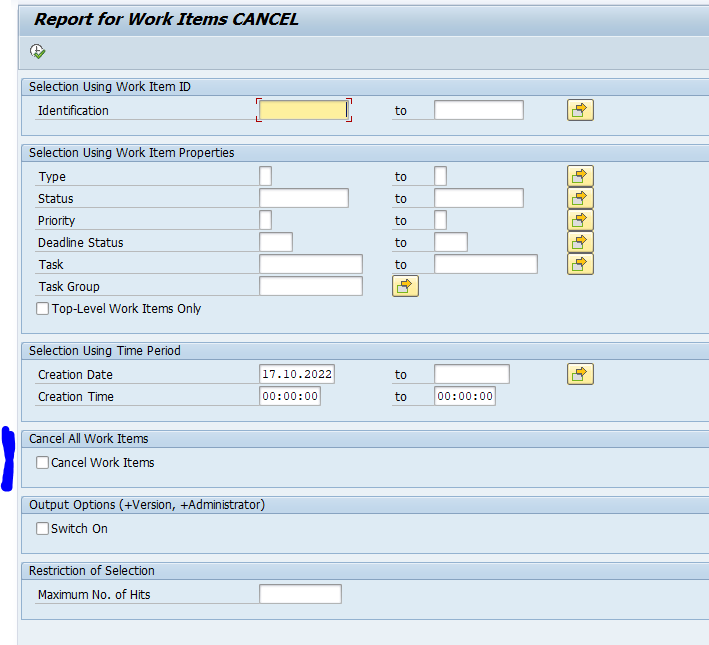
Start screen has 1 extra option more than standard SAP:
The program working explained
When the new option is selected, after the data fetching, the program simply calls function module SWW_WI_ADMIN_CANCEL to cancel the item. Since it is done in loop and without user interaction, the program can run in batch mode.
The custom program source code text
* Report ZRSWIWILS_WI_CANCEL *----------------- Standard program RSWIWILS copy ---------------------* *---------- This code is to extend existing functionality--------------* REPORT zrswiwils_wi_cancel MESSAGE-ID swf_rep_base. INCLUDE rswlfcod. INCLUDE rswuincl. CLASS cl_swf_rdg_dispatcher DEFINITION LOAD. ************************************************************************ * Begin of Data * ************************************************************************ DATA: g_list_cnt TYPE sy-tabix. DATA: zlt_wiheader TYPE swfatalvitm. DATA: int TYPE REF TO if_swf_rep_workitem_selection. DATA: tcode LIKE sy-tcode. DATA: g_windows_titlebar TYPE string. CONSTANTS: zlc_tcode TYPE sytcode VALUE 'SWIA'. *- type pools TYPE-POOLS: slis. TABLES: swfawrkitm. *- select options SELECTION-SCREEN BEGIN OF BLOCK b1 WITH FRAME TITLE TEXT-a01. SELECT-OPTIONS: id FOR swfawrkitm-wi_id. SELECTION-SCREEN END OF BLOCK b1. SELECTION-SCREEN BEGIN OF BLOCK b2 WITH FRAME TITLE TEXT-a02. SELECT-OPTIONS: type FOR swfawrkitm-wi_type, state FOR swfawrkitm-wi_stat, prio FOR swfawrkitm-wi_prio, dhsta FOR swfawrkitm-wi_dh_stat, task FOR swfawrkitm-wi_rh_task, taskg FOR swfawrkitm-wi_rh_task NO INTERVALS. PARAMETERS: top_only TYPE xfeld. SELECTION-SCREEN END OF BLOCK b2. SELECTION-SCREEN BEGIN OF BLOCK b3 WITH FRAME TITLE TEXT-a03. SELECT-OPTIONS: cd FOR swfawrkitm-wi_cd, ct FOR swfawrkitm-wi_ct NO-EXTENSION. SELECTION-SCREEN END OF BLOCK b3. SELECTION-SCREEN BEGIN OF BLOCK b6 WITH FRAME TITLE TEXT-a06. PARAMETERS: p_cancel TYPE xfeld DEFAULT ' '. SELECTION-SCREEN END OF BLOCK b6. SELECTION-SCREEN BEGIN OF BLOCK b4 WITH FRAME TITLE TEXT-a04. PARAMETERS: p_more TYPE swi_params-option AS CHECKBOX. PARAMETERS: filter TYPE swf_utl002-clsname NO-DISPLAY. PARAMETERS: p_swia TYPE xfeld NO-DISPLAY DEFAULT space. " note 1274031 SELECTION-SCREEN END OF BLOCK b4. SELECTION-SCREEN BEGIN OF BLOCK b5 WITH FRAME TITLE TEXT-a05. PARAMETERS: p_maxsel TYPE tbmaxsel. SELECTION-SCREEN END OF BLOCK b5. *------------------------------------------------------------- INITIALIZATION. *------------------------------------------------------------- cd-low = sy-datum. cd-sign = 'I'. cd-option = 'EQ'. APPEND cd. *------------------------------------------------------------- *- F4 functionality *------------------------------------------------------------- AT SELECTION-SCREEN ON VALUE-REQUEST FOR task-low. DATA: act_object_ext TYPE rhobjects-object. CALL FUNCTION 'RH_SEARCH_TASK' IMPORTING act_object_ext = act_object_ext EXCEPTIONS no_active_plvar = 1 no_org_object_selected = 2 no_valid_task_type = 3 OTHERS = 4. IF sy-subrc EQ 0. task-low = act_object_ext. ENDIF. AT SELECTION-SCREEN ON VALUE-REQUEST FOR task-high. DATA: act_object_ext TYPE rhobjects-object. CALL FUNCTION 'RH_SEARCH_TASK' IMPORTING act_object_ext = act_object_ext EXCEPTIONS no_active_plvar = 1 no_org_object_selected = 2 no_valid_task_type = 3 OTHERS = 4. IF sy-subrc EQ 0. task-high = act_object_ext. ENDIF. *------------------------------------------------------------- START-OF-SELECTION. *------------------------------------------------------------- PERFORM main USING p_more p_maxsel. *---------------------------------------------------------------------* * FORM MAIN * *---------------------------------------------------------------------* * ........ * *---------------------------------------------------------------------* FORM main USING p_more TYPE xfeld p_maxsel TYPE tbmaxsel. DATA: field_lst TYPE slis_t_fieldcat_alv, field_cat TYPE slis_fieldcat_alv, is_layout TYPE slis_layout_alv, is_variant LIKE disvariant, it_sort TYPE slis_t_sortinfo_alv, l_string TYPE string, l_grid_title TYPE lvc_title. *- prepare the list format (determine columns...) PERFORM prepare_format CHANGING field_lst field_cat is_layout it_sort. is_variant-report = sy-repid. *- get the list from the database. PERFORM get_workitem_header USING p_more p_maxsel CHANGING zlt_wiheader. *- check empty DATA: hits TYPE i. DESCRIBE TABLE zlt_wiheader LINES hits. IF NOT hits IS INITIAL. *- set table layout is_layout-cell_merge = 'X'. *- set title is_layout-window_titlebar = 'Workitems Cancel'(001). g_windows_titlebar = is_layout-window_titlebar. PERFORM get_title USING hits g_windows_titlebar l_grid_title. is_layout-window_titlebar = l_grid_title. IF p_cancel IS NOT INITIAL AND zlt_wiheader IS NOT INITIAL. * Cancel the work item PERFORM cancel_workitem TABLES zlt_wiheader. ENDIF. *- call the CO function to display the list. CALL FUNCTION 'REUSE_ALV_GRID_DISPLAY' EXPORTING i_callback_program = CONV syrepid( 'ZRSWIWILS_WI_CANCEL' ) i_callback_user_command = 'CALL_UCOMM_WILIST' is_layout = is_layout it_fieldcat = field_lst it_sort = it_sort is_variant = is_variant TABLES t_outtab = zlt_wiheader EXCEPTIONS OTHERS = 1. ELSE. MESSAGE s003. ENDIF. ENDFORM. "main *---------------------------------------------------------------------* * FORM PREPARE_FORMAT * *---------------------------------------------------------------------* * ........ * *---------------------------------------------------------------------* * --> FIELD_LST * * --> FIELD_CAT * * --> IS_LAYOUT * *---------------------------------------------------------------------* FORM prepare_format CHANGING field_lst TYPE slis_t_fieldcat_alv field_cat TYPE slis_fieldcat_alv is_layout TYPE slis_layout_alv it_sort TYPE slis_t_sortinfo_alv. DATA: is_sort LIKE LINE OF it_sort. DATA: structure_name TYPE dd02l-tabname VALUE 'SWFAWRKITM'. DATA: lt_fieldcat TYPE lvc_t_fcat. DATA: ls_fieldcat TYPE lvc_s_fcat. DATA: wf_settings TYPE swp_admin. DATA: lh_aging_services TYPE REF TO cl_sww_daag_services. FIELD-SYMBOLS: <field_lst> LIKE LINE OF field_lst. is_layout-box_fieldname = 'B_MARKED'. is_layout-box_tabname = 'WIHEADER'. *- prepare sort PERFORM set_sort_tab CHANGING it_sort. *- get fieldcatalog CALL FUNCTION 'LVC_FIELDCATALOG_MERGE' EXPORTING i_structure_name = structure_name CHANGING ct_fieldcat = lt_fieldcat EXCEPTIONS inconsistent_interface = 1 program_error = 2 OTHERS = 3. LOOP AT lt_fieldcat INTO ls_fieldcat. IF ls_fieldcat-fieldname EQ 'WI_RHTEXT'. ls_fieldcat-lowercase = 'X'. ENDIF. MOVE-CORRESPONDING ls_fieldcat TO field_cat. field_cat-seltext_s = ls_fieldcat-scrtext_s. field_cat-seltext_l = ls_fieldcat-scrtext_l. field_cat-seltext_m = ls_fieldcat-scrtext_m. APPEND field_cat TO field_lst. ENDLOOP. *- no reference for B_MARKED CLEAR field_cat-ref_tabname. field_cat-tech = 'X'. field_cat-fieldname = 'B_MARKED'. APPEND field_cat TO field_lst. CLEAR field_cat-tech. *- set columns positions LOOP AT field_lst ASSIGNING <field_lst>. CASE <field_lst>-fieldname. WHEN 'WI_ID'. <field_lst>-col_pos = 1. WHEN 'WI_STAT'. <field_lst>-col_pos = 2. WHEN 'WI_CHCKWI'. <field_lst>-col_pos = 3. WHEN 'TYPETEXT'. <field_lst>-col_pos = 4. <field_lst>-outputlen = 15. WHEN 'WI_RH_TASK'. <field_lst>-col_pos = 5. <field_lst>-outputlen = 11. WHEN 'WI_CD'. <field_lst>-col_pos = 6. <field_lst>-outputlen = 10. WHEN 'WI_CT'. <field_lst>-col_pos = 7. <field_lst>-outputlen = 8. WHEN 'WI_TEXT'. <field_lst>-col_pos = 8. <field_lst>-outputlen = 80. WHEN 'WI_CONFIRM'. <field_lst>-col_pos = 9. WHEN 'WI_REJECT'. <field_lst>-col_pos = 10. WHEN 'WI_PRIOTXT'. <field_lst>-col_pos = 11. WHEN 'RETRY_CNT'. <field_lst>-col_pos = 12. WHEN 'TOP_TASK'. <field_lst>-col_pos = 13. WHEN OTHERS. <field_lst>-col_pos = 999999. ENDCASE. ENDLOOP. SORT field_lst BY col_pos. LOOP AT field_lst ASSIGNING <field_lst>. <field_lst>-col_pos = sy-tabix. ENDLOOP. *- set standard layout CLEAR field_cat. field_cat-no_out = 'X'. MODIFY field_lst FROM field_cat TRANSPORTING no_out WHERE fieldname EQ 'WI_LANG' OR fieldname EQ 'WI_TYPE' OR fieldname EQ 'VERSION' OR fieldname EQ 'WI_PRIO' OR fieldname EQ 'NOTE_CNT' OR fieldname EQ 'WI_RELEASE' OR fieldname EQ 'STATUSTEXT' OR fieldname EQ 'TCLASS' OR fieldname EQ 'WI_DH_STAT' OR fieldname EQ 'RETRY_CNT' OR fieldname EQ 'WLC_FLAGS' OR fieldname EQ 'TOP_TASK' OR fieldname EQ 'AGING_STATE' OR fieldname EQ 'AGING_TEMPERATURE'. *- delete aging fields if not applicable lh_aging_services = cl_sww_daag_services=>get_instance( ). IF lh_aging_services->aging_enabled( ) NE 'X'. DELETE field_lst WHERE fieldname EQ 'AGING_STATE' OR fieldname EQ 'AGING_TEMPERATURE'. ENDIF. *- set checkboxes CLEAR field_cat. field_cat-checkbox = 'X'. MODIFY field_lst FROM field_cat TRANSPORTING checkbox WHERE fieldname EQ 'WI_CONFIRM' OR fieldname EQ 'WI_REJECT' OR fieldname EQ 'WI_DEADEX' OR fieldname EQ 'NOTE_EXIST' OR fieldname EQ 'ASYNCAGENT'. IF tcode = 'SWI2_ADM1'. " workitems ohne bearbeiter CLEAR field_cat. field_cat-col_pos = '0'. field_cat-key = 'X'. MODIFY field_lst FROM field_cat TRANSPORTING col_pos key WHERE fieldname EQ 'ASYNCAGENT'. ELSE. CLEAR field_cat. field_cat-tech = 'X'. MODIFY field_lst FROM field_cat TRANSPORTING tech WHERE fieldname EQ 'ASYNCAGENT'. ENDIF. *- delete agents if necessary CALL FUNCTION 'SWP_ADMIN_DATA_READ' IMPORTING wf_settings = wf_settings EXCEPTIONS OTHERS = 1. IF wf_settings-no_agents = 'X'. field_cat-tech = 'X'. MODIFY field_lst FROM field_cat TRANSPORTING tech WHERE fieldname EQ 'EXEUSER' OR fieldname EQ 'FORW_BY'. ENDIF. ENDFORM. "prepare_format *---------------------------------------------------------------------* * FORM CALL_UCOMM_WILIST * *---------------------------------------------------------------------* * Dynamic call to process the keyboard input. * *---------------------------------------------------------------------* * --> UCOMM * * --> SELFIELD * *---------------------------------------------------------------------* FORM call_ucomm_wilist USING ucomm TYPE syucomm selfield TYPE slis_selfield. DATA: old_list_cnt LIKE g_list_cnt, s_return LIKE swl_return, line_idx LIKE sy-tabix, l_tabix LIKE sy-tabix, linesel_cnt LIKE sy-tabix, b_line_selected LIKE sy-binpt, ls_wiheader TYPE LINE OF swfatalvitm. DATA: lt_wrkitm TYPE swfatwrkitm. DATA: delta_list_cnt TYPE sytabix. DATA: ls_por TYPE sibflpor. DATA: lt_por TYPE sibflport. DATA: lv_ucomm TYPE syucomm. DATA: l_excp TYPE REF TO cx_swf_ifs_exception. DATA: ls_suspend TYPE swp_suspen. DATA: ls_swwwidh TYPE swwwidh. DATA: l_wi_index TYPE sytabix. DATA: lh_grid TYPE REF TO cl_gui_alv_grid. DATA: l_grid_title TYPE lvc_title. DATA: l_count TYPE sytabix. PERFORM pick_line USING selfield-tabindex zlt_wiheader CHANGING line_idx linesel_cnt b_line_selected. LOOP AT zlt_wiheader INTO ls_wiheader WHERE b_marked EQ 'X'. ls_por-catid = swfco_objtype_bc. ls_por-instid = ls_wiheader-wi_id. APPEND ls_por TO lt_por. ENDLOOP. IF lt_por[] IS INITIAL. READ TABLE zlt_wiheader INDEX line_idx INTO ls_wiheader. ls_por-catid = swfco_objtype_bc. ls_por-instid = ls_wiheader-wi_id. APPEND ls_por TO lt_por. ENDIF. ************************************************************************ * Refresh Instancemanager * ************************************************************************ TRY. CALL METHOD cl_swf_run_wim_factory=>initialize( ). CATCH cx_swf_ifs_exception INTO l_excp. CALL METHOD cl_swf_utl_message=>send_message_via_exception( l_excp ). ENDTRY. CASE ucomm. ************************************************************************ * Filter * ************************************************************************ WHEN '&ILT'. ************************************************************************ * Refresh * ************************************************************************ WHEN '1REF'. CALL METHOD int->refresh IMPORTING ex_delta_count = delta_list_cnt. CALL METHOD int->get_entries IMPORTING ex_wientries = lt_wrkitm. CLEAR zlt_wiheader[]. PERFORM convert_to_alv_list USING lt_wrkitm p_more CHANGING zlt_wiheader. MESSAGE s811(w8) WITH delta_list_cnt. selfield-refresh = 'X'. selfield-row_stable = 'X'. ************************************************************************ * Pick * ************************************************************************ WHEN '&IC1'. IF linesel_cnt > 1. MESSAGE s201(wi). EXIT. ENDIF. IF line_idx = 0. MESSAGE s004(0k). EXIT. ENDIF. READ TABLE zlt_wiheader INDEX line_idx INTO ls_wiheader. ls_por-catid = 'BC'. ls_por-instid = ls_wiheader-wi_id. IF ls_wiheader-wi_type = wi_flow. lv_ucomm = function_wi_workflow_display. ELSE. lv_ucomm = cl_swf_rdg_dispatcher=>c_function_wi_display. ENDIF. CALL METHOD cl_swf_rdg_dispatcher=>execute_dialog_request EXPORTING im_por = ls_por im_function = lv_ucomm EXCEPTIONS OTHERS = 1. IF sy-subrc <> 0. MESSAGE ID sy-msgid TYPE sy-msgty NUMBER sy-msgno WITH sy-msgv1 sy-msgv2 sy-msgv3 sy-msgv4. ENDIF. WHEN OTHERS. * IF line_idx = 0. "--- OSS note 1422569 --- IF linesel_cnt = 0. MESSAGE s004(0k). EXIT. ENDIF. CALL METHOD cl_swf_rdg_dispatcher=>execute_dialog_request_multi EXPORTING im_por = lt_por im_function = ucomm EXCEPTIONS OTHERS = 1. IF sy-subrc <> 0. MESSAGE ID sy-msgid TYPE sy-msgty NUMBER sy-msgno WITH sy-msgv1 sy-msgv2 sy-msgv3 sy-msgv4. ENDIF. ENDCASE. DATA: ls_layout TYPE slis_layout_alv. DATA: lt_filtered_entries TYPE slis_t_filtered_entries. DATA: l_lines TYPE i. CALL FUNCTION 'REUSE_ALV_GRID_LAYOUT_INFO_GET' IMPORTING es_layout = ls_layout et_filtered_entries = lt_filtered_entries EXCEPTIONS OTHERS = 1. IF sy-subrc EQ 0. DESCRIBE TABLE lt_filtered_entries LINES l_lines. DESCRIBE TABLE zlt_wiheader LINES l_count. l_count = l_count - l_lines. PERFORM get_title USING l_count g_windows_titlebar l_grid_title. ls_layout-window_titlebar = l_grid_title. CALL FUNCTION 'REUSE_ALV_GRID_LAYOUT_INFO_SET' EXPORTING is_layout = ls_layout. ENDIF. ENDFORM. "call_ucomm_wilist *&---------------------------------------------------------------------* *& Form set_sort_tab *&---------------------------------------------------------------------* * text *----------------------------------------------------------------------* * -->P_IT_SORT sorttab (ALV format) *----------------------------------------------------------------------* FORM set_sort_tab CHANGING p_it_sort TYPE slis_t_sortinfo_alv. DATA: is_sort TYPE slis_sortinfo_alv. REFRESH p_it_sort. is_sort-tabname = 'WIHEADER'. is_sort-spos = 1. is_sort-fieldname = 'WI_CD'. is_sort-down = 'X'. APPEND is_sort TO p_it_sort. is_sort-spos = 2. is_sort-fieldname = 'WI_CT'. is_sort-down = 'X'. APPEND is_sort TO p_it_sort. is_sort-spos = 3. is_sort-fieldname = 'WI_ID'. is_sort-down = 'X'. APPEND is_sort TO p_it_sort. ENDFORM. " set_sort_tab *&---------------------------------------------------------------------* *& Form get_workitem_header *&---------------------------------------------------------------------* * text *----------------------------------------------------------------------* * -->P_WI_HEADER text *----------------------------------------------------------------------* FORM get_workitem_header USING p_more TYPE xfeld p_maxsel TYPE tbmaxsel CHANGING p_wi_header TYPE swfatalvitm. DATA: rangetab_for_id TYPE swfartwiid. DATA: rangetab_for_type TYPE swfartwitp. DATA: rangetab_for_creation_date TYPE swfartcrdat. DATA: rangetab_for_creation_time TYPE swfartcrtim. DATA: rangetab_for_task TYPE swfartrhtsk. DATA: rangetab_for_state TYPE swfartwista. DATA: rangetab_for_priority TYPE swfartprio. DATA: rangetab_for_dhsta TYPE swfartdhsta. DATA: lt_wrkitm TYPE swfatwrkitm. DATA: ls_wrkitm TYPE LINE OF swfatwrkitm. DATA: ls_alvitm TYPE LINE OF swfatalvitm. IF int IS INITIAL. int = cl_swf_rep_manager=>get_instance( ). ENDIF. *- set selection properties IF p_more EQ 'X'. CALL METHOD int->set_property EXPORTING im_name = if_swf_rep_workitem_selection=>c_get_administrator im_value = 'X'. ENDIF. *- convert parameters rangetab_for_id[] = id[]. rangetab_for_type[] = type[]. rangetab_for_creation_date[] = cd[]. rangetab_for_creation_time[] = ct[]. rangetab_for_task[] = task[]. rangetab_for_state[] = state[]. rangetab_for_priority[] = prio[]. rangetab_for_dhsta[] = dhsta[]. CALL METHOD int->clear( ). CALL METHOD int->set_filter_strategy( filter ). CALL METHOD int->set_range_tab( rangetab_for_id ). CALL METHOD int->set_range_tab( rangetab_for_type ). CALL METHOD int->set_range_tab( rangetab_for_creation_date ). CALL METHOD int->set_range_tab( rangetab_for_creation_time ). CALL METHOD int->set_range_tab( rangetab_for_task ). CALL METHOD int->set_range_tab( rangetab_for_state ). CALL METHOD int->set_range_tab( rangetab_for_priority ). CALL METHOD int->set_range_tab( rangetab_for_dhsta ). CALL METHOD int->set_only_top_wi( top_only ). CALL METHOD int->set_maxsel( p_maxsel ). CALL METHOD int->read( ). CALL METHOD int->get_entries IMPORTING ex_wientries = lt_wrkitm. PERFORM convert_to_alv_list USING lt_wrkitm p_more CHANGING p_wi_header. ENDFORM. " get_workitem_header *---------------------------------------------------------------------* * FORM convert_to_alv_list * *---------------------------------------------------------------------* * ........ * *---------------------------------------------------------------------* * --> WIHEADER * * --> WIALVITM * *---------------------------------------------------------------------* FORM convert_to_alv_list USING wiheader TYPE swfatwrkitm more TYPE xfeld CHANGING wialvitm TYPE swfatalvitm. DATA: ls_wrkitm TYPE LINE OF swfatwrkitm. DATA: ls_alvitm TYPE LINE OF swfatalvitm. DATA: lv_wi_handle TYPE REF TO if_swf_run_wim_internal. DATA: ls_admin TYPE swhactor. DATA: lt_agents TYPE tswhactor. LOOP AT wiheader INTO ls_wrkitm. MOVE-CORRESPONDING ls_wrkitm TO ls_alvitm. IF ls_wrkitm-wlc_flags O swfcr_p_asynchronous_rule. ls_alvitm-asyncagent = 'X'. ENDIF. IF more EQ 'X' AND ls_alvitm-wi_type EQ swfco_wi_flow. TRY. CALL METHOD cl_swf_run_wim_factory=>find_by_wiid EXPORTING im_wiid = ls_wrkitm-wi_id RECEIVING re_instance = lv_wi_handle. lt_agents = lv_wi_handle->get_administrator_agents( ). READ TABLE lt_agents INDEX 1 INTO ls_admin. ls_alvitm-adm_agent = ls_admin. CATCH cx_swf_run_wim. ENDTRY. ENDIF. IF top_only IS INITIAL. APPEND ls_alvitm TO wialvitm. ELSE. IF ls_alvitm-wi_chckwi IS INITIAL. APPEND ls_alvitm TO wialvitm. ENDIF. ENDIF. ENDLOOP. ENDFORM. "convert_to_alv_list *---------------------------------------------------------------------* * FORM PICK_LINE * *---------------------------------------------------------------------* * ........ * *---------------------------------------------------------------------* * --> SELFIELD_IDX * * --> WIHEADER * * --> INDEX * * --> LINESEL_CNT * * --> B_OK * *---------------------------------------------------------------------* FORM pick_line USING selfield_idx LIKE sy-tabix wiheader TYPE swfatalvitm CHANGING index LIKE sy-tabix linesel_cnt LIKE sy-tabix b_ok LIKE sy-binpt. DATA: lines_marked LIKE sy-tabix, marked_idx LIKE sy-tabix, cursor_line LIKE sy-binpt. IF selfield_idx > 0. READ TABLE wiheader INDEX selfield_idx TRANSPORTING NO FIELDS. IF sy-subrc = 0. cursor_line = 'X'. ENDIF. ENDIF. LOOP AT wiheader TRANSPORTING NO FIELDS WHERE b_marked = 'X'. ADD 1 TO lines_marked. marked_idx = sy-tabix. ENDLOOP. ************************************************************************ * List tool algorithm * ************************************************************************ IF cursor_line = 'X'. index = selfield_idx. IF lines_marked < 2. linesel_cnt = 1. ELSE. linesel_cnt = lines_marked. ENDIF. b_ok = 'X'. ELSEIF lines_marked = 1. index = marked_idx. linesel_cnt = 1. b_ok = 'X'. ELSEIF lines_marked > 1. linesel_cnt = lines_marked. b_ok = 'X'. ENDIF. ENDFORM. "pick_line *&---------------------------------------------------------------------* *& Form GET_TITLE *&---------------------------------------------------------------------* * text *----------------------------------------------------------------------* * -->P_HITS text * -->P_L_STRING text *----------------------------------------------------------------------* FORM get_title USING p_hits TYPE sytabix p_title_template TYPE string p_title TYPE lvc_title. DATA: l_string TYPE string. DATA: l_count(10) TYPE n. IF p_hits > 1. l_string = '(&1 entries)'(014). ELSEIF p_hits EQ 1. l_string = '(1 entry)'(015). ENDIF. l_count = p_hits. SHIFT l_count LEFT DELETING LEADING '0'. CONCATENATE p_title_template l_string INTO p_title SEPARATED BY space. REPLACE '&1' IN p_title WITH l_count. ENDFORM. " GET_TITLE *&---------------------------------------------------------------------* *& Form CANCEL_WORKITEM *&---------------------------------------------------------------------* * text *----------------------------------------------------------------------* * -->P_ZLT_WIHEADER text *----------------------------------------------------------------------* FORM cancel_workitem TABLES p_zlt_wiheader TYPE swfatalvitm. TYPES: zlty_status TYPE RANGE OF sww_wistat. DATA: zlt_r_status TYPE RANGE OF sww_wistat. CONSTANTS: zlc_stat_complete TYPE sww_statxt VALUE 'COMPLETED', zlc_stat_cancel TYPE sww_statxt VALUE 'CANCELLED', zlc_sign TYPE ddsign VALUE 'I', zlc_options TYPE ddoption VALUE 'EQ'. zlt_r_status = VALUE zlty_status( LET s = zlc_sign o = zlc_options IN sign = s option = o ( low = zlc_stat_complete ) ( low = zlc_stat_cancel ) ). *//Keep only the work items which has to be CANCELLED DELETE p_zlt_wiheader WHERE wi_stat IN zlt_r_status. IF p_zlt_wiheader[] IS NOT INITIAL. LOOP AT p_zlt_wiheader ASSIGNING FIELD-SYMBOL(<zlfs_wiheader>). TRY. CALL FUNCTION 'SWW_WI_ADMIN_CANCEL' EXPORTING wi_id = <zlfs_wiheader>-wi_id do_commit = abap_true IMPORTING new_status = <zlfs_wiheader>-wi_stat EXCEPTIONS update_failed = 1 no_authorization = 2 infeasible_state_transition = 3 OTHERS = 4. *- exception handling CATCH cx_swf_run_wim INTO DATA(lv_excp). DATA: zlr_txmgr TYPE REF TO cl_swf_run_transaction_manager. CALL METHOD zlr_txmgr->rollback( ). ENDTRY. ENDLOOP. ENDIF. ENDFORM.
add parameter
call SWW_WI_ADMIN_CANCEL in loop
