2600030 Parameter Recommendations in SAP HANA Environments
2699939 SAP HANA Emergency Suitcase
2100010 SAP HANA Popular Misconceptions
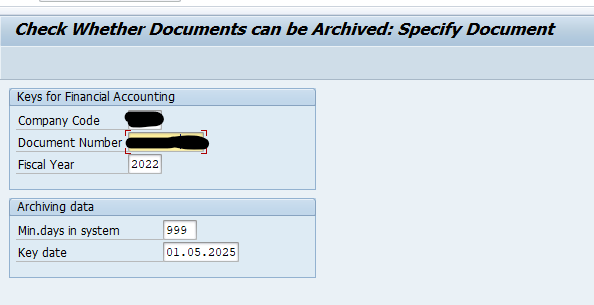
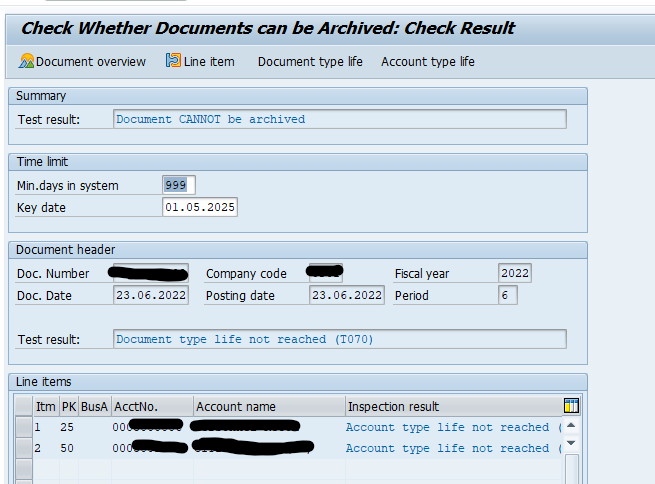
1642148 FAQ: SAP HANA Database Backup & Recovery
1999880 FAQ: SAP HANA System Replication
1999930 FAQ: SAP HANA I/O Analysis
1999997 FAQ: SAP HANA Memory
1999998 FAQ: SAP HANA Lock Analysis
2000000 FAQ: SAP HANA Performance Optimization
2000002 FAQ: SAP HANA SQL Optimization
2000003 FAQ: SAP HANA
2014562 FAQ: SAP HANA LT Replication Server (SLT)
2044468 FAQ: SAP HANA Partitioning
2057046 FAQ: SAP HANA Delta Merges
2057595 FAQ: SAP HANA High Availability
2081591 FAQ: SAP HANA Table Distribution
2100009 FAQ: SAP HANA Savepoints
2100040 FAQ: SAP HANA CPU
2101244 FAQ: SAP HANA Multitenant Database Containers
2112604 FAQ: SAP HANA Compression
2114710 FAQ: SAP HANA Threads and Thread Samples
2115815 FAQ: SAP HANA Database Patches and Upgrades
2116157 FAQ: SAP HANA Consistency Checks and Corruptions
2124112 FAQ: SAP HANA Parsing
2127458 FAQ: SAP HANA Loads and Unloads
2142945 FAQ: SAP HANA Hints
2147247 FAQ: SAP HANA Statistics Server
2159014 FAQ: SAP HANA Security
2160391 FAQ: SAP HANA Indexes
2169283 FAQ: SAP HANA Garbage Collection
2177064 FAQ: SAP HANA Service Restarts and Crashes
2180119 FAQ: SAP HANA Smart Data Access
2180165 FAQ: SAP HANA Expensive Statements Trace
2186744 FAQ: SAP HANA Parameters
2200772 FAQ: SAP HANA Statement Routing and Client Distribution Mode
2220627 FAQ: SAP HANA LOBs
2222110 FAQ: SAP HANA Load History
2222200 FAQ: SAP HANA Network
2222218 FAQ: SAP HANA Database Server Management Console (hdbcons)
2222220 FAQ: SAP HANA DBACOCKPIT
2222250 FAQ: SAP HANA Workload Management
2222277 FAQ: SAP HANA Column Store and Row Store
2336344 FAQ: SAP HANA Static Result Cache
2340450 FAQ: SAP HANA Table Replication
2366291 FAQ: SAP HANA Executed Statements Trace
2380176 FAQ: SAP HANA Database Trace
2393013 FAQ: SAP HANA Clients
2399993 FAQ: SAP HANA Fast Data Access (FDA)
2400005 FAQ: SAP HANA Persistence
2400006 FAQ: SAP HANA Statement Hints
2400007 FAQ: SAP HANA Runtime Dumps
2400022 FAQ: SAP HANA Smart Data Integration (SDI)
2412519 FAQ: SAP HANA SQL Trace Analyzer
2416490 FAQ: SAP HANA Data Aging in SAP S/4HANA
2470289 FAQ: SAP HANA Non-Uniform Memory Access (NUMA)
2477204 FAQ: SAP HANA Services and Ports
2502256 FAQ: SAP HANA Caches
2506811 FAQ: SAP HANA Dynamic Result Cache
2520774 FAQ: SAP HANA Performance Trace
2535951 FAQ: SAP HANA Users and Schemas
2570371 FAQ: SAP HANA Execution Engine (HEX)
2573880 FAQ: SAP HANA Full System Info Dump
2593571 FAQ: SAP HANA Integrated liveCache
2596466 FAQ: SAP HANA XS Advanced
2599949 FAQ: SAP HANA Extended SQL Executor (ESX)
2600076 FAQ: SAP HANA Inverted Individual Indexes
2600095 FAQ: SAP HANA Sequences
2669621 FAQ: SAP HANA Capture and Replay
2670064 FAQ: SAP HANA Multi-Dimensional Services (MDS)
2700084 FAQ: SAP HANA Persistent Memory
2799997 FAQ: SAP HANA Native Storage Extension (NSE)
2799998 FAQ: SAP HANA Plan Stability
2800006 FAQ: SAP HANA Cockpit
2800007 FAQ: SAP HANA Temporary Tables
2800008 FAQ: SAP HANA Fulltext Indexes
2800020 FAQ: SAP HANA Triggers
2800028 FAQ: SAP HANA Optimizer Statistics
2800030 FAQ: SAP HANA Kernel Profiler
2800048 FAQ: SAP HANA TREXviaDBSL
2800055 FAQ: SAP HANA Kernel Sentinel
2899330 FAQ: SAP HANA KPI Collector
2975780 FAQ: SAP HANA LDAP Based Authentication and Authorization
3007062 FAQ: SAP HANA Third Party Cluster Solutions
3158257 FAQ: SAP HANA User Store (hdbuserstore)
3266082 FAQ: SAP HANA Cloud
3288971 FAQ: Pacemaker Cluster Resource Manager in SAP HANA System Replication Environments
3300523 FAQ: SAP HANA in the Neo Environment
3421606 FAQ: SAP HANA Auditing Activity
1984422 How-To: Analyzing SAP HANA Out-of-memory (OOM) Dumps
1986747 How-To: Analyzing internal Columns in SAP HANA Column Store
1994962 How-To: Activation of Hybrid LOBs in SAP HANA
1998599 How-To: Analyzing high SAP HANA Memory Consumption due to Translation Tables
1999020 How-To: SAP HANA Troubleshooting when Database is no longer accessible
1999993 How-To: Interpreting SAP HANA Mini Check Results
2088971 How-To: Controlling the Amount of Records in SAP HANA Monitoring Views
2092196 How-To: Terminating Sessions in SAP HANA
2119087 How-To: Configuring SAP HANA Traces
2154870 How-To: Understanding and defining SAP HANA Limitations
2222217 How-To: Troubleshooting SAP HANA Startup Times
2222249 How-To: Resolving SAP HANA Service Inconsistencies between Daemon and Topology
2313619 How-To: Generating SAP HANA Call Stacks
- 2332284 – Data volume reclaim failed because of snapshot pages
2388483 How-To: Data Management for Technical Tables
2399979 How-To: Configuring automatic SAP HANA Data Collection with SAP HANASitter
2399990 How-To: Analyzing ABAP Short Dumps in SAP HANA Environments
2399996 How-To: Configuring automatic SAP HANA Cleanup with SAP HANACleaner
2400024 How-To: SAP HANA Administration and Monitoring
2445867 How-To: Interpreting and Resolving SAP HANA Alerts
2469025 How-To: Upgrading to SAP HANA 2.0
2498739 How-To: Analyzing Runtime Dumps with SAP HANA Dump Analyzer
- 2499913 – How to shrink SAP HANA Data Volume size
2529478 How-To: Configuring SAP HANA Statistics Server Parameters
2572224 How-To: Repairing SAP HANA Tables
2631805 How-To: Stopping SAP HANA
2999990 How-To: SAP HANA Performance Analysis