OAUTH call from ABAP

OAUTH can be called from custom ABAP. The explanation is given in this formal SAP help file. But it is quite complex.

In the example program below we will use OAUTH to call SAP BTP CPI.

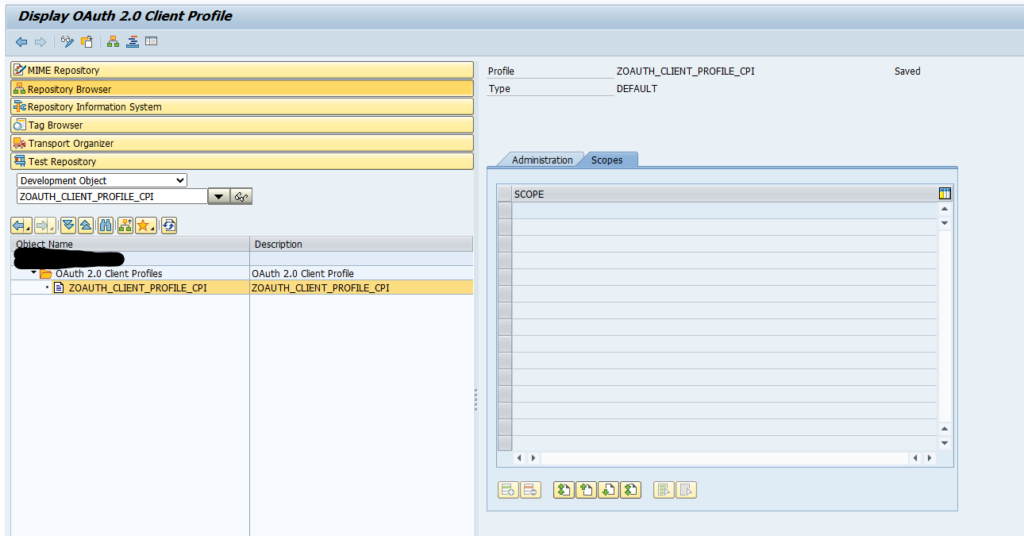
First in SE80 we create a OAUTH client profile named ZOAUTH_CLIENT_PROFILE_CPI:

Then the rest of the ABAP coding is according to the SAP help file, including the error handling on issues you might face.

*&--------------------------------------------------------------------*
*& Report Z_CALL_API_USING_OAUTH
*&--------------------------------------------------------------------*
*&
*&--------------------------------------------------------------------*

REPORT z_call_api_using_oauth.

PARAMETERS:
  zp_url   TYPE string                    LOWER CASE
                                          DEFAULT 'https://apimanagement.eu10.hana.ondemand.com/v1/api/hc/xxx/call_name',
  zp_sslid TYPE strustssl-applic          DEFAULT 'ANONYM',
  zp_profl TYPE oa2c_profiles-profile     DEFAULT 'ZOAUTH_CLIENT_PROFILE_CPI',
  zp_confg TYPE oa2c_client-configuration DEFAULT 'ZOAUTH_CLIENT_PROFILE_CPI'.

CONSTANTS:
  BEGIN OF zgcs_create_return,
    argument_not_found TYPE sy-subrc VALUE 1,
    plugin_not_active  TYPE sy-subrc VALUE 2,
    internal_error     TYPE sy-subrc VALUE 3,
    others             TYPE sy-subrc VALUE 4,
  END OF zgcs_create_return.

START-OF-SELECTION.

  " oData: restrict to two entries returned, via url
  DATA(zgv_api_url) = |{ zp_url }?$top=2|.

  cl_http_client=>create_by_url( EXPORTING  url                = zgv_api_url
                                            ssl_id             = zp_sslid
                                 IMPORTING  client             = DATA(zlo_http_client)
                                 EXCEPTIONS argument_not_found = zgcs_create_return-argument_not_found
                                            plugin_not_active  = zgcs_create_return-plugin_not_active
                                            internal_error     = zgcs_create_return-internal_error
                                            OTHERS             = zgcs_create_return-others ).

  CASE sy-subrc.
    WHEN zgcs_create_return-argument_not_found.
      MESSAGE 'Argument not found when trying to create http client instance' TYPE 'E'.
    WHEN zgcs_create_return-plugin_not_active.
      MESSAGE 'Plugin not active for creation of http client instance' TYPE 'E'.
    WHEN zgcs_create_return-internal_error.
      MESSAGE 'Internal error when trying to create http client instance' TYPE 'E'.
    WHEN zgcs_create_return-others.
      MESSAGE 'Generic error when trying to create http client instance' TYPE 'E'.
  ENDCASE.

  zlo_http_client->propertytype_logon_popup = zlo_http_client->co_disabled.

  TRY.
      DATA(zgo_oauth_client) = cl_oauth2_client=>create( i_profile       = zp_profl
                                                         i_configuration = zp_confg ).
    CATCH cx_oa2c_config_not_found.
      MESSAGE 'OAuth 2.0 Client Configuration not found' TYPE 'E'.
    CATCH cx_oa2c_config_profile_assign.
      MESSAGE 'OAuth 2.0 Client Config - Unassigned Profile' TYPE 'E'.
    CATCH cx_oa2c_kernel_too_old.
      MESSAGE 'OAuth 2.0 Client - Kernel too old' TYPE 'E'.
    CATCH cx_oa2c_missing_authorization.
      MESSAGE 'OAuth 2.0 Client missing authorization' TYPE 'E'.
    CATCH cx_oa2c_config_profile_multi.
      MESSAGE 'OAuth 2.0 Client Config - Profile assigned multiple times' TYPE 'E'.
  ENDTRY.

  " Set oAuth token to the http client
  TRY.
      zgo_oauth_client->set_token( io_http_client = zlo_http_client
                                   i_param_kind   = if_oauth2_client=>c_param_kind_header_field ).
    CATCH cx_oa2c_at_not_available
          cx_oa2c_at_expired.

      " When setting the token fails, first try and get a new token
      TRY.
          zgo_oauth_client->execute_cc_flow( ).
        CATCH cx_oa2c_badi_implementation.
          MESSAGE 'OAuth 2.0 Client BAdI Impl. Error' TYPE 'E'.
        CATCH cx_oa2c_not_supported.
          MESSAGE 'Not supported by Service Provider.' TYPE 'E'.
        CATCH cx_oa2c_not_allowed.
          MESSAGE 'OAuth 2.0 Client Runtime - Not Allowed' TYPE 'E'.
        CATCH cx_oa2c_prot_http_failure.
          MESSAGE 'OAuth 2.0 Client Runtime Protocol - HTTP Failure' TYPE 'E'.
        CATCH cx_oa2c_prot_other_error.
          MESSAGE 'OAuth 2.0 Client Runtime Protocol - Other Error' TYPE 'E'.
        CATCH cx_oa2c_prot_unexpected_code.
          MESSAGE 'OAuth 2.0 Client Runtime Protocol - Unexpected Code' TYPE 'E'.
        CATCH cx_oa2c_prot_http_forbidden.
          MESSAGE 'OAuth 2.0 Client Runtime Protocol - HTTP 403 - Forbidden' TYPE 'E'.
        CATCH cx_oa2c_prot_http_not_found.
          MESSAGE 'OAuth 2.0 Client Runtime Protocol - HTTP 404 - Not Found' TYPE 'E'.
        CATCH cx_oa2c_server_error.
          MESSAGE 'OAuth 2.0 Client Runtime Protocol - Server Error' TYPE 'E'.
        CATCH cx_oa2c_temporarily_unavail.
          MESSAGE 'OAuth 2.0 Client Runtime Protocol - Temporarily Unavailable' TYPE 'E'.
        CATCH cx_oa2c_unsupported_grant_type.
          MESSAGE 'OAuth 2.0 Client Runtime Protocol - Unsupported Grant Type' TYPE 'E'.
        CATCH cx_oa2c_unauthorized_client.
          MESSAGE 'OAuth 2.0 Client Runtime Protocol - Unauthorized Client' TYPE 'E'.
        CATCH cx_oa2c_invalid_scope.
          MESSAGE 'OAuth 2.0 Client Runtime Protocol - Invalid Scope' TYPE 'E'.
        CATCH cx_oa2c_invalid_grant.
          MESSAGE 'OAuth 2.0 Client Runtime Protocol - Invalid Grant' TYPE 'E'.
        CATCH cx_oa2c_invalid_client.
          MESSAGE 'OAuth 2.0 Client Runtime Protocol - Invalid Client' TYPE 'E'.
        CATCH cx_oa2c_invalid_request.
          MESSAGE 'OAuth 2.0 Client Runtime Protocol - Invalid Request' TYPE 'E'.
        CATCH cx_oa2c_invalid_parameters.
          MESSAGE 'OAuth 2.0 Client Runtime - Invalid Parameters' TYPE 'E'.
        CATCH cx_oa2c_secstore_adm.
          MESSAGE 'OAuth 2.0 Client Runtime - SecStore Administration' TYPE 'E'.
        CATCH cx_oa2c_secstore.
          MESSAGE 'OAuth 2.0 Client Runtime - Secstore' TYPE 'E'.
        CATCH cx_oa2c_protocol_exception.
          MESSAGE 'OAuth 2.0 Client Runtime - Protocol Exception' TYPE 'E'.
      ENDTRY.

      " Set oAuth token to the http client
      TRY.
          zgo_oauth_client->set_token( io_http_client = zlo_http_client
                                       i_param_kind   = if_oauth2_client=>c_param_kind_header_field ).
        CATCH cx_oa2c_at_not_available.
          MESSAGE 'oAuth 2.0: Acces token not available' TYPE 'E'.
        CATCH cx_oa2c_at_expired.
          MESSAGE 'Access Token has expired.' TYPE 'E'.
        CATCH cx_oa2c_at_profile_not_covered.
          MESSAGE 'Access token has expired.' TYPE 'E'.
        CATCH cx_oa2c_not_supported.
          MESSAGE 'Not supported by Service Provider.' TYPE 'E'.
        CATCH cx_oa2c_badi_implementation.
          MESSAGE 'OAuth 2.0 Client BAdI Impl. Error' TYPE 'E'.
        CATCH cx_oa2c_secstore.
          MESSAGE 'OAuth 2.0 Client Runtime - Secstore' TYPE 'E'.
        CATCH cx_oa2c_invalid_parameters.
          MESSAGE 'OAuth 2.0 Client Runtime - Invalid Parameters' TYPE 'E'.
        CATCH cx_oa2c_icf_error.
          MESSAGE 'Unknown error received from ICF.' TYPE 'E'.
      ENDTRY.

    CATCH cx_oa2c_at_profile_not_covered.
      MESSAGE 'Access token has expired.' TYPE 'E'.
    CATCH cx_oa2c_not_supported.
      MESSAGE 'Not supported by Service Provider.' TYPE 'E'.
    CATCH cx_oa2c_badi_implementation.
      MESSAGE 'OAuth 2.0 Client BAdI Impl. Error' TYPE 'E'.
    CATCH cx_oa2c_secstore.
      MESSAGE 'OAuth 2.0 Client Runtime - Secstore' TYPE 'E'.
    CATCH cx_oa2c_invalid_parameters.
      MESSAGE 'OAuth 2.0 Client Runtime - Invalid Parameters' TYPE 'E'.
    CATCH cx_oa2c_icf_error.
      MESSAGE 'Unknown error received from ICF.' TYPE 'E'.
  ENDTRY.

  " From here on handle the http client for the API interaction
  zlo_http_client->request->set_version( if_http_request=>co_protocol_version_1_0 ).
  DATA(zlo_rest_client) = NEW cl_rest_http_client( io_http_client = zlo_http_client ).

" Get data from API
  TRY.
      zlo_rest_client->if_rest_client~get( ).
      " Collect response received from the REST API
      DATA(zli_response) = zlo_rest_client->if_rest_client~get_response_entity( ).
      DATA(zgv_http_status_code) = zli_response->get_header_field( `~status_code` ).
      DATA(zgv_status_reason)    = zli_response->get_header_field( `~status_reason` ).
      DATA(zgv_response_data)    = zli_response->get_string_data( ).

      " Record the response of the interface
      IF zgv_http_status_code BETWEEN 200 AND 299.
        " Success
        MESSAGE 'Call was succesful' TYPE 'S'.
      ELSE.
        MESSAGE 'Call failed' TYPE 'E'.
      ENDIF.

      WRITE / 'Response'.
      WRITE / zgv_response_data.

      " Issues with REST client must not lead to a short-dump
    CATCH cx_rest_client_exception INTO DATA(zlx_rest_client).
      IF zlx_rest_client->if_t100_message~t100key IS NOT INITIAL.
        DATA zlv_message TYPE string.
        MESSAGE ID zlx_rest_client->if_t100_message~t100key-msgid
                 TYPE 'E'
                 NUMBER zlx_rest_client->if_t100_message~t100key-msgno
                   WITH zlx_rest_client->if_t100_message~t100key-attr1
                        zlx_rest_client->if_t100_message~t100key-attr2
                        zlx_rest_client->if_t100_message~t100key-attr3
                        zlx_rest_client->if_t100_message~t100key-attr4.
      ELSE.
        MESSAGE 'Rest client Exception' TYPE 'E'.
      ENDIF.
  ENDTRY.

  zlo_http_client->close( ).

Set up AIF interface error handling

SAP has a nice framework to handle interface errors: AIF (application integration framework).

The framework is quite old already but was not very popular. Not to the fact that it is not good (it is in fact quite good), but it is because it is a licensed product and too expensive for the value it brings.

The framework is now split into 2 parts:

  • Use in combination with standard SAP scenarios (in this case the use of AIF is free)
  • Use in combination with your own custom flows (in this case you need to pay for the AIF license)

Activating AIF error handling content

For reference you can read the formal help file from SAP on activating AIF content.

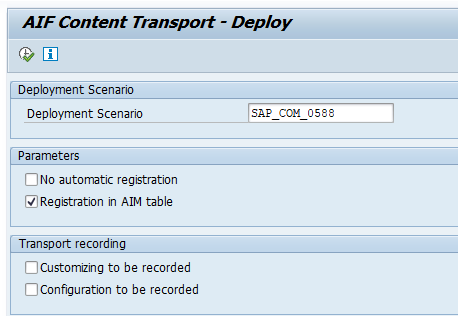
Extract the content using SE38 report /AIF/CONTENT_EXTRACT.

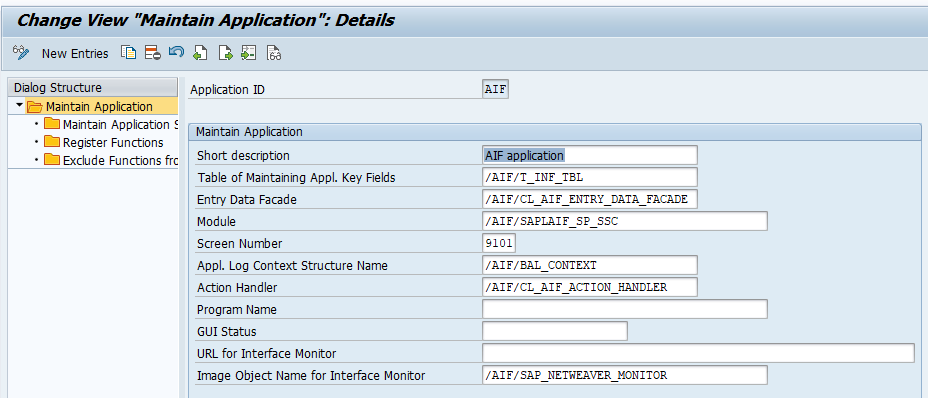
Then start transaction /AIF/CUST to maintain the customizing for errors. The input is given on this SAP help page.


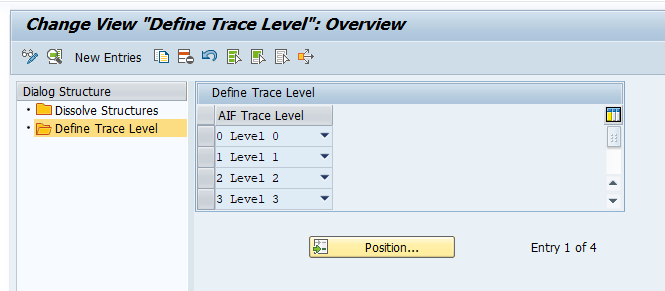
And define the error handling levels:

Use of AIF

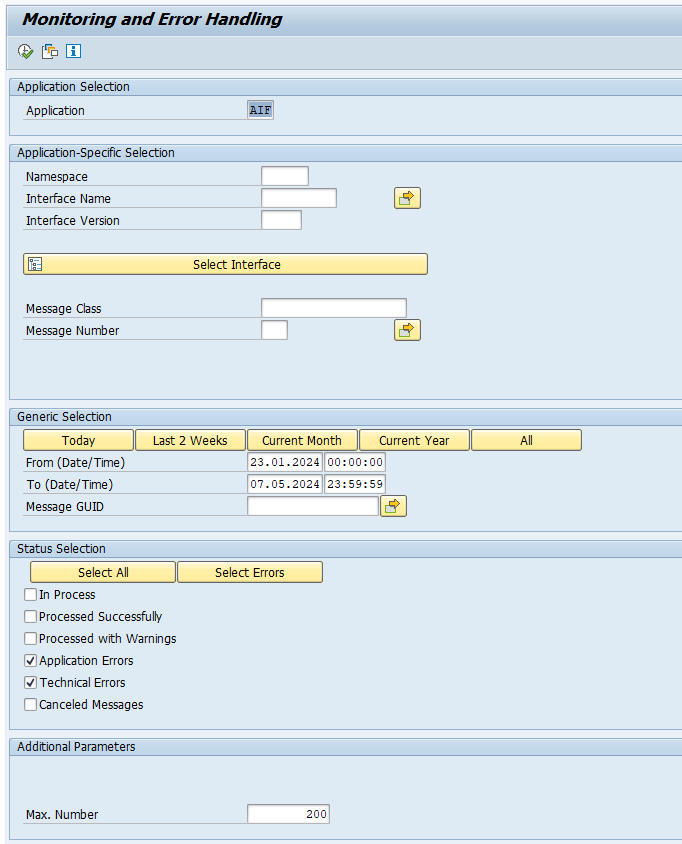
Transaction /AIF/ERR can be used for the error handling monitoring:

ABAP escape functions

The escape function is used in IT systems to indicate a real value of a character in stead of the control function of the character. Example is the < character which means smaller than, but in HTML is also a control character. For more background read wikipedia.

In ABAP code you sometimes need to set a URL with these characters, or build a HTML text. Then you really need to use these rules.

Documentation of the Esacpe function in ABAP can be found in this URL.

Example is the following code:

cl_demo_output=>display(
  escape( val    = 'IF a < b.'
          format = cl_abap_format=>e_xml_text ) ).

The result will be IF a &lt; b. < is in xml replaced by escape character &lt;.

Demo program

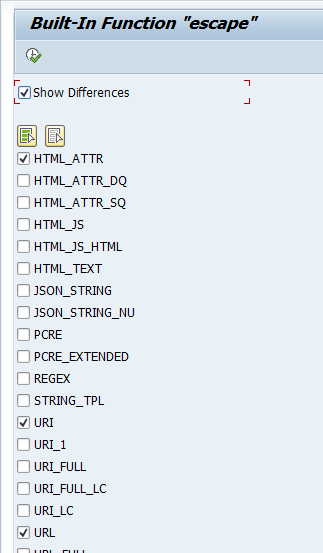
A full list can be found in ABAP program DEMO_ESCAPE. Start the program and select the type you want to check (do select the Show Differences tick box):

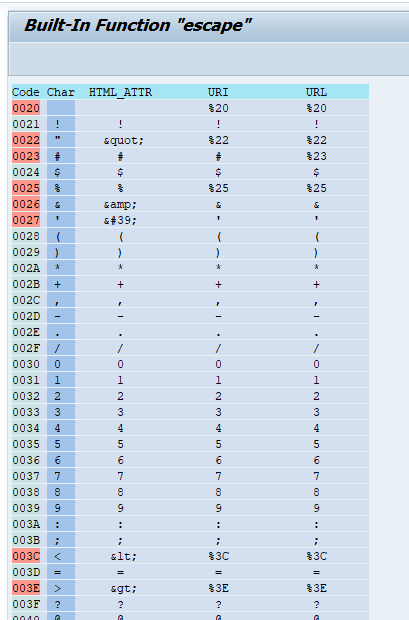
Output is now show for the diverse characters:

ODATA V4 activation

This blog will explain how to activate ODATA V4.

Questions that will be answered in this blog are:

  • How to activate ODATA V4 on your SAP system?
  • Does SAP support ODATA V3?
  • Do all consuming applications support ODATA V4?
  • What are the differences of ODATA V2 and V4?

ODATA V4

In the typical FIORI use case you will activate ODATA V2. SAP has skipped ODATA V3. ODATA V4 is supported by SAP.

Constraints of SAP ODATA V4 are listed in OSS note 2322624 – SAP Gateway SAP_GWFND OData V4 protocol – Known Constraints.

Filtering is powerful in ODATA V4. Read more on this in OSS note 2305033 – SAP Gateway OData V4 $flter Consulting Note.

Keep in mind not all application fully support all aspects of ODATA V4 or might not be able to consume ODATA V4 at all. Check first with the consumer before publishing an ODATA on V4.

Activation of ODATA V4

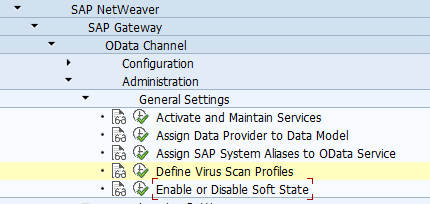
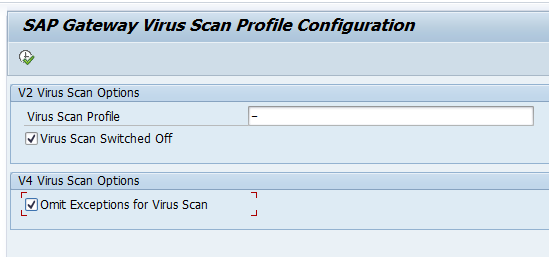
First step in activation is to check the virus scan settings for ODATA:

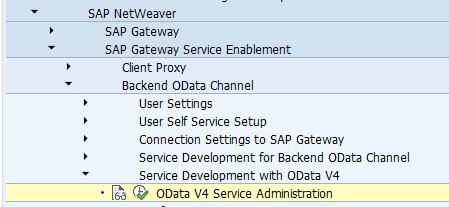
Activation of ODATA V4 messages via service administration:

Or use transaction /iwbep/v4_admin:

And for the front end /iwfnd/v4_admin:

Press button Add service groups:

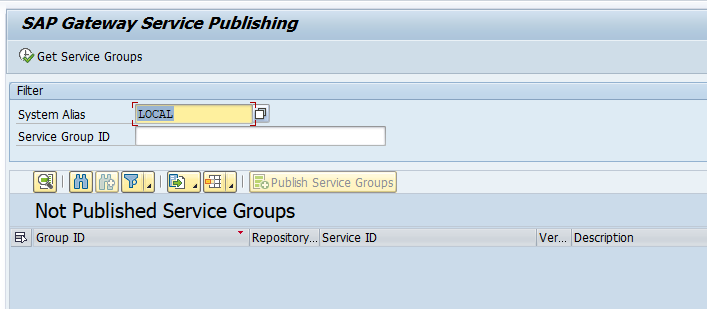
Push the button Get Service Groups:

And select your entry and press Publish Service Groups:

Which one to publish has to be told to you. The consultant requesting it might link to the API hub.

After activation, you can use the Service Test button to check if the activation is ok:

On the screen hit Execute and the result should be a HTTP 200 success message:

OSS notes and background

Background notes:

Bug fix OSS notes:

Useful background blogs:

Differences between ODATA V2 and V4

For UI consumption differences between ODATA V2 and V4 read this SAP help file.

Generic blog on main differences ODATA V2 and V4: read here.

Or read this SAP blog on differences ODATA V2 and V4 for SAP specific.

RFC connections with fast serialization

Fast serialization is an option in the RFC settings to increase performance.

Questions that will be answered in this blog are:

  • What is required to use RFC fast serialization?
  • When to use RFC fast serialization?
  • How can I switch to fast serialization without touching the RFC in SM59?
  • How do I make the settings for RFC fast serialization?

Fast serialization

Fast serialization is available since release Basis 7.51. Downport might be possible, but think twice if you want to do this. Background OSS note on fast serialization is 2372888 – Fast serialization in RFC.

The whole goal of fast serialization is simply to increase the performance.

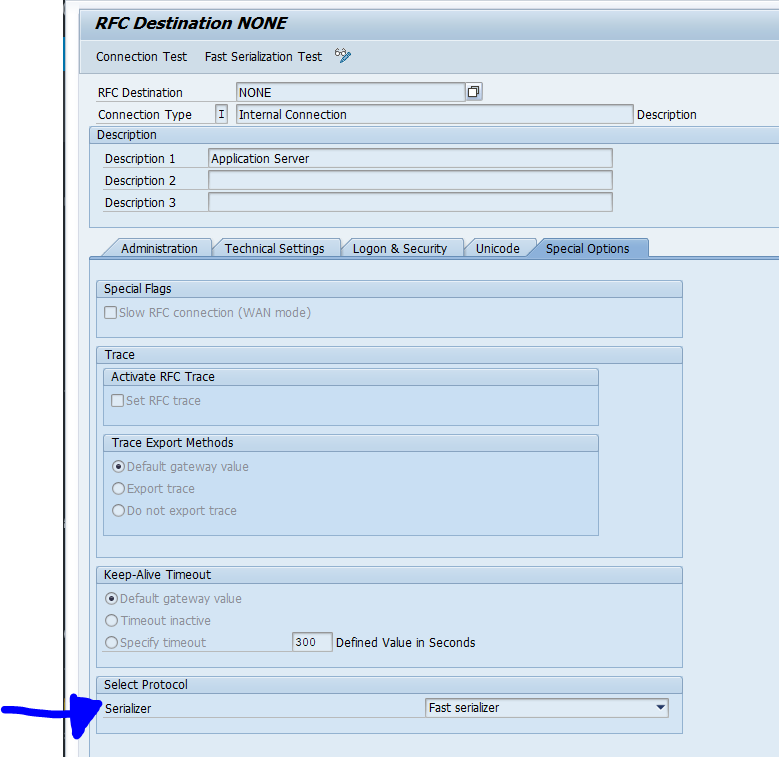
The fast serialization option is set in the RFC destination on the tab Special Options at the bottom:

Note that in S4HANA destination NONE is using fast serialization by default. Keep it that way.

Switching to fast serialization without touching SM59

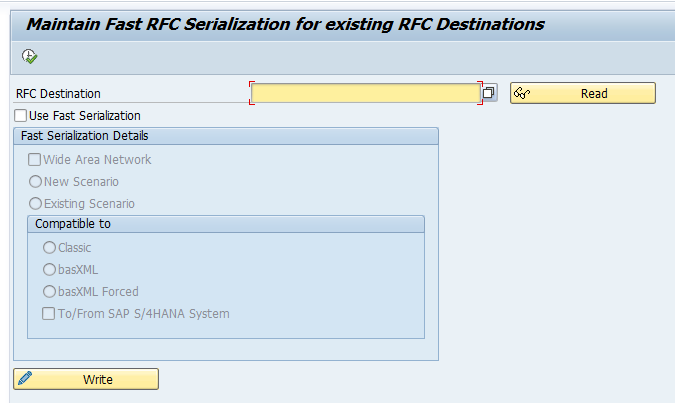
In SM59 when you touch the RFC it might request you to re-enter the password. You can still switch the existing RFC without touching SM59. The instruction is in OSS note 2315100 – Activation of new RFC serialization on client side. Run program SFASTRFCMAINTENANCE (2561904 – Fast RFC serialization maintained with SFASTRFCMAINTENANCE):

When to use fast serialization

Fast serialization can be used when both the sender and receiver side of the RFC connection supports it.

Fast serialization in custom or standard RFC function modules

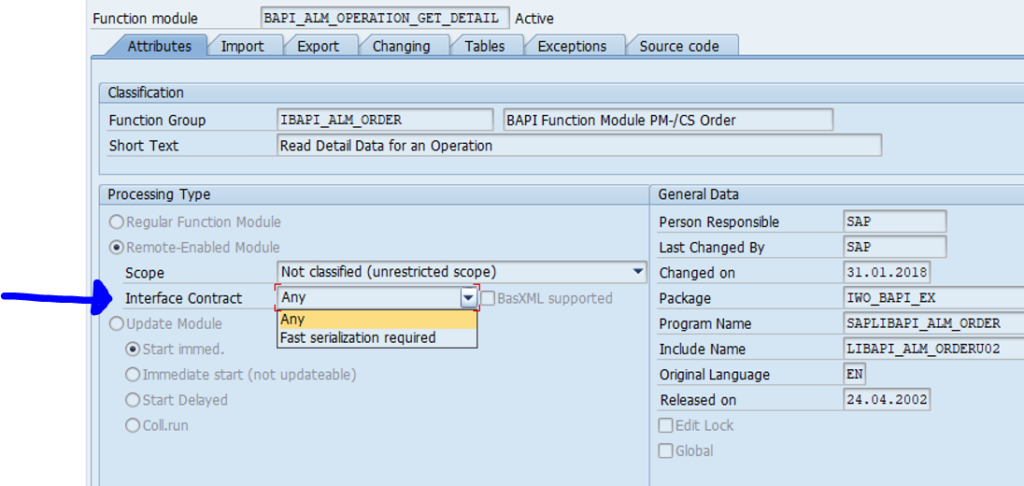
In SE37 SAP can set an RFC enabled function module Interface Contract to Fast serialization required. If you have build custom RFC function module that also only works with Fast serialization you should set this option:

Bug fix and explanation OSS notes

SAP API business hub

SAP has collected all their web services and ODATA services on one central page.

Questions that will be answered in this blog are:

  • How to use the SAP API business hub to find an SAP interface for my use case?

SAP API business hub

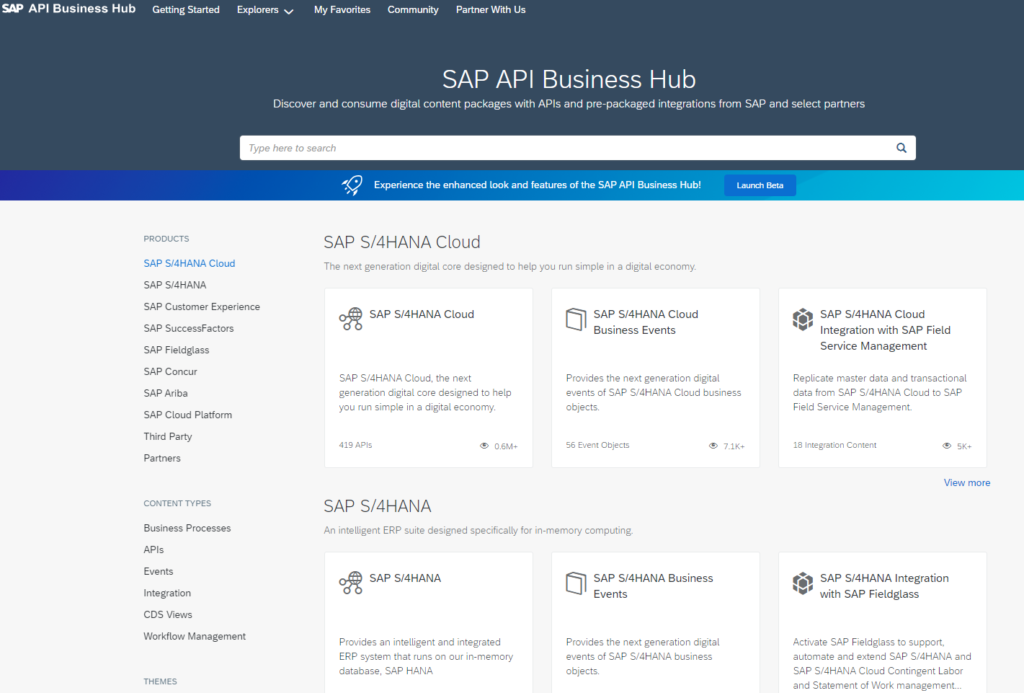
Start the SAP API business hub by going to the URL api.sap.com:

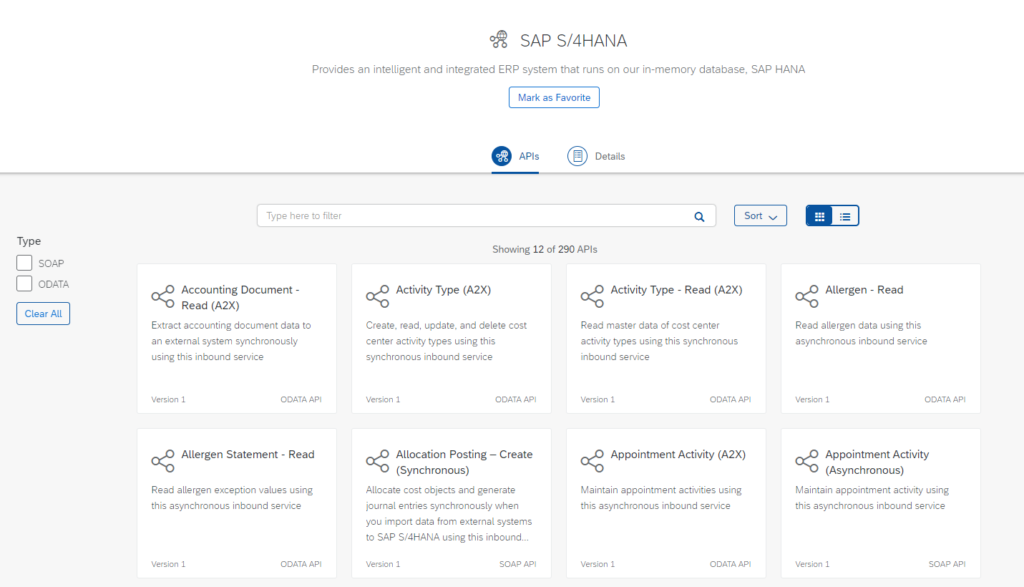
Let’s zoom in to SAP S4HANA:

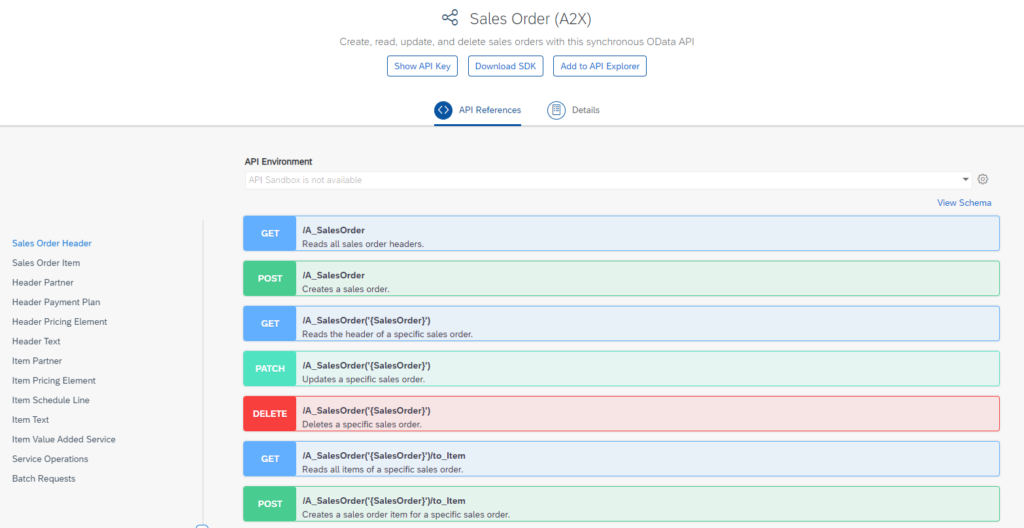
Now search for Sales Order and select the Sales Order ODATA:

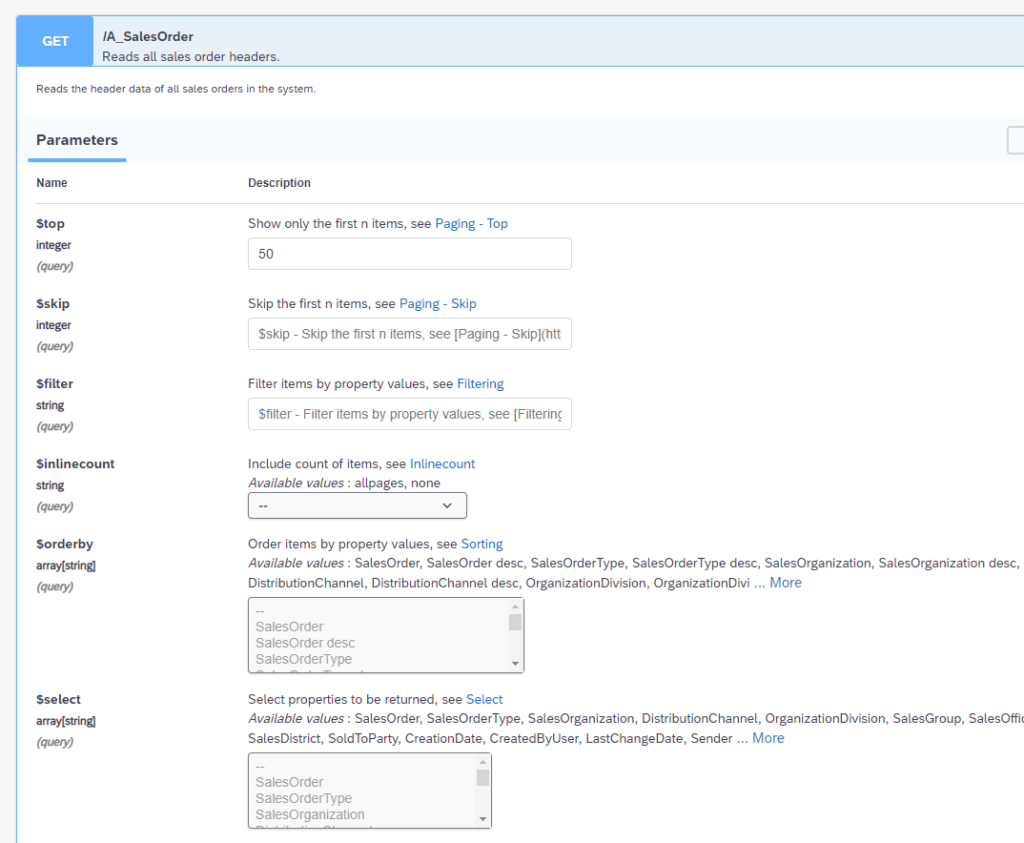
For each method you can zoom into the details:

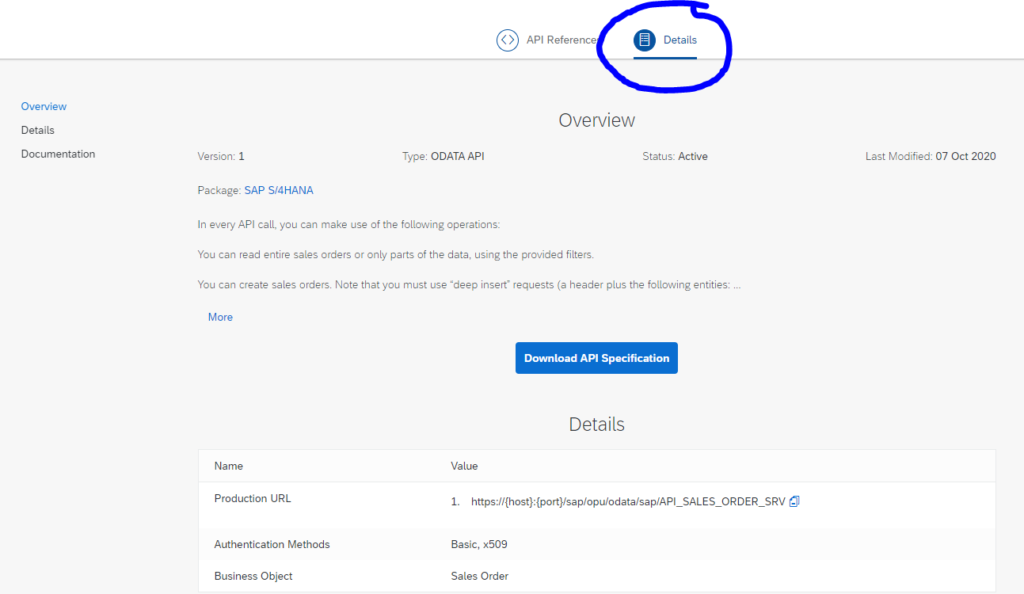
On the main details tab you can download the API specification, for example in JSON format:

Also it tells you how to build the URL to be called.

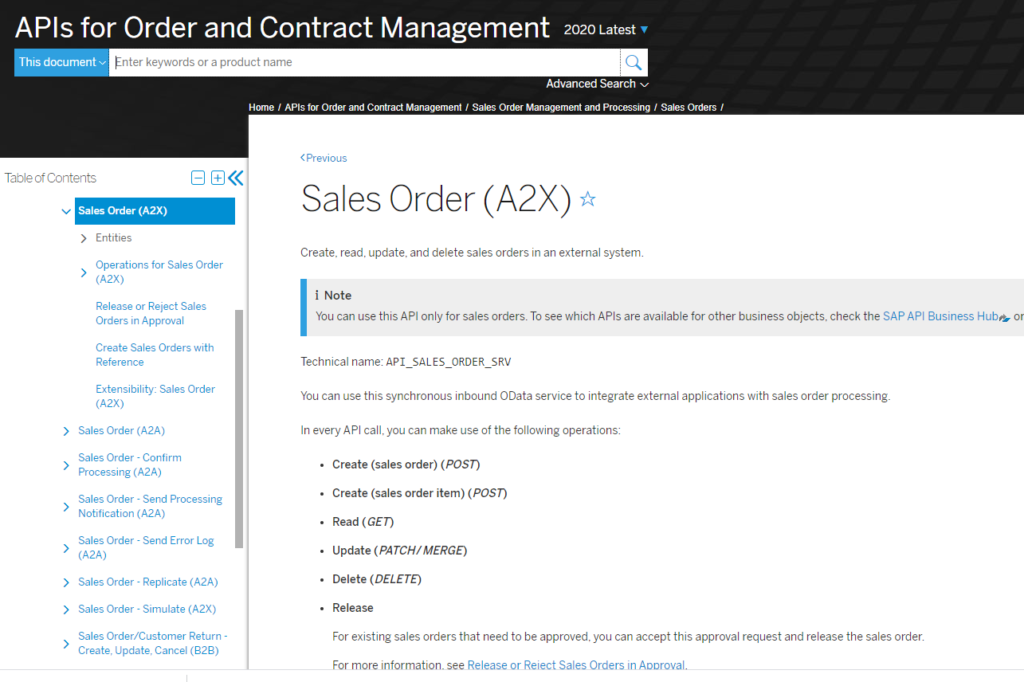
A bit below on the same screen is the link to the online documentation:

Which links to the actual help.sap.com helpfile:

SAP reference

SAP reference blog can be found here.

APC: Abap push channel

The ABAP push channel (APC) is the ABAP implementation of websockets. It’s goal is to enable the ABAP stack to send push messages to registered web clients.

This blog will answer the following questions:

  • How to setup an ABAP push channel?
  • How to implement the ABAP push channel?
  • How to test the ABAP push channel?
  • Where to find more background and examples on ABAP push channel?

Setting up an ABAP push channel

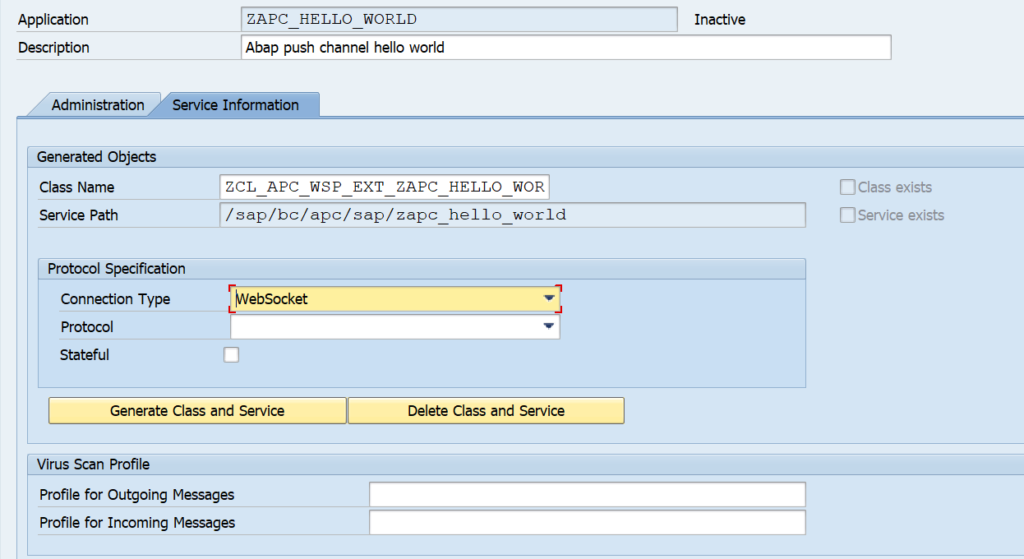
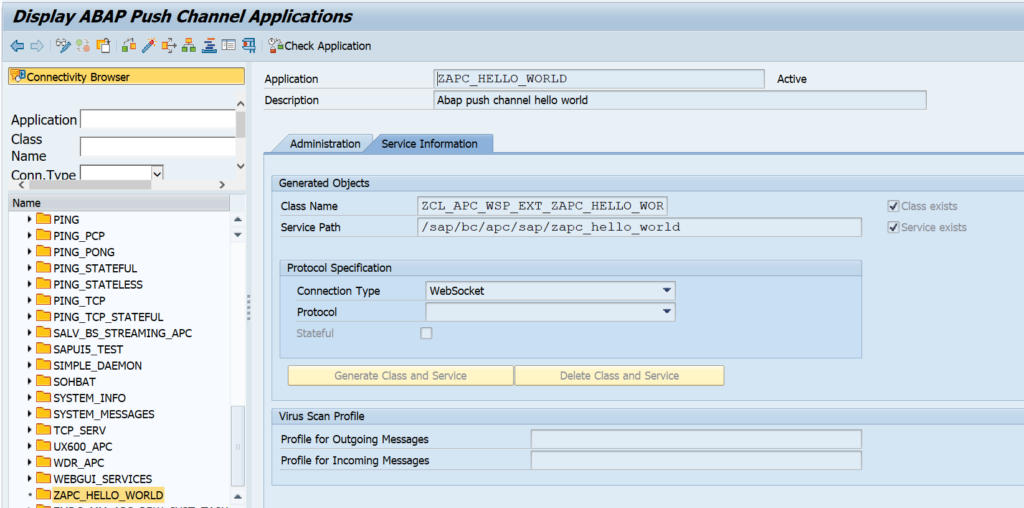
To setup an ABAP push channel go to transaction SE80 and right click, select create / connectivity / ABAP push channel notification.

Now press the Generate Class and Service button. The classes and services will now be generated as placeholders. Save your work.

If you try to activate the service at this point in time you get this error message:

The reason is that we didn’t implement two methods of the new class yet: the ON_START and ON_MESSAGE.

Implementing the actual APC class

To do this, we go to SE24 and lookup the generated class and we select the ON_START method:

Press the redefine button to redefine the method.

Use this code in the method:

TRY.
* send the message on WebSocket connection
DATA(lo_message) = i_message_manager->create_message( ).        lo_message->set_text( |ON_START has been successfully executed !| ).
i_message_manager->send( lo_message ).
CATCH cx_apc_error INTO DATA(lx_apc_error).
MESSAGE lx_apc_error->get_text( ) TYPE 'E'.
ENDTRY.

This basically confirms the push channel registration.

Now redefine the ON_MESSAGE method:

TRY.
* create the message object
DATA(lo_message) = i_message_manager->create_message( ).
* send message
lo_message->set_text( |Hello World !| ).
i_message_manager->send( lo_message ).
CATCH cx_apc_error INTO DATA(lx_apc_error).
MESSAGE lx_apc_error->get_text( ) TYPE 'E'.
ENDTRY.

It simply pushes the message: ‘Hello World’.

Save and generate the class in SE24.

Now we can go back to the SE80 ABAP push channel we have created and activate it as well. You can run the consistency check to see all is fine:

Testing the ABAP push channel

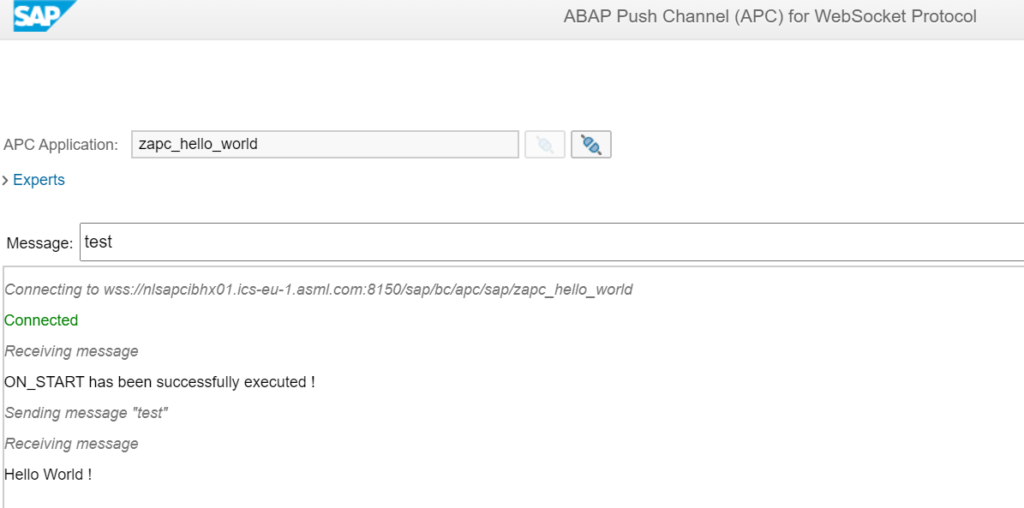
Now you can test the ABAP push channel by hitting the test button in the SE80 screen of the ABAP push channel. The test service will launch an ABAP webdynpro screen.

If the ABAP webdynpro screen does not launch, activate in SCIF transaction the following 2 nodes: WDR_TEST_APC and WDR_TEST_APC_WSP.

Test result:

As an alternative to SE80 you can also use transaction SAPC:

Background information

Excellent blogs on ABAP push channels are:

SAP interfacing: REST

The SAP ABAP stack can also interface using REST protocol. To support this interface protocol SAP has developed special classes in the ABAP stack.

Questions that will be answered in this blog are:

  • How do I create a REST interface in ABAP stack?
  • How do I test a REST interface in ABAP stack?
  • Which tools to use to developer REST interface?

REST in ABAP

SAP delivers in the ABAP netweaver stack the ABAP REST library. The full specification can be found on the SAP help portal. The help portal also contains a small tutorial. Next to the pre-delivered REST library classes there are no tools for you available to faster develop REST in ABAP. It is coming down to SE24 and SE80.

Good reference blog is the SAP blog on usage of REST in Netweaver 7.4. This also explains the generic REST architecture implementation in ABAP.

Creating REST service in ABAP

We will create a simple Hello World REST service in ABAP. There are 2 main classes in REST ABAP: the application class handling the URL and the resource class where the logic is.

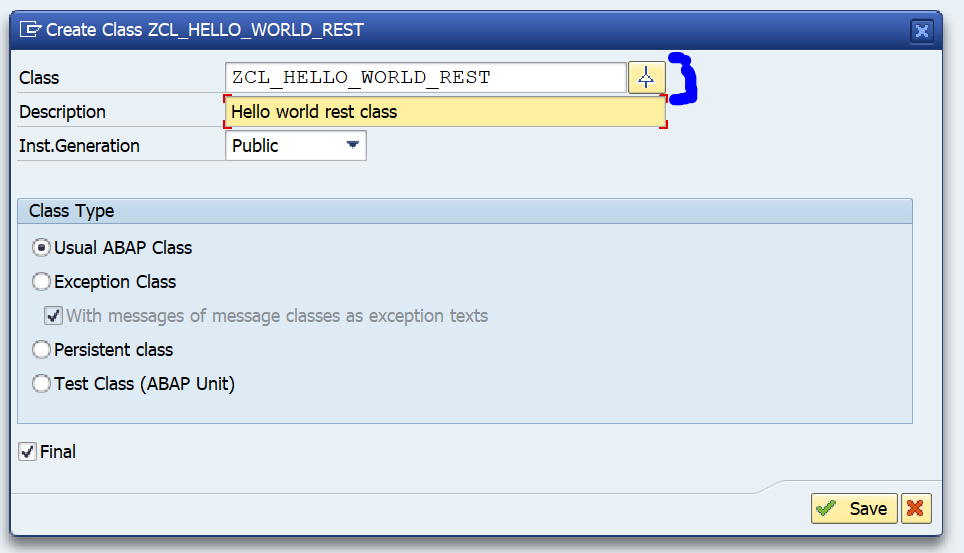
Start transaction SE24 and create a new class inheriting from the SAP delivered class CL_REST_HTTP_HANDLER:

REST create class

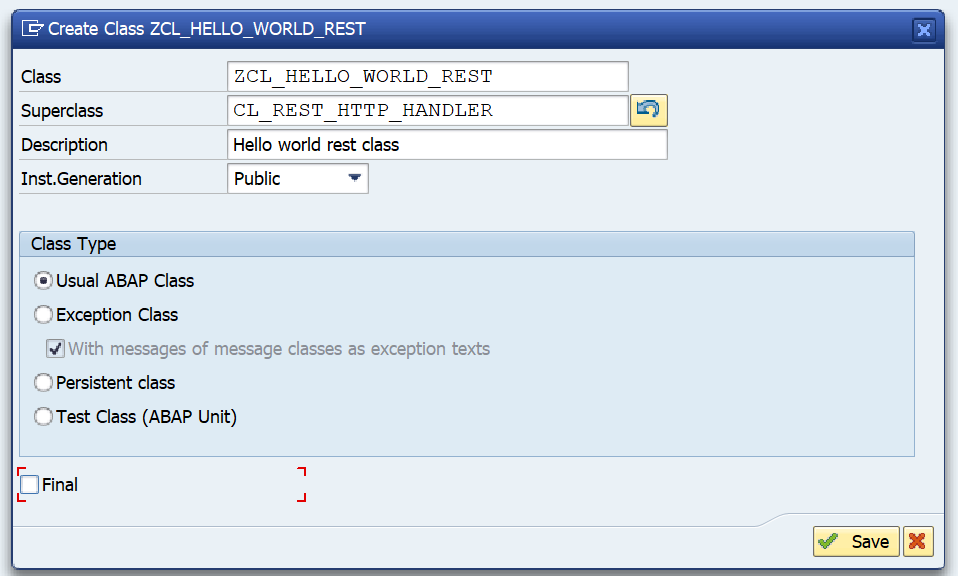
important here to press the inheritance button! Fill out CL_REST_HTTP_HANDLER as superclass:

REST create class as inheritance

It is mandatory to redefine the GET_ROOT_HANDLER method:

For now just leave the method empty. Save and generate.

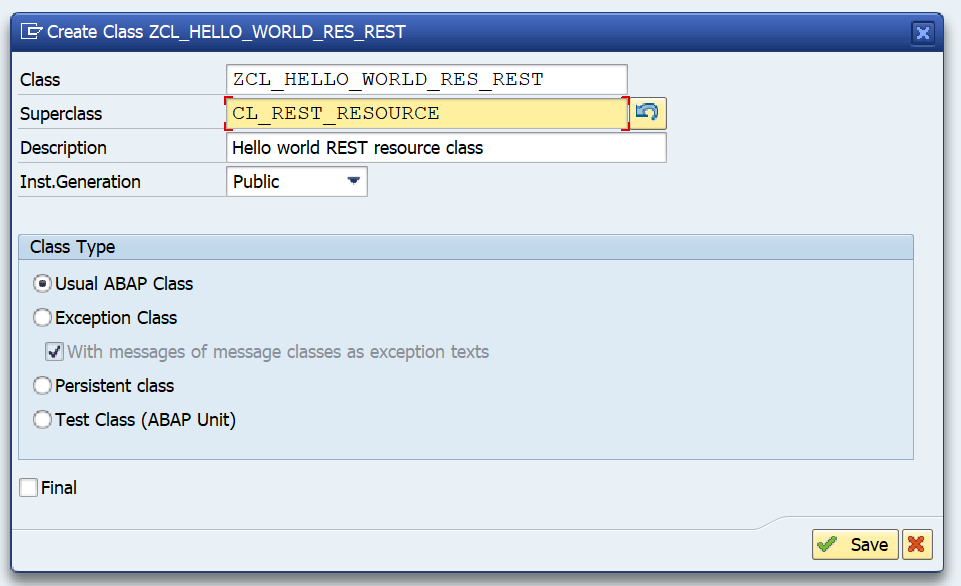
Now create the REST resource class based on inheritance of CL_REST_RESOURCE:

REST define resource class

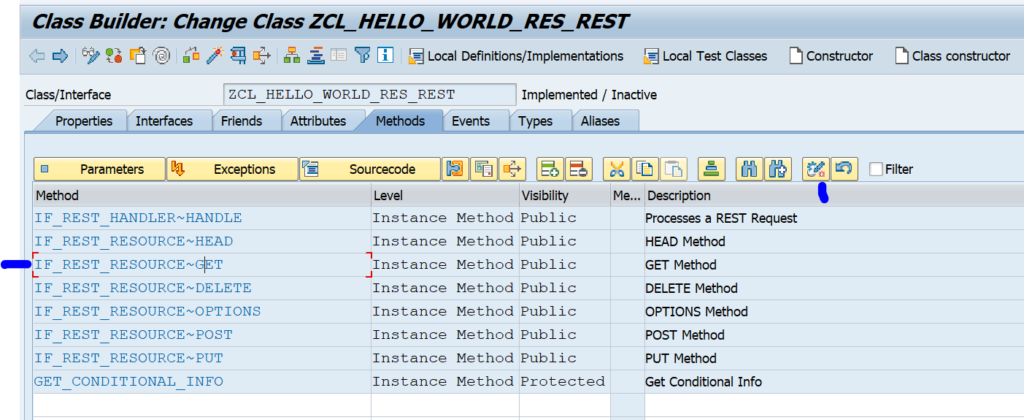
Now redefine the GET method:

REST resource class redefine GET method

No we add a simple implementation by simply adding the text ‘Hello World’:

REST resource class GET method implementation

Save and activate this class.

Now we go back to the previous class: the application class. In here we now edit the GET_ROOT_HANDLER implementation we left empty earlier:

REST implementation of root handler

If the URL is getting the input /hello then the handler class (our resource class) ZCL_HELLO_WORLD_RES_REST is called. This class will return the string.

Save and activate again. The coding work is done.

Runtime implementation

Now we need to make a runtime implementation. Goto transaction SICF and select the main node default_host first. Then select from the menu Service/Host the option Create Service:

REST SICF create service

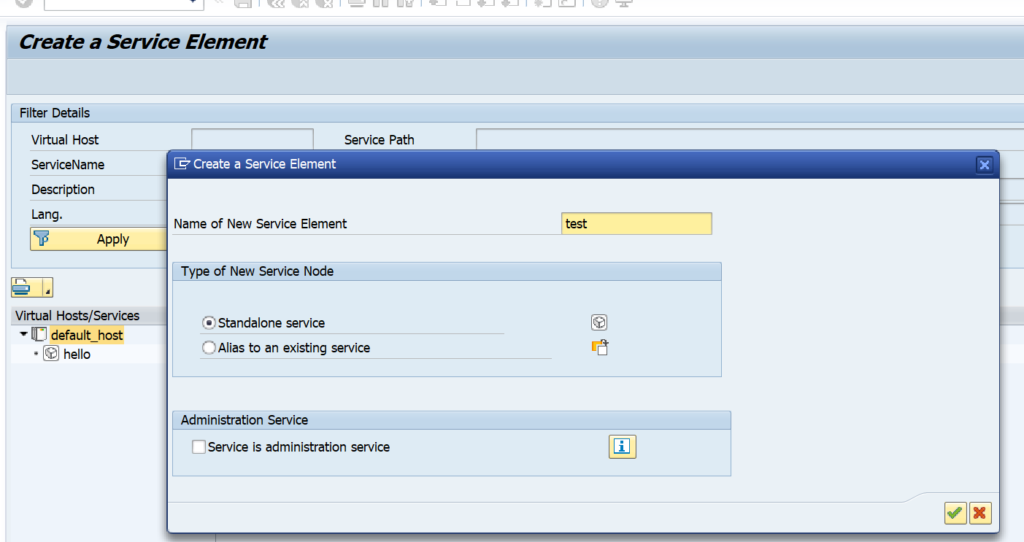
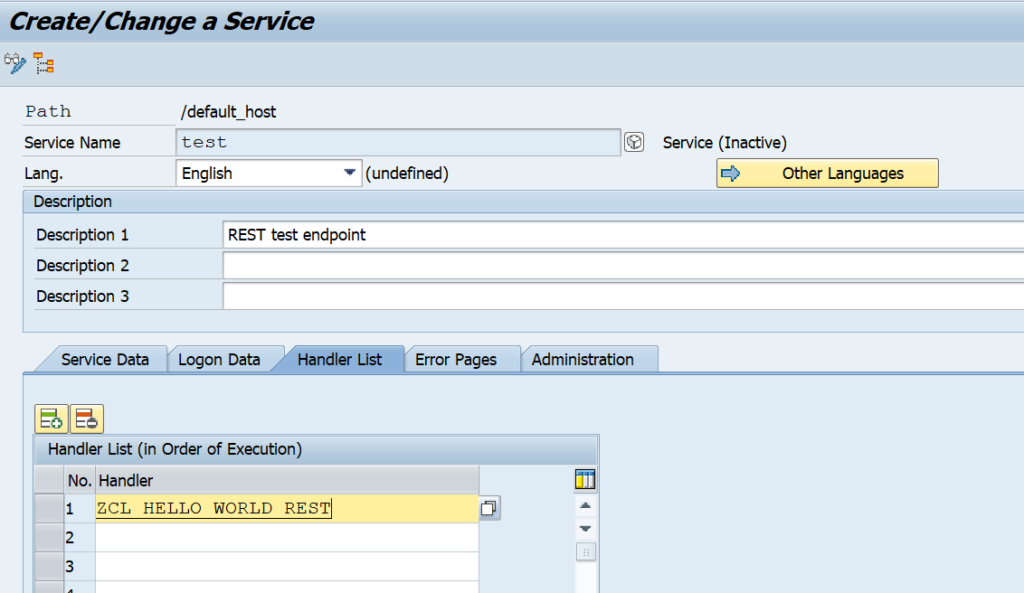
Fill out the name of the service and click ok. In the next screen give a description and in the Handler List section refer to the application class ZCL_HELLO_WORLD_REST:

REST SICF handler

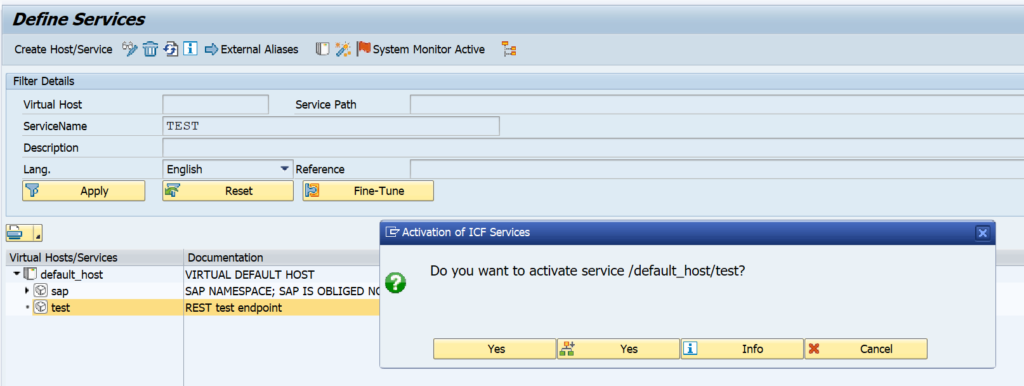
Save the service. The service is created but not active. To activate right click on the service and select Activate:

REST SICF activate service

Testing the service

From the previous SICF screen right click the service again and select the option Test Service. A screen will come that says “No suitable resource found”. Now modify the URL by adding /hello after the test in the URL, and press enter again:

REST SICF test service

The URL build up: the test is the name defined in SICF. The /hello was defined in the application class.

Authorizations and security

The REST library has no specifics about authorization and security. So you have to take care your self.

Business authorization security: has to be built in via AUTHORITY-CHECK statements at the correct spots.

Technical security is provided in the Logon Data tab on the SICF node. Here you can set requirements for the technical logon method and if you only allow https.

REST versus ODATA

ODATA is based on REST and has more features. If you have a choice, you best use ODATA. ODATA exposing is described in this blog.

In SAP REST is supported, but you have to code a lot, and limited tools are available. For ODATA much more development and monitoring tools are available.

SAP interfacing: ODATA

In the previous blog we have setup RFC enabled function module. If you want to expose this function module as ODATA service you can use the wizard in transaction SEGW. This blog assumes the basis ODATA basis activation has been performed (see this blog).

Questions that will be answered in this blog are:

  • How do I generate an ODATA service based on a RFC function module?
  • How do I test if the ODATA service is properly working?

Set up of the ODATA service

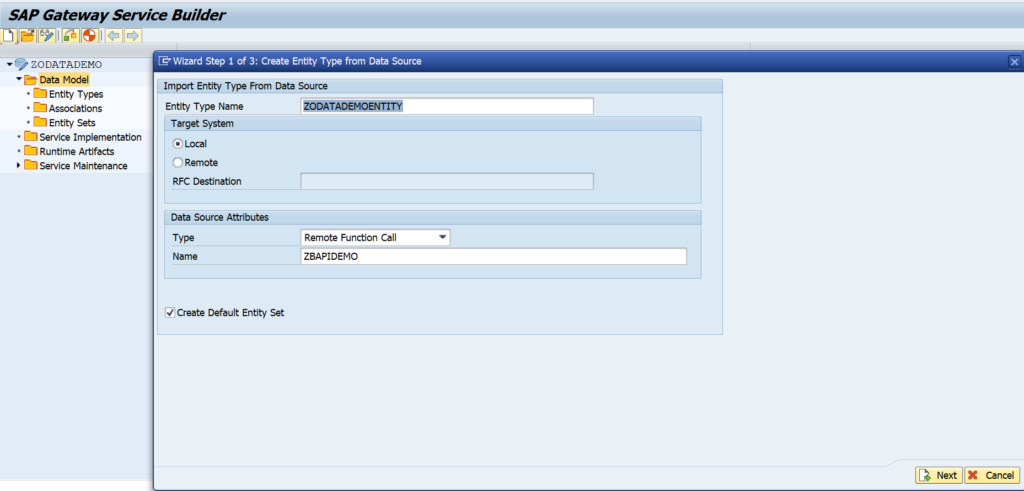
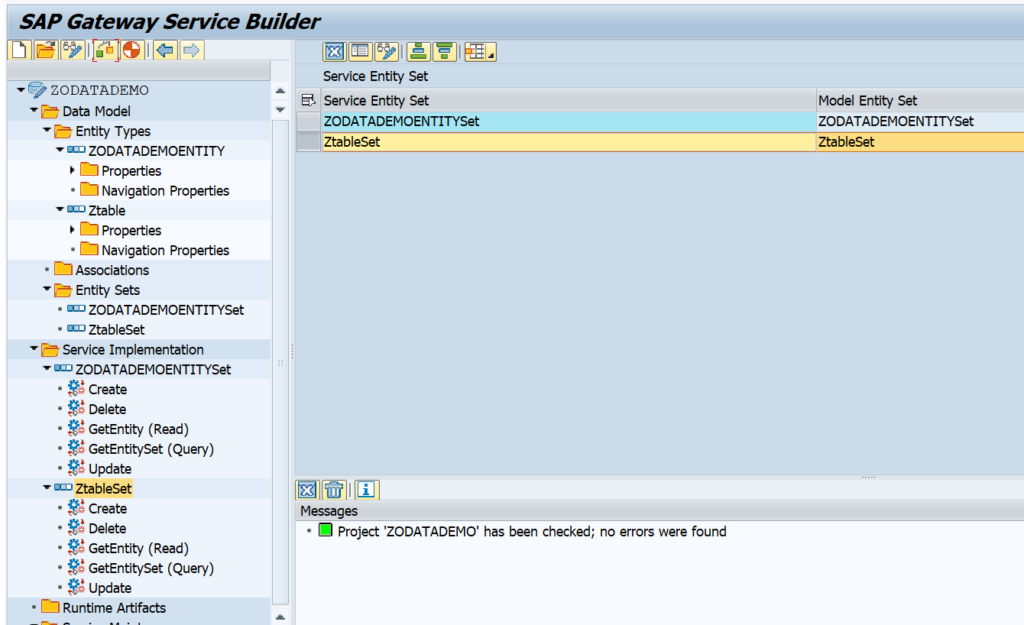
Start transaction SEGW and create a new project:

Now start the RFC import wizard by right clicking on Data Model and selecting the option Import and then RFC/BOR interface:

Now select the data parameters:

And enter which field is key field:

After pressing finish the wizard will generate the needed classes.

Save your work and press the check button to validate if everything is ok:

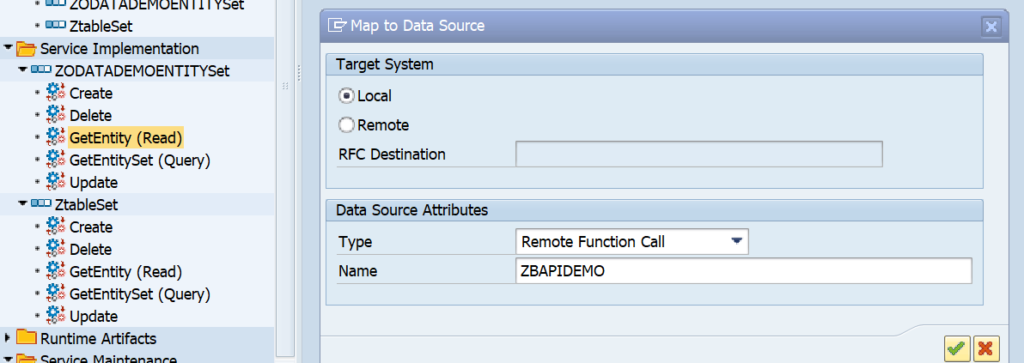
Now we need to map the implementation to the RFC module. Right click on the GetEntitySet below ZODATADEMOENTITYSet and select Map to Data Source:

Now map the fields (you can use drag and drop):

Now you need to map the data fields correctly and press check.

Save your work.

Generation of objects

You can see that the Runtime Artifacts section is still empty.

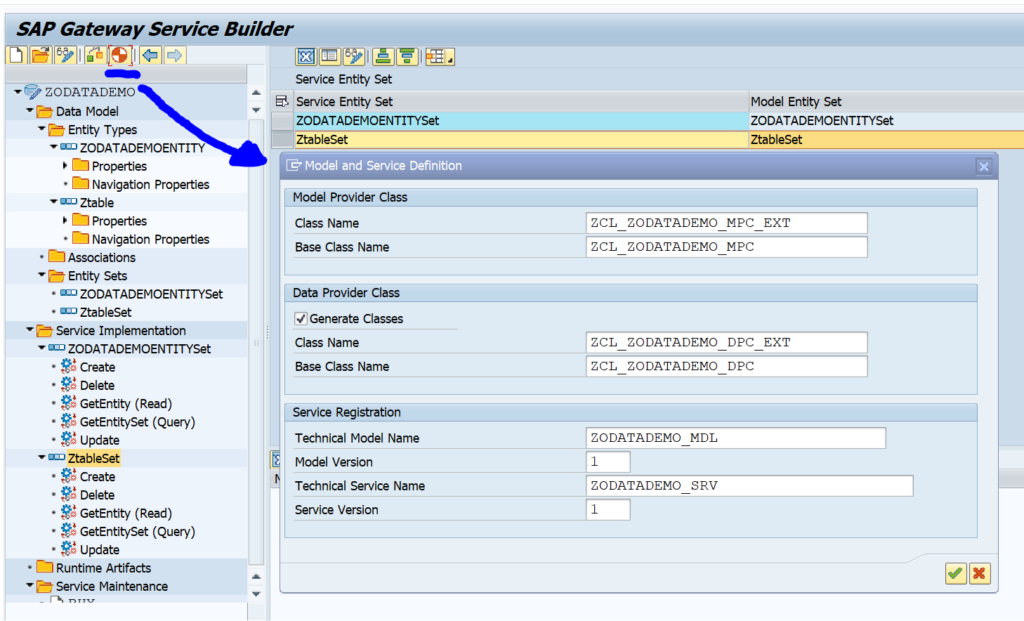
Now press the button Generate Runtime Artifacts:

Wait for the generation to finish:

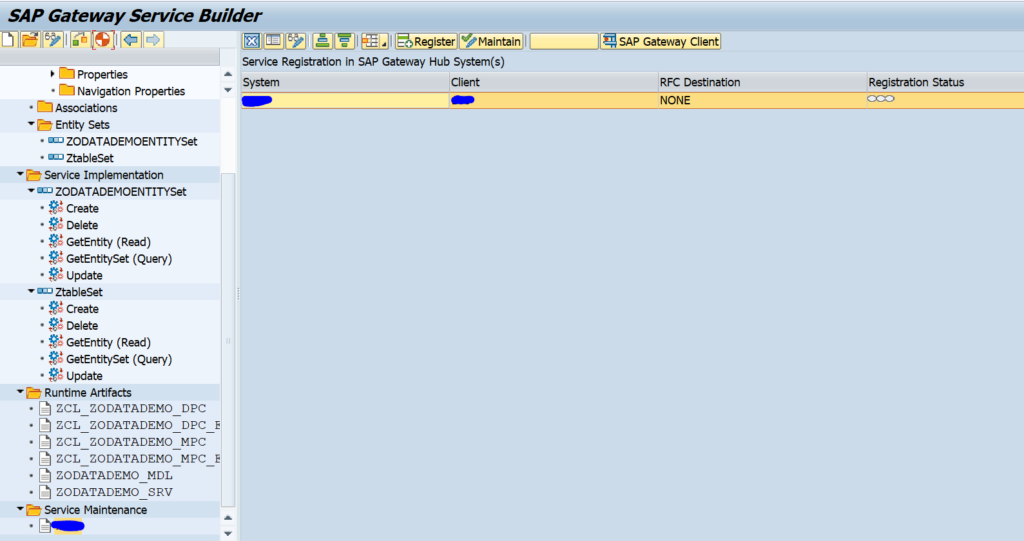
Now the runtime artifacts are generated, but the service maintenance is not done yet. Open the section Service maintenance and double click on the system:

Now press the Register Service button:

Accept settings and assign package for transport:

Now the registration status is green.

Testing the ODATA service

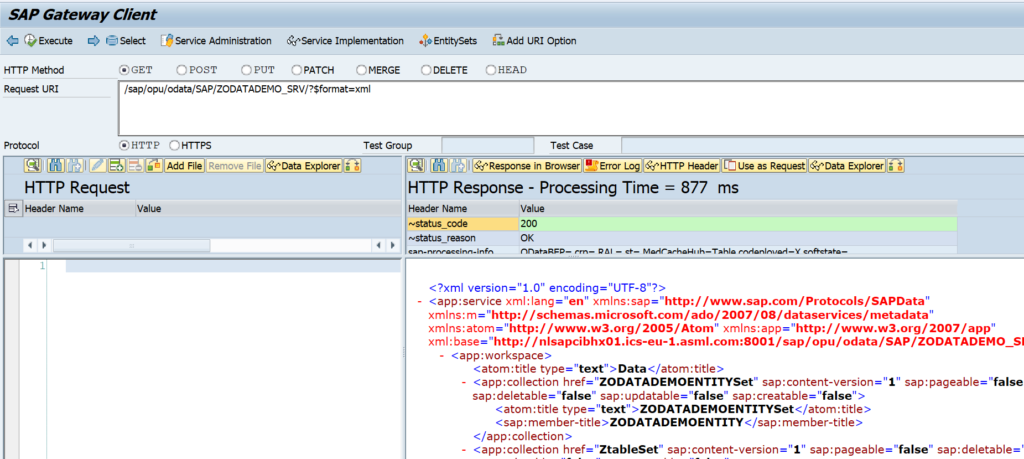
Press the button SAP Gateway Client (or start transaction /IWFND/GW_CLIENT directly, and then enter the correct service):

The test client starts:

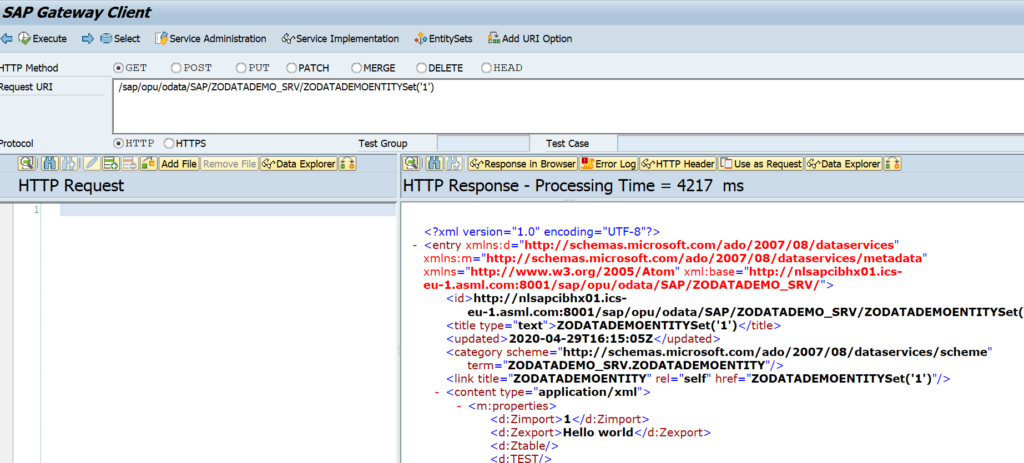
Enter the correct inputdata: /sap/opu/odata/SAP/ZODATADEMO_SRV/ZODATADEMOENTITYSet(‘1’)

And check the output:

Attention points

The example above seems simple, but you will face more issues in real live implementation when you need to add tables and more complex structures. In those cases additional configuration and many times extra coding in the methods of the generated classes is required.

Nice blogs to start with:

ODATA security

The user calling the ODATA service needs a special right in SAP to be allowed to call the ODATA service.

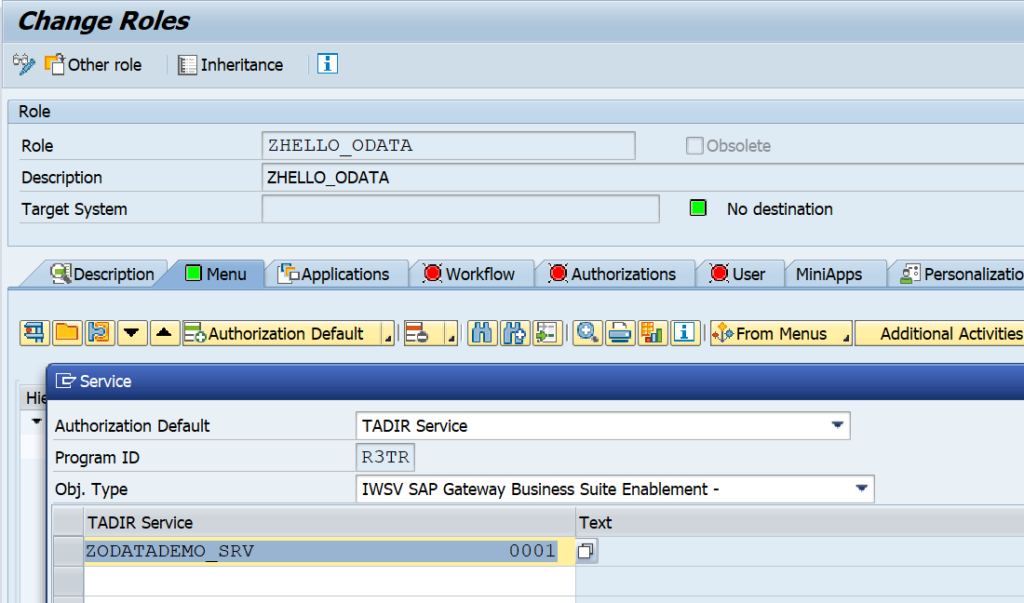
Start transaction PFCG and create a new role. On the menu tab select the option Authorization Default. Then select type Tadir and object type IWSV gateway business suite enablement. Now you can finally search for our own developed and activated ODATA service:

Now save the role and assign it to the user(s) needing to call this ODATA service.

The application security relies on the function security authorization check inside the RFC function module.

ODATA V2 and V4

SAP is now moving from ODATA V2 towards ODATA V4. Read more on ODATA V4 activation in this blog.

SAP interfacing: exposing web services

In the previous blog we have created a test RFC module. We now will expose this test RFC module as web service. This blog assumes the basic SOAP web service runtime has been done according to the manual in this blog.

If you are looking for information on how to consume a web service in the ABAP stack: read this blog.

Questions that will be answered are:

  • How can I generate a web service design time based on an RFC module?
  • How do I activate the web service runtime via SOAMANAGER?
  • How do I test my web service?

Creating the web service based on RFC module

Goto transaction SE80 and search for the test BAPI:

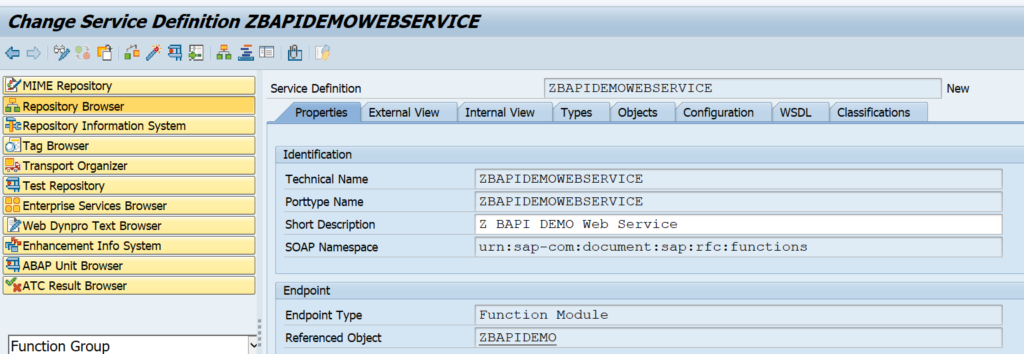
Now right click on the name ZBAPIDEMO function module and select the option Create / Enterprise Service:

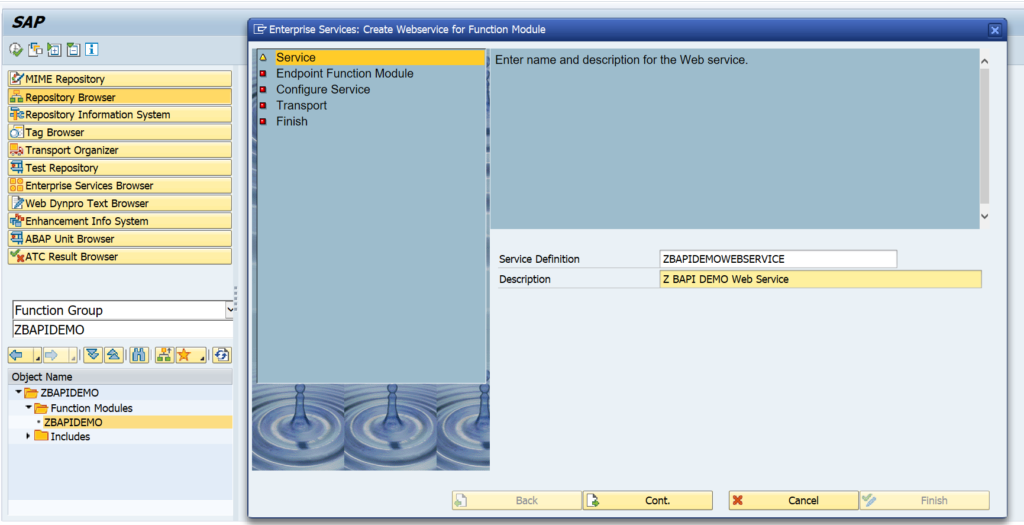
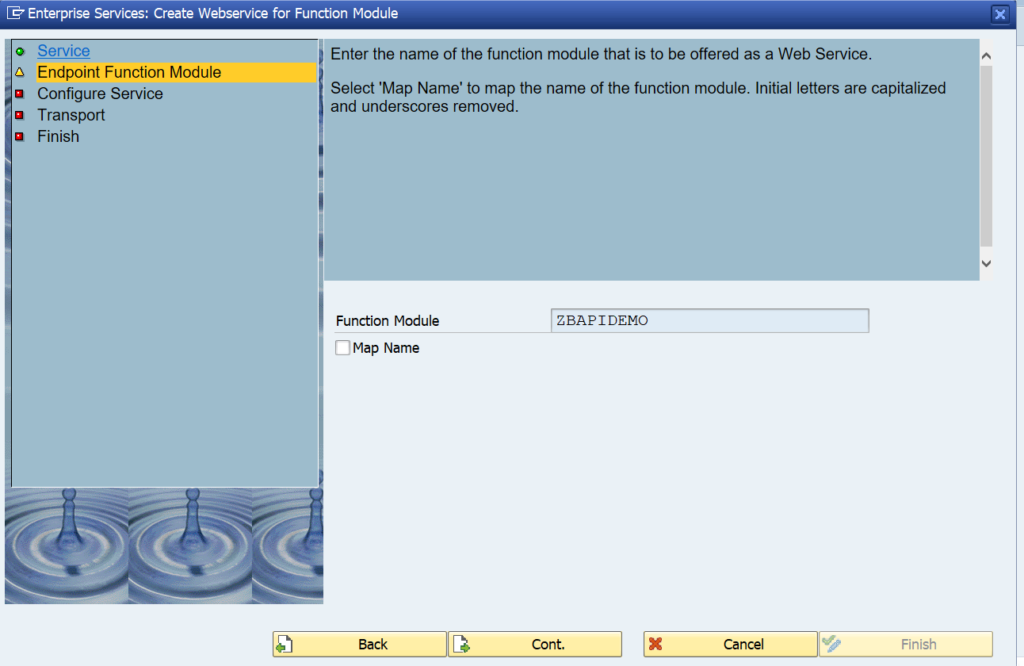
Fill out the name for the service definition and the description. Press Cont. to continue to the next screen:

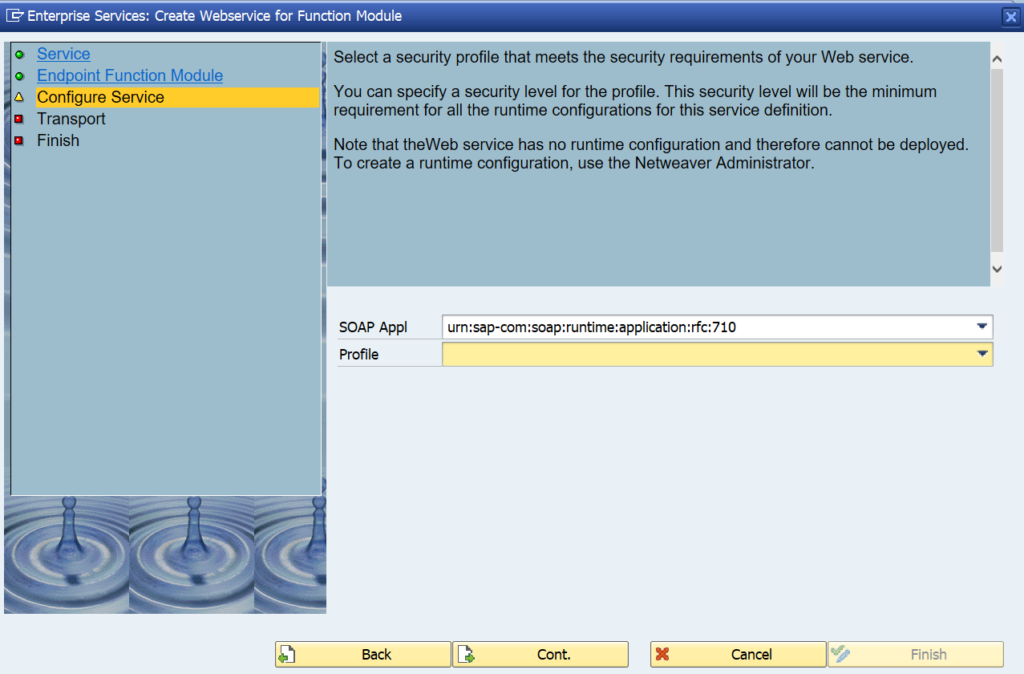
Press Cont to go to the next step:

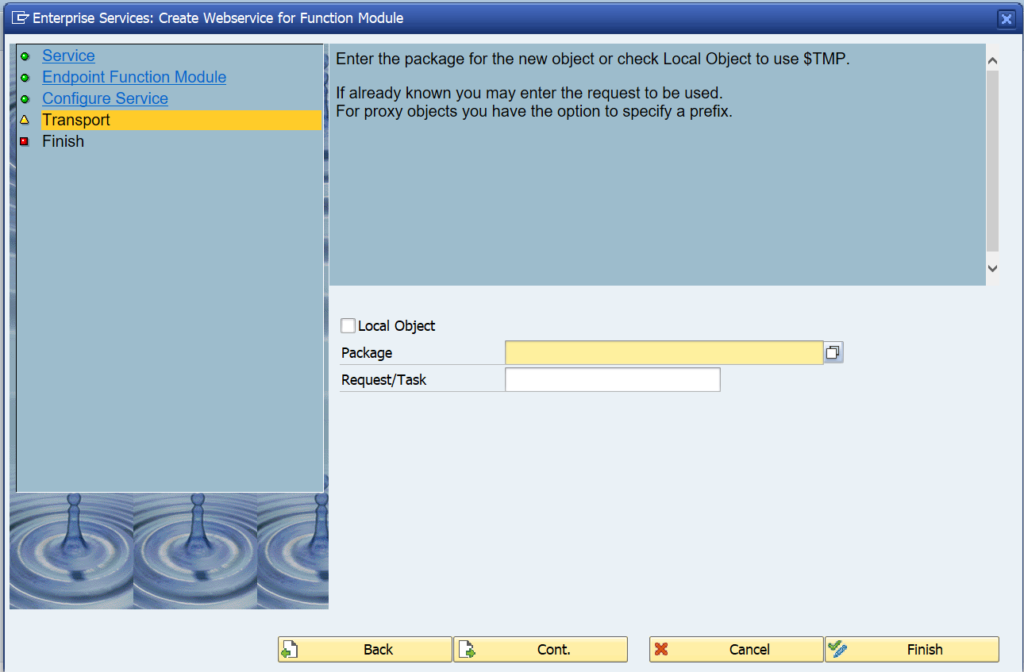
Press Cont. to go to the next screen:

Fill out your package and transport request.

Important here: on a sandbox you might want to use a local object ($TMP). In a development system, NEVER use the local option. A lot of data structures and coding will be generated. If you later try to move the objects from $TMP to a real package, you will be faced with a lot of issues. See note  886682 - Proxy inconsistencies on the use of repair programs SXIVERI_PROXY_HASHID_CHECK and SXIVERI_PROXY_HASHID_CHECK_70. After the cumbersome and painfull repair you will not make the mistake again... 

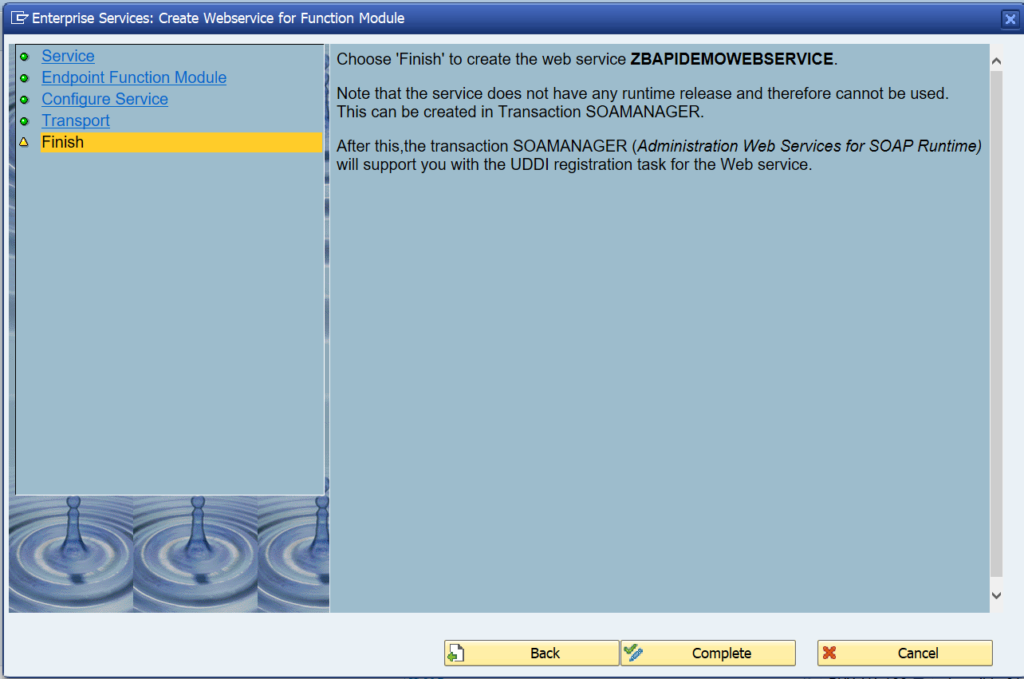
Press Cont. to goto the last screen:

On the screen you can already see the next action after completion: SOAMANAGER. But first press Complete to start the generation of the objects.

After the generation, do not forget to Activate the objects!

Activation success message:

Setting up the runtime with SOAMANAGER

To setup the runtime, start transaction SOAMANAGER. It is assumed that the basis team has performed the initial SOAP runtime setup. If not done, ask the basis team to follow the steps in this blog.

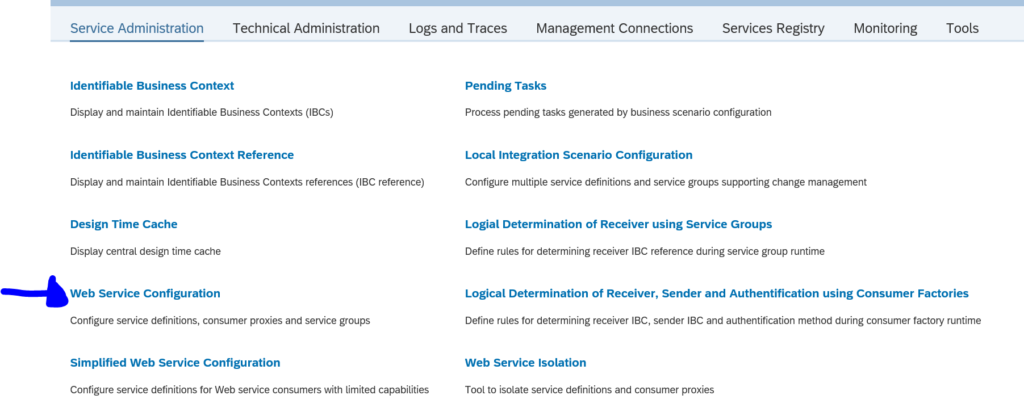
On the SOAMANAGER start screen choose the option Web Service Configuration:

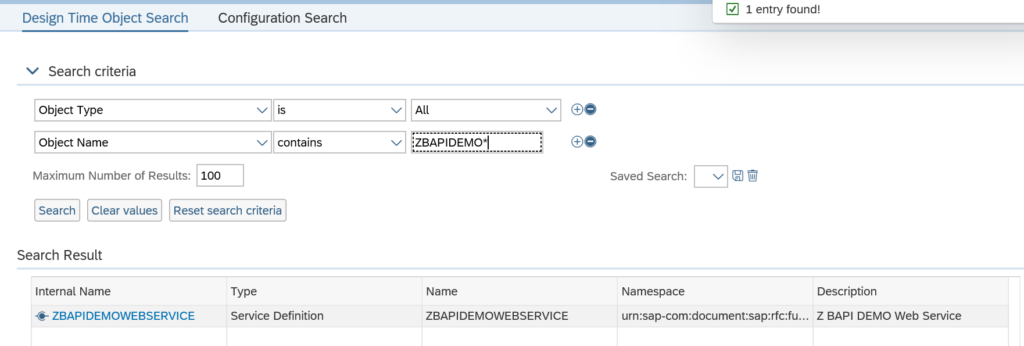
In the next screen search for the design time object we created and activated in the previous section (if you forgot the activate, you will not find it now…):

Select the service and on the next screen press the button Create Service:

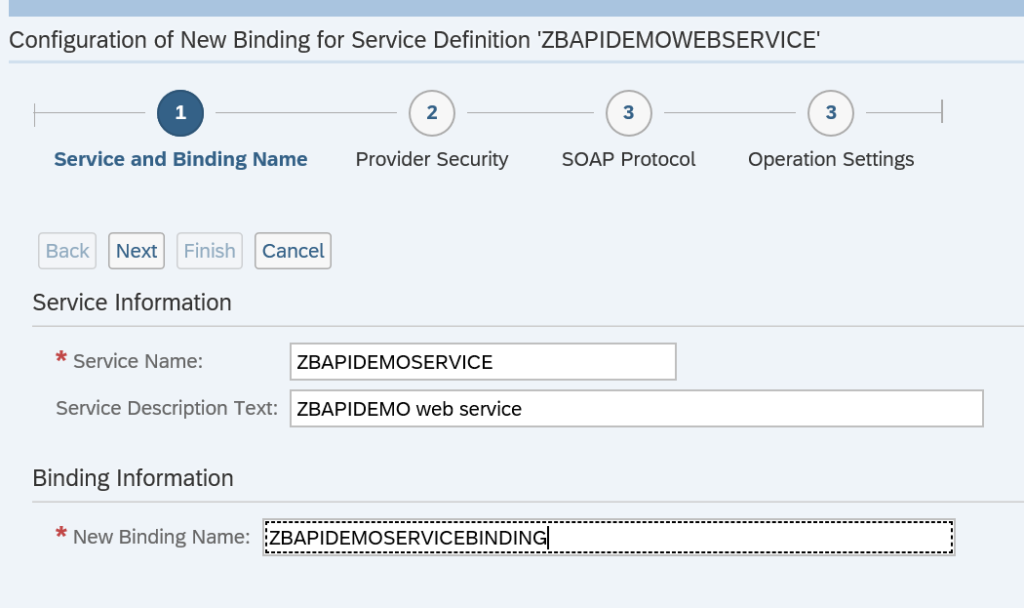
Fill out the definition details:

Press Next and define the security settings:

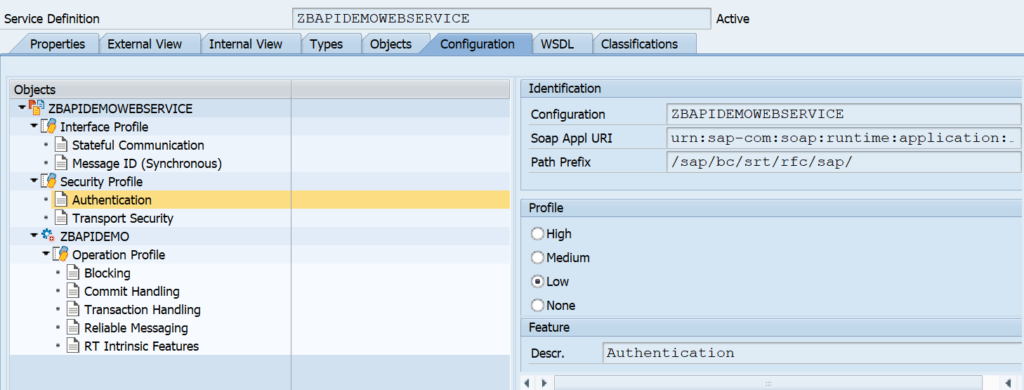
Remark: in the newer versions, the default security is set to high. If you need lower security, go back to SE80 definition in the tab configuration to change the security profile (save and regenerate!):

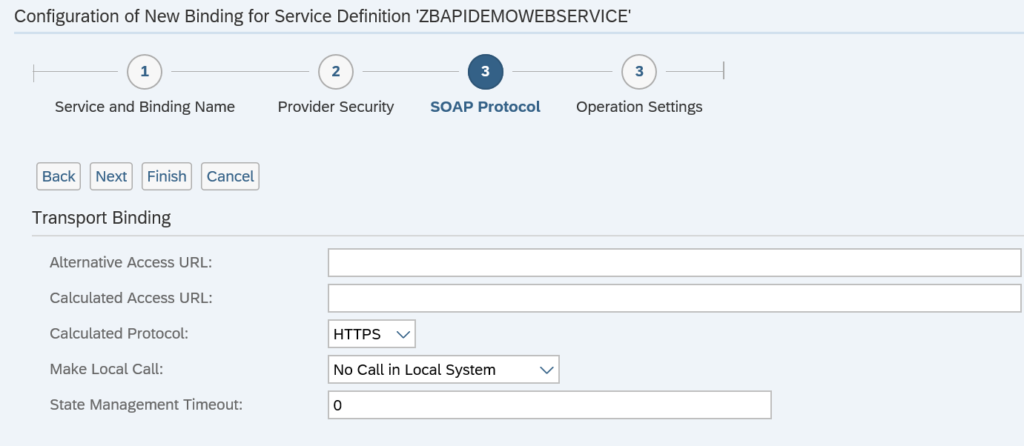
Press next and define the SOAP protocol settings:

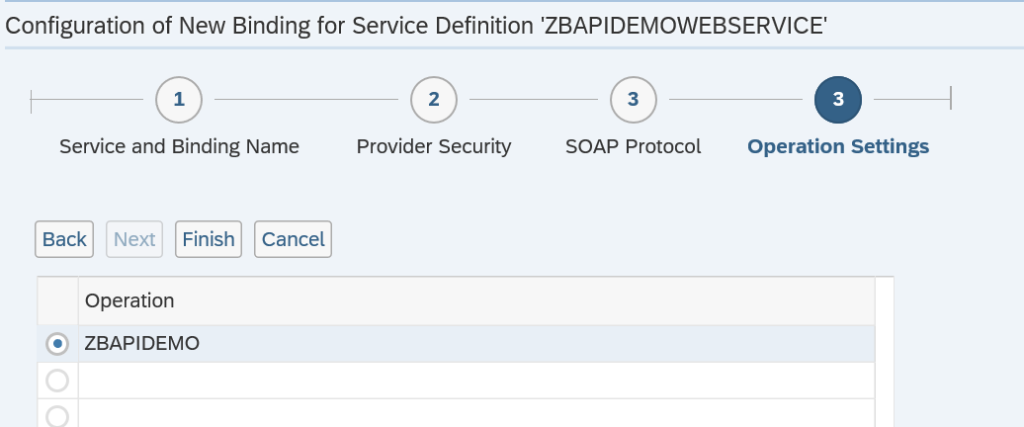
On the last screen of the wizard press finish:

Wait for the runtime generation to finish.

The screen returns to the generated runtime artifacts:

The most important artifact is WSDL file which you can open from here.

Testing the service

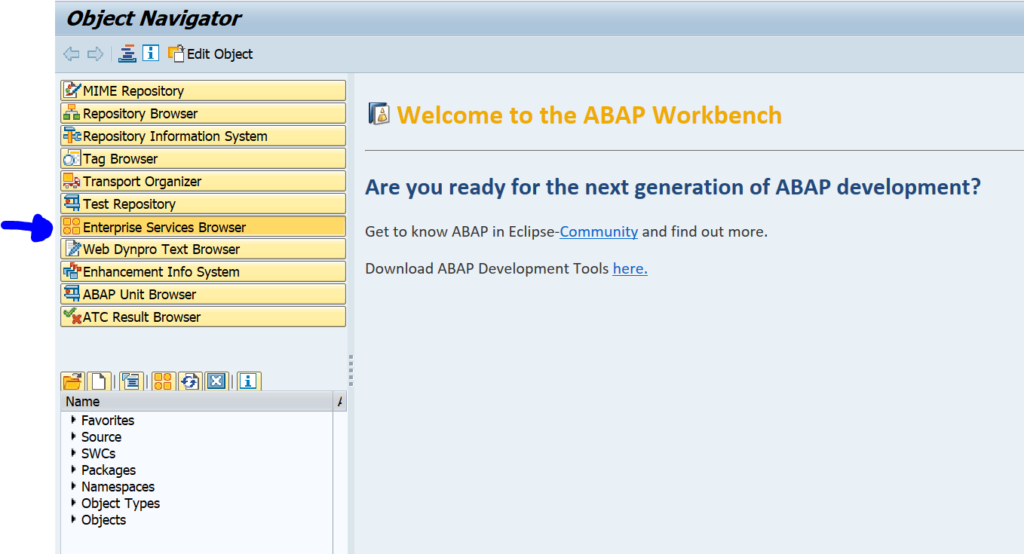
Go to transaction SE80 and select the Enterprise Services Browser (if not visible go to menu path Utilities/Settings and add the tool):

Now open your service by clicking the Open Object button and search for the service in the second tab:

Check that the WSDL file is properly showing:

If ok, press the test button (F8) to start the test tool:

On the next screen first press the XML editor button to allow the content to be changed:

Now press execute to test. The result:

Web service security

The functionality security of the web service is the same as for the generic RFC handling (see blog on this).

The technical security of web services is mainly driven from the security settings in SOAMANAGER. There you can set the transport protocol security and you can indicate if you want simple user ID / password security or work with additional certificates for server to server authentication.

The user calling the SAP web service must have the authorization object S_SERVICE. In S_SERVICE you can define the specific web service it needs to be able to call.

Troubleshooting web services security issues

For troubleshooting web services note 2321968 – SOAP Web Service Security Troubleshooting refers to a very extensive SAP site for web service security issues troubleshooting.

Monitoring web services

For monitoring web services messages, read this dedicated blog.

To validate if the web services is correctly accessible, you need a small Z program as described in this blog.