System log messages and audit log messages

System and audit log message are used in many different ways and applications.

When you have a system log message code or audit log message code, you might want more information, or in some cases change the severity level of the code.

Questions that will be answered in this blog are:

  • Where can I find the definition of the system log message codes and their long text?
  • Where can I find the definition of the audit log message codes and their long text?
  • How can I change the severity of system log and audit log messages?

Maintenance of system log and audit log messages

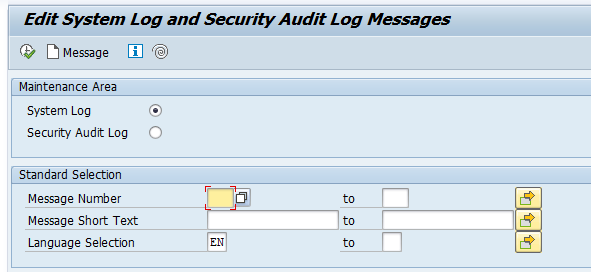
Maintenance of system and audit log messages is done with transaction SE92:

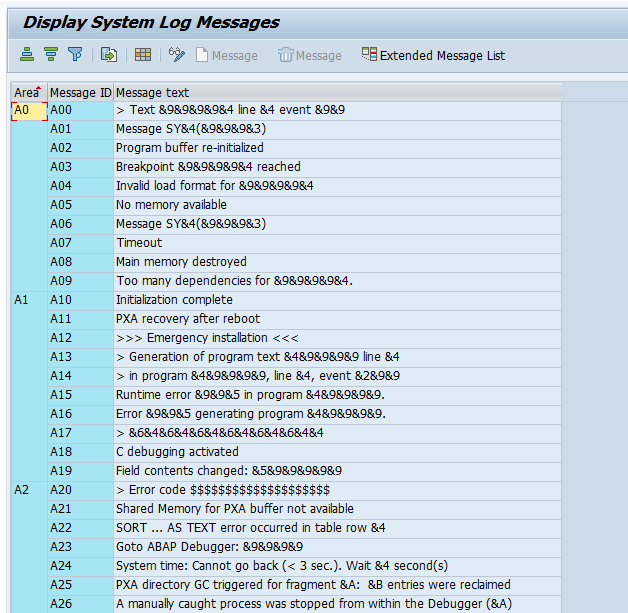
You can now get a list of messages:

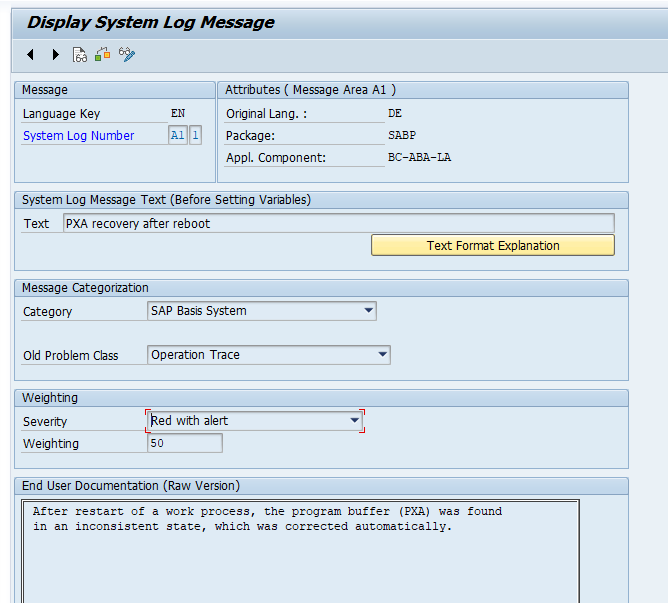
And per message you can see the details:

In the details you can see the short text, long text and the Severity. The severity will determine the traffic light in the SM21 system log overview.

For ABAP code to write the new message to the system log, read this blog.

Audit log change of severity

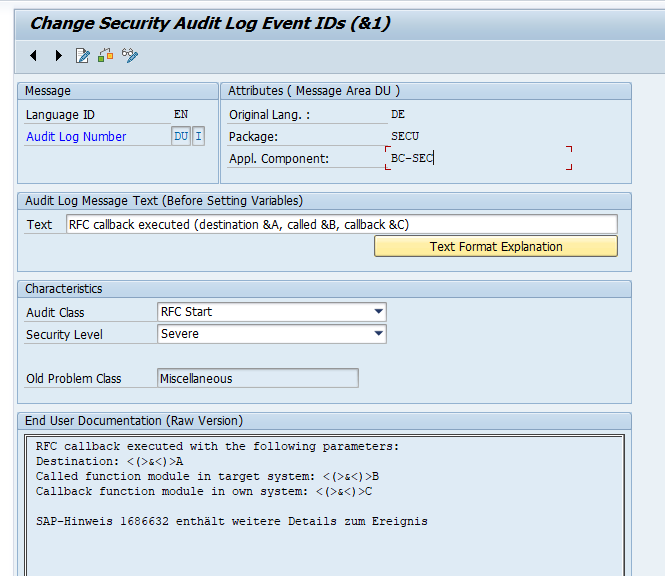
You can also change audit log severity:

Changing from default SAP does require a key.

Related OSS notes

OSS notes:

RFC connections with fast serialization

Fast serialization is an option in the RFC settings to increase performance.

Questions that will be answered in this blog are:

  • What is required to use RFC fast serialization?
  • When to use RFC fast serialization?
  • How can I switch to fast serialization without touching the RFC in SM59?
  • How do I make the settings for RFC fast serialization?

Fast serialization

Fast serialization is available since release Basis 7.51. Downport might be possible, but think twice if you want to do this. Background OSS note on fast serialization is 2372888 – Fast serialization in RFC.

The whole goal of fast serialization is simply to increase the performance.

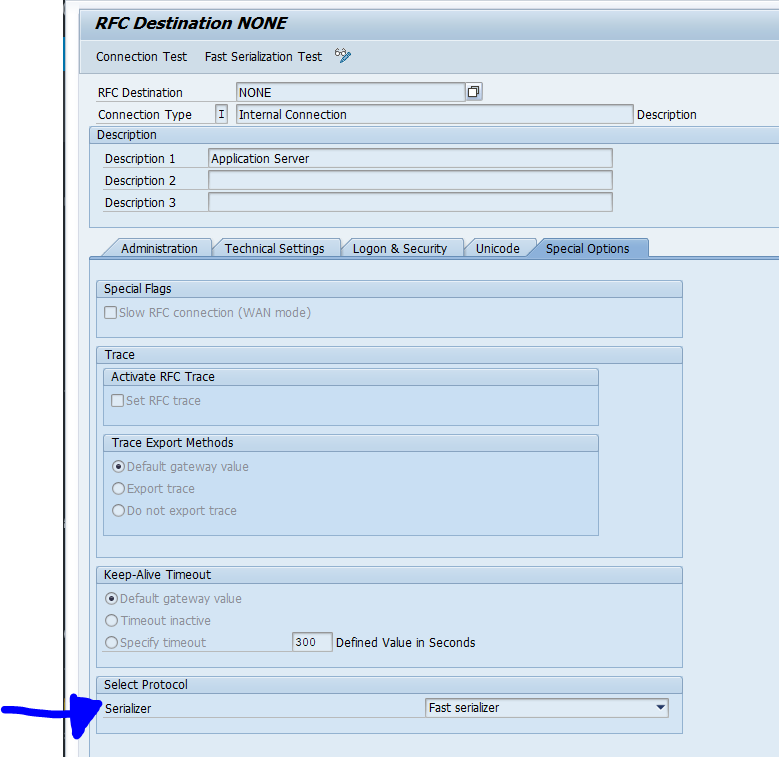
The fast serialization option is set in the RFC destination on the tab Special Options at the bottom:

Note that in S4HANA destination NONE is using fast serialization by default. Keep it that way.

Switching to fast serialization without touching SM59

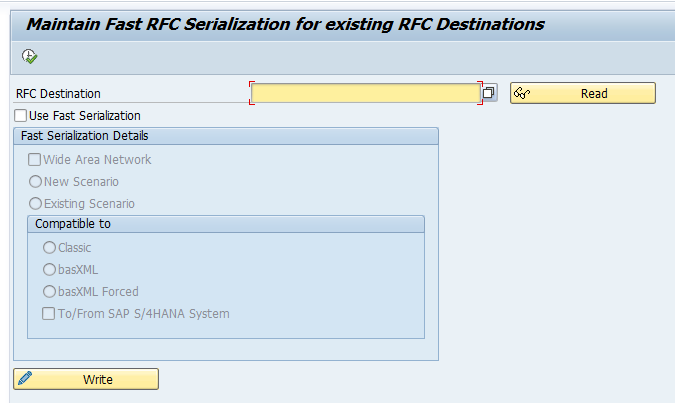
In SM59 when you touch the RFC it might request you to re-enter the password. You can still switch the existing RFC without touching SM59. The instruction is in OSS note 2315100 – Activation of new RFC serialization on client side. Run program SFASTRFCMAINTENANCE (2561904 – Fast RFC serialization maintained with SFASTRFCMAINTENANCE):

When to use fast serialization

Fast serialization can be used when both the sender and receiver side of the RFC connection supports it.

Fast serialization in custom or standard RFC function modules

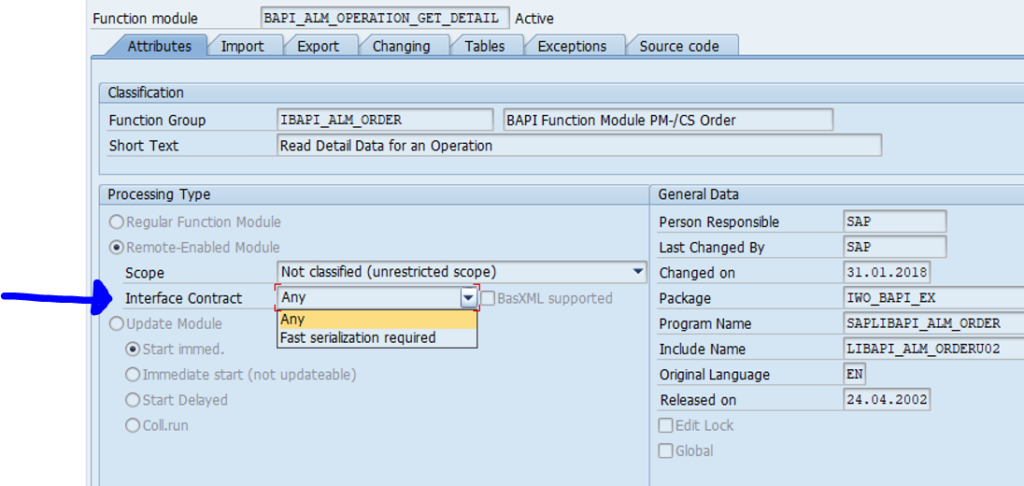
In SE37 SAP can set an RFC enabled function module Interface Contract to Fast serialization required. If you have build custom RFC function module that also only works with Fast serialization you should set this option:

Bug fix and explanation OSS notes

SAP downtime optimization app

SAP has create an app for analyzing the downtime for a SAP system upgrade or support package.

Questions that will be answered in this blog are:

  • How to use the SAP downtime minimization app?

Full references of SAP downtime minimization app

The full specification of the SAP downtime minimization app is maintained in SAP OSS note 2881515 – Introduction to the Technical Downtime Optimization App and on this SAP blog.

Using the SAP downtime minimization app

The app is hosted at SAP and can be reached on this URL: https://launchpad.support.sap.com/#/downtimeoptimization. When you start you come to the intro screen:

You start with the upload button. Here you can upload the UPGANA and APPLANA xml files:

After uploading, you need to wait 3 hours.

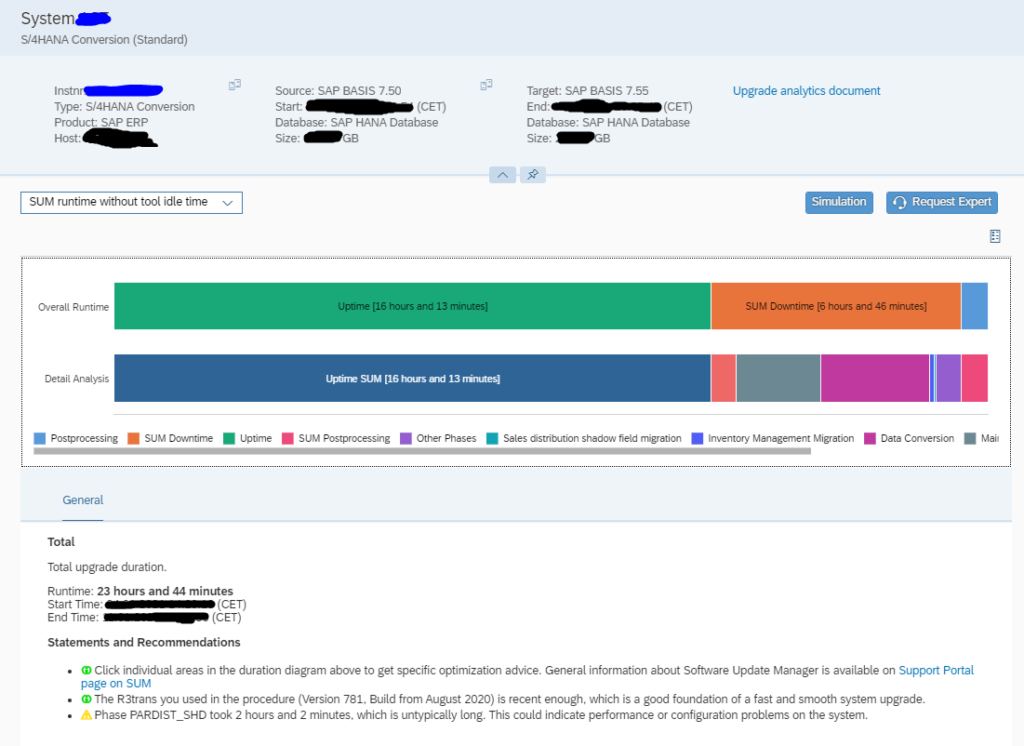
When you come back the result should be there:

Now you can analyze the SUM runtime uptime and downtime phase timing (this is tool time without idle time). There are hints given by SAP on which parts improvements could be made.

Reducing downtime

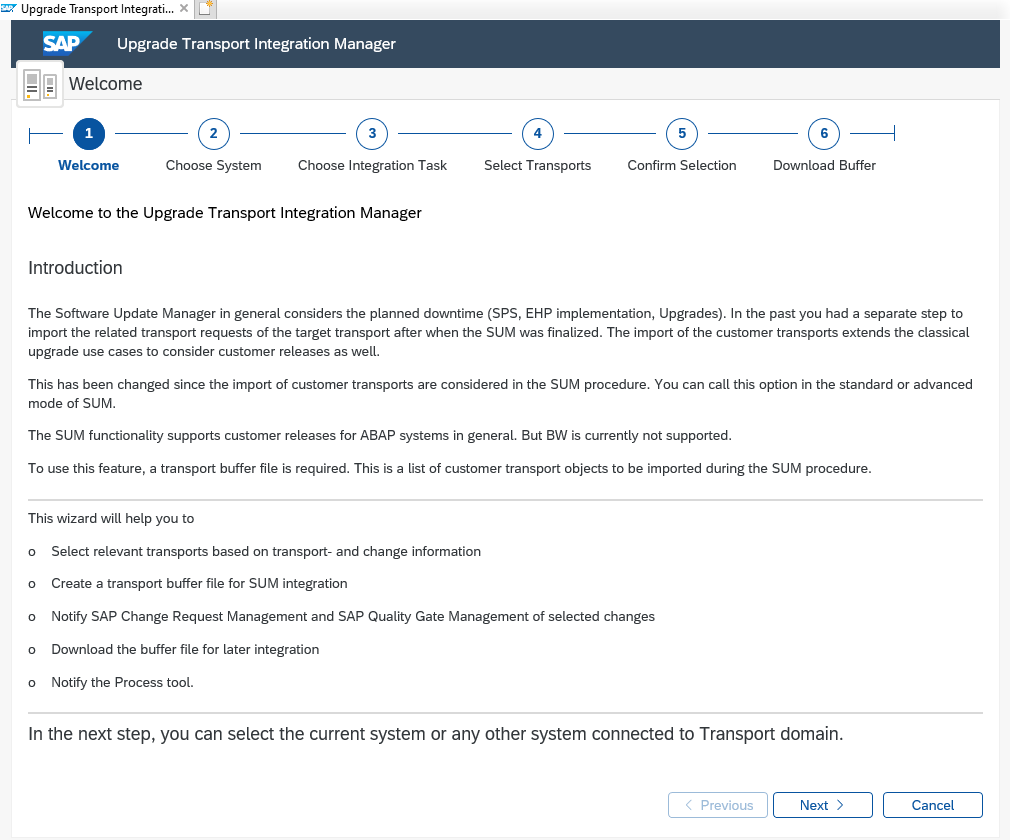
For reducing downtime, you can read the blog on including customer transport in SUM upgrade procedure as one of the means to reduce the downtime.

Also read OSS note 2351294 – S/4HANA System Conversion / Upgrade: Measures to reduce technical downtime, which contains many hints for downtime reduction.

Logical file names

This blog will explain the maintenance of logical file names.

Questions that will be answered in this blog are:

  • Why use logical file names?
  • How to setup logical paths and logical file names?
  • Which variables can be used in logical file names and logical paths?
  • What is new in transaction SFILE?

Why use logical file name?

The use of a logical file name in any ABAP keeps the location and name name of the file constant from a logical function perspective. The actual implementation of the file location can then be maintained by the basis team. If they want to move files around, they can do so, as long as they also update the logical files. Also this way an ABAP developer does not need to worry in case of any OS switch (for example from Windows to Linux).

The names are the same on development, QA and production system. The basis team can choose to have different file structures on each system. For example by including the system ID in the folder name.

Maintaining logical file path

To maintain logical file names, start transaction FILE:

With new entries, you can add new logical file path.

We will use A2_GLOBALPATH here as example. Select the entry and click on Assignment of physical path to logical path:

Select the operating system to see the details:

Logical file names

Logical file names are also maintained with transaction FILE:

Parameters in naming

The following parameters can be used in the naming conventions:

ParameterMeaning
<OPSYS>Operating system in function module parameter
<INSTANCE>Application Instance
<SYSID>Application name in accordance with system field SY-SYSID.
<DBSYS>Database system in accordance with system field SY-DBSYS
<SAPRL>Release in accordance with system field SY-SAPRL
<HOST>Host name in accordance with system field SY-HOST
<CLIENT>Client in accordance with system field SY-MANDT
<LANGUAGE>Logon language in accordance with system field SY-LANGU
<DATE>Date in accordance with system field SY-DATUM
<YEAR>Year in accordance with system field SY-DATUM, four characters
<SYEAR>Year in accordance with system field SY-DATUM, two characters
<MONTH>Month in accordance with system field SY-DATUM
<DAY>Day in accordance with system field SY-DATUM
<WEEKDAY>Weekday in accordance with system field SY-FDAYW
<TIME>Time in accordance with system field SY-UZEIT
<STIME>Hour and minute in accordance with system field SY-UZEIT
<HOUR>Hour in accordance with system field SY-UZEIT
<MINUTE>Minute in accordance with system field SY-UZEIT
<SECOND>Seconds in accordance with system field SY-UZEIT
<PARAM_1>External parameter 1 passed in function call
<PARAM_2>External parameter 2 passed in function call
<PARAM_3>External parameter 3 passed in function call
<P=name>Value of a profile parameter in the current system
<V=name>Value of a variable in the variable table
<F=name>Return value of a function module

Transaction SFILE

Transaction SFILE is a new maintenance transaction. It is available as of S4HANA 1610. The main functions are the same as FILE. Main new function is the mass download and upload of definitions.

More background on SFILE: see OSS note 2370836 – FAQ | File access management with transaction SFILE.

Bug fix OSS notes:

BI queue deletion

During a SPAM import or during application of a TCI OSS note using SPAM, you can get errors due to BI queues. This blog will explain how to delete these queues.

Questions that will be answered in this blog are:

  • How to clean up the BI queues in case SPAM or TCI note is being blocked by it?

qRFC clean up

First start in transaction SMQ1 to delete the MCEX BI outbound queues:

SMQ1 BI outbound queues

Select all queues and press the delete button.

More blocks

If it is still blocking run program RMCEXCHK:

RMCEXCHK result

Look for the application number(s) that is blocking. In this example 04. For V3 updates read 2886816 – Supplement to Note 652310 & 67014 & 1083709 about error ‘due to open V3 proc not changed’.

Now start transaction LBWG to delete the setup for this application:

LBWG transaction

Details behind LBWG are explained in OSS note 1752439 – Explanation of transaction LBWG.


FIORI search setup

FIORI search is a very powerful tool for the end users. It enables a google like search on the business data.

Questions that will be answered in this blog are:

  • How does FIORI search work from the end user perspective?
  • How to set up FIORI search?
  • How to authorize search data?

FIORI search from end user perspective

From the end user perspective: open the search glass and key anything. Just like in Google:

Now wait for the search engine to give results:

Now you can select a record, or select a related app (with the … you get more options):

Set up of FIORI search

In the FIORI launchpad configuration parameters (see SAP help) make sure that the enableSearch is set to true. Otherwise the search icon does not appear.

In case you run a FIORI hub, make sure to setup the web dispatcher rules properly to the backend (see SAP help).

Next step is to activate the search models and the backend (see blog). The search setup for FIORI launchpad is fully dependent on the backend search.

Some apps use related links. For these related links, the related FIORI app or FIORI factsheet must be activated. See this blog on how to fast activate complete groups of FIORI apps.

FIORI search authorizations

FIORI search relies on the authorizations of the end user. First make sure that the general authorization for the search is active in this IMG node:

The setting Model Authorization must be set to Check:

In the search cockpit (transaction ESH_COCKPIT), make sure that the user authorizations are indexed. In case of doubt run it under the Actions button, and select Index User Authority:

If one end user gets results and the other one does not get the same result: the main reason might be difference in authorizations.

Useful OSS notes

For specific use cases the following OSS notes might be relevant:

Setting up trusted RFC connection

This blog will explain how to set up trusted RFC connection.

Questions that will be answered are:

  • How to setup a trusted RFC connection?
  • How to edit generated RFC in SM59 using the TOGL function?


Setting up trusted RFC

Start in transaction SM59 to create an RFC to the destination system:

Trusted RFC with user name

Fill out your own user ID first. Make sure your user ID is existing in the destination system and is having sufficient S_RFCACL rights in the destination system. See OSS note 128447 – Trusted/trusting systems for the details.

Test the connection including the remote logon.

If that is ok, start transaction SMT1 and start the roadmap for setting up the trusted connection:

SMT1 enter destination

Enter the destination and finish the roadmap:

SMT1 complete roadmap

Complete the roadmap. 

Now return to SM59 for the destination and remove the user ID, tick the box “Current User” and switch the Trust Relationship to Yes:

Trusted RFC with trust setting

Now test again. All should work.

Background SAP wiki can be found in this link.

Background notes:

Testing trusted RFC

A trusted RFC can be tested via the Remote Logon button:

If you now can jump from the current system to the connected system without password prompt: then all is fine.

If it is not working: check in the target system in ST22 for a remote logon failure dump. Must likely your user does not have sufficient rights in the target system.

RFC security settings

For checking RFC security settings, read this dedicated blog.

RFC Access Control List

In the newer S4HANA versions, you can switch from an authorization check towards a full Access Control List setup. Use transaction SMTACL and select the trust connection:

Switch here to Access Control List Check.

RFC hacking

Be aware that RFC’s and especially trusted RFC’s can be misused for hacking. Read this dedicated blog on how, and how to protect.

Checking which systems you trust

With transaction SMT2 you can check which systems have a trusted system setup towards the system you are currently logged in to.

Editing trusted connections

Trusted connections are generated. In case of emergency you might need to edit this, in the command bar enter keyword TOGL to go to SM59 edit mode:

See note 3212943 – How to edit the settings of unchangeable RFC destinations.

Trusted systems and installation number changes

If you have trusted systems and want to change an installation number of one of the systems, carefully read this OSS note: 2849941 – SMT1/SMT2 configuration after SID or installation number change.

Issues with trust certificates

In exceptional cases you might face issues with cache refresh of replaced certificates. See OSS note 2947038 – Error SOAP:1033 CheckPSE occurs in STRUST/STRUSTSSO2. Solution is to run program SRT_CFG_CLEAR_DESIGNTIME_CACHE.

Trusted RFC security note 3157268

Unfortunately SAP released security note 3157268 – How-To-Guide: Migration of Trusted/Trusting Relationships. Along with the FAQ note 3281854 – FAQ for Security Note 3089413. If you did not migrate your existing trusted RFC’s to the new setup, do it fast within reasonable time (which includes proper testing).

After migration is done, or when you have a new setup, make sure you have set parameter rfc/allowoldticket4tt to the value no.

Set up FIORI notifications

This blog will explain the setup of FIORI notifications. They are sometimes also called FIORI push notifications.

The notifications on the FIORI launchpad are pushed to the end user on the top right part of the screen:

In this case 22 notifications are present.

Questions that will be answered in this blog are:

  • How to generically activate FIORI notifications?
  • Which specific settings do I need to perform to activate notifications for my specific workflow?
  • Hot to test FIORI notificaitons?
  • Where to find more background on FIORI notifications?

Setting up the FIORI notifications

Goto the customizing entry for notification channel configuration. We will set up the scenario for embedded FIORI. If you want to set up notifications for the FIORI gateway as a central step, more activities are required. These are listed at the sap help site.

Start with the Notification Hub RFC destination:

Set the destination to NONE and press execute:

Now set the backend system alias to LOCAL and press execute:

Now goto the menu entry for Manage Notification Providers to activate the desired ones:

Now we will setup the notification channel hub. Goto this customizing actions:

Start with the action Manage SAP System Aliases and map the LOCAL gateway to RFC destination NONE:

Now select the Publish the Notification ODATA Service entry and make sure the service /IWNGW/NOTIFICATION_SRV is published:

If not done, push the button Publish Service Groups, select LOCAL, press button Get Service Groups and search for /IWNGW/NOTIFICATION_SRV:

And publish it.

Now check in Manage WebSocket Endpoint that service NOTIFICATION_PUSH_APC is active:

In the customizing entry Activate and Maintain Push Channels, check that the push channels are properly active, and if not activate it:

Go to transaction SWF_PUSH_NOTIF1 to add the workflow task for push notifications. We will add task TS00008267 (this is used in the generic workflow verification):

Click on the text icon to maintain the text:

Make sure that in the technical job repository SJOBREPO (see blog) that the jobs for deadline monitoring and push notifications are running:

Testing the push notifications

Now you can start the verification workflow in SWU3 (see blog) or start test transaction /IWNGW/BEP_DEMO:

The results can be seen on the FIORI launchpad:

Notification icon not visible on the FIORI launchpad

If the notification is hidden, check the configurations in transactions /UI2/NWBC_CFG_SAP and /UI2/NWBC_CFG_CUST. It can be that an adminstrator has suppressed this function.

Background information

The minimum requirements for FIORI notifications are described in OSS note 2578256 – What is the minimum requirement for Fiori Notification?.

Configuration restrictions are listed in OSS 2729492 – Configuring notifications in Fiori Launchpad and known restrictions.

See this SAP help file on the topic for setup FIORI notifications.

See this SAP help file for notification channel troubleshooting.

See this SAP help file for end user tips & tricks with regards to FIORI notifications.

For custom development of FIORI push notifications, read this SAP blog.

For a very good and extensive full setup description for 1809 FIORI 2.0 description, read this SAP blog.

Formal OSS note for error analysis: 3358966 – Fiori Push Notifications are not created – Help for analysis.

Bug fix notes

Number ranges tips & tricks

This blog is about number ranges.

Questions that will be answered in this blog are:

  • How to maintain number ranges?
  • How to transport number ranges?
  • How to clean up old number ranges?
  • How to check if number ranges are full or almost full?
  • Which notes can help me when we have performance issues issues with number ranges?

SNRO number range maintenance

Number ranges can be maintained with transaction SNRO. After starting select the number range to maintain:

Now press the button Interval Editing:

Now you can display or change the intervals or current number:

Transport of number ranges

Number ranges are not directly put into a transport. If you want to transport them, select from the range maintenance screen the menu option Ranges / Transport. You will get this warning screen:

After pressing Yes, the popup for the transport request will come.

Number range fill up check

Program RSNUMHOT can be used to check if any number range is full or is at a certain percentage.

Output example:

For background running read the KBA note 2485249 – How to see the spool results of report RSNUMHOT.

Clearing abandoned number ranges: 3286395 – RSNUMHOT | Critical intervals are reported for abandoned number ranges.

Number range buffer

Using transaction SM56 you can check the number range buffer settings:

See also OSS note 2586414 – NUM: Increase default of number range buffer size.

Number range clean up

If you have an older SAP implementation, the amount of number ranges can go very high. There are many number ranges per year, especially in finance. The result can be that transaction SNRO gets very slow. If this is the case install OSS note 2931837 – NR: Reorganization of interval table. This will bring program NK_IV_REORGANIZE to reorganize the number range table:

Number range issues

Number ranges are know to have issues in 2 areas:

  • Performance (mainly on very large systems): can be seen in SM66 or SM50 with long updates on table NRIV
  • Gaps in number ranges where legal requirements exist

OSS notes to check when having number range issues:

Batch job result distribution

When a batch job finishes, there are use cases where you want to be informed on the results.

Questions that will be answered in this blog are:

  • How can I mail the spool result of a batch job?
  • How can I mail if the job went ok or not?

Mailing job status

As of version S4HANA 1709 (basis version 7.52), you can mail the batch job result for cancelled jobs, or in all cases when it finishes. In SM37 after job is planned goto change mode of the job and push the E-mail Notification button:

In case of issues check OSS note 2951767 – E-mail notifications are not sent.

Mailing spool result

For mailing spool results use the Spool List Recipient button:

On older systems there might be a cutoff after 1000 lines in the mail. See OSS note 329537 – Spool cut off at 1000 lines when sent to recipient. In case of issues, you can check OSS note 760838 – Spool lists are not sent and 930570 – Problems with sent OTF documents.

Mailing spool result to multiple mail addresses

In transaction SO15 create a distribution list:

Hit the create button to create a distribution list:

Goto the tab Dist. list content to enter the e-mail addresses:

Save the list.

Now you can go to SM37 and change the job:

In the recipient field hit F4 or the selection button and switch to the distribution list. Search the correct one and press ok:

In case somebody by accident deleted a shared distribution list, check OSS note 2477819 – Distribution Lists have been deleted for recovery options.

Bug fixes

Bug fix OSS notes: