FIORI search setup

FIORI search is a very powerful tool for the end users. It enables a google like search on the business data.

Questions that will be answered in this blog are:

  • How does FIORI search work from the end user perspective?
  • How to set up FIORI search?
  • How to authorize search data?

FIORI search from end user perspective

From the end user perspective: open the search glass and key anything. Just like in Google:

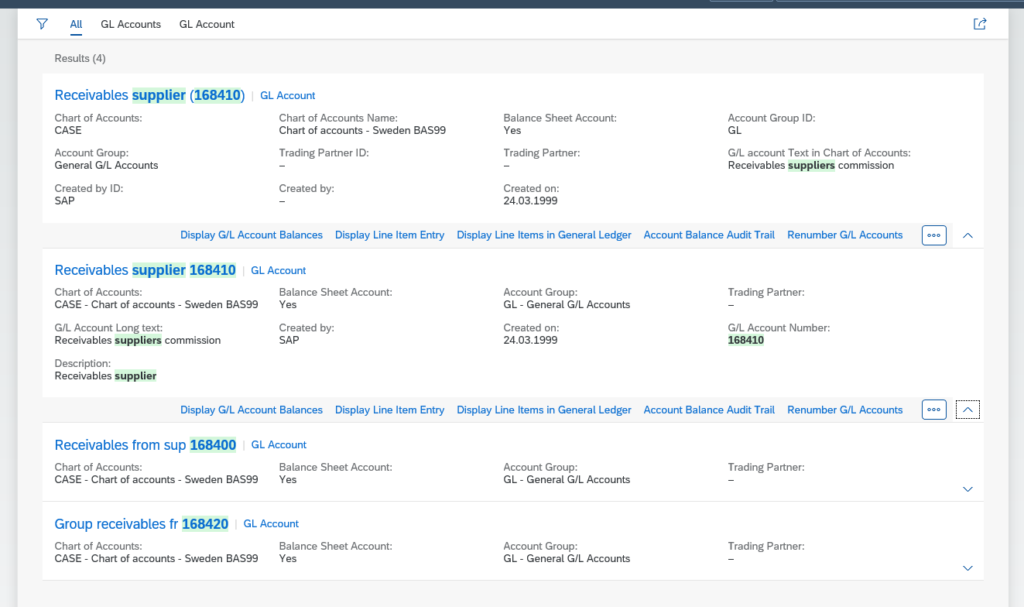
Now wait for the search engine to give results:

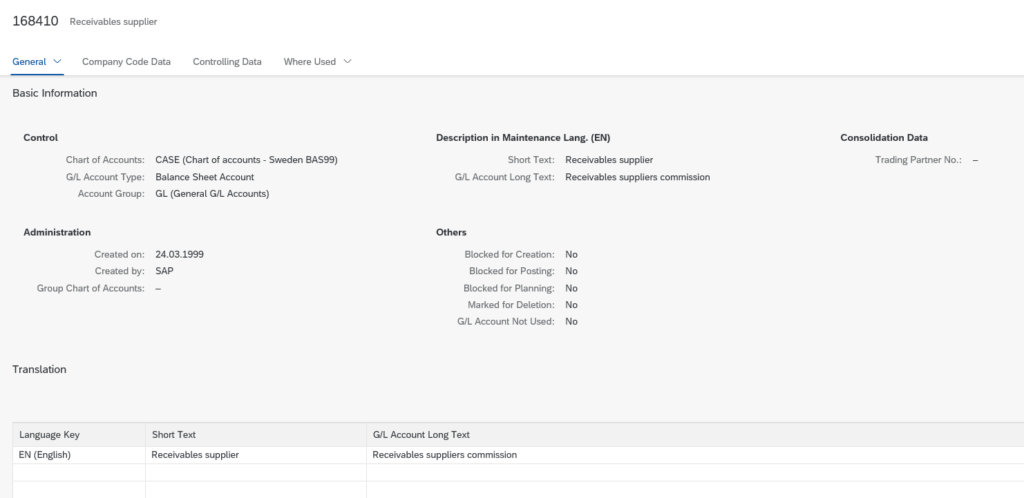
Now you can select a record, or select a related app (with the … you get more options):

Set up of FIORI search

In the FIORI launchpad configuration parameters (see SAP help) make sure that the enableSearch is set to true. Otherwise the search icon does not appear.

In case you run a FIORI hub, make sure to setup the web dispatcher rules properly to the backend (see SAP help).

Next step is to activate the search models and the backend (see blog). The search setup for FIORI launchpad is fully dependent on the backend search.

Some apps use related links. For these related links, the related FIORI app or FIORI factsheet must be activated. See this blog on how to fast activate complete groups of FIORI apps.
FIORI search authorizations

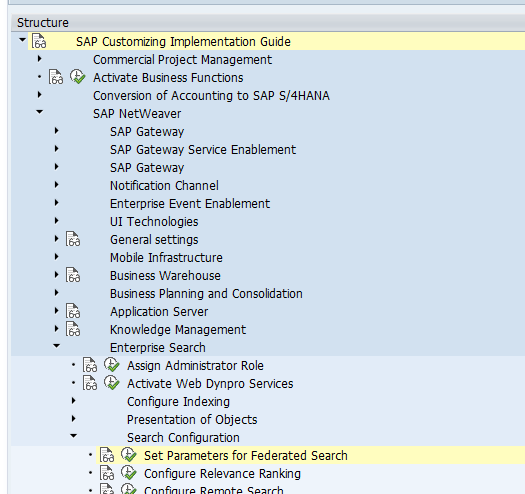
FIORI search relies on the authorizations of the end user. First make sure that the general authorization for the search is active in this IMG node:

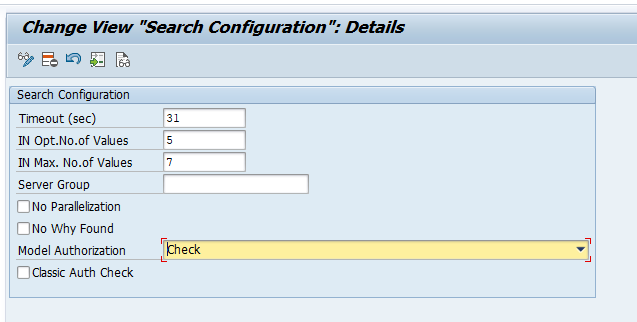
The setting Model Authorization must be set to Check:

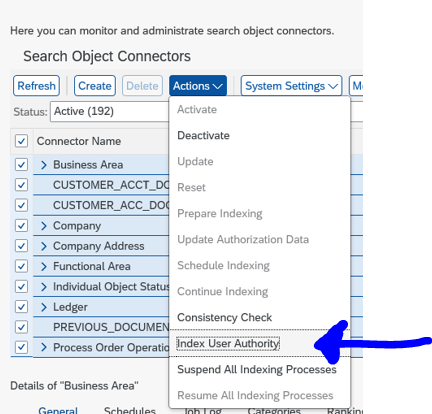
In the search cockpit (transaction ESH_COCKPIT), make sure that the user authorizations are indexed. In case of doubt run it under the Actions button, and select Index User Authority:

If one end user gets results and the other one does not get the same result: the main reason might be difference in authorizations.

Useful OSS notes

For specific use cases the following OSS notes might be relevant:

Set up FIORI notifications

This blog will explain the setup of FIORI notifications. They are sometimes also called FIORI push notifications.

The notifications on the FIORI launchpad are pushed to the end user on the top right part of the screen:

In this case 22 notifications are present.

Questions that will be answered in this blog are:

  • How to generically activate FIORI notifications?
  • Which specific settings do I need to perform to activate notifications for my specific workflow?
  • Hot to test FIORI notificaitons?
  • Where to find more background on FIORI notifications?

Setting up the FIORI notifications

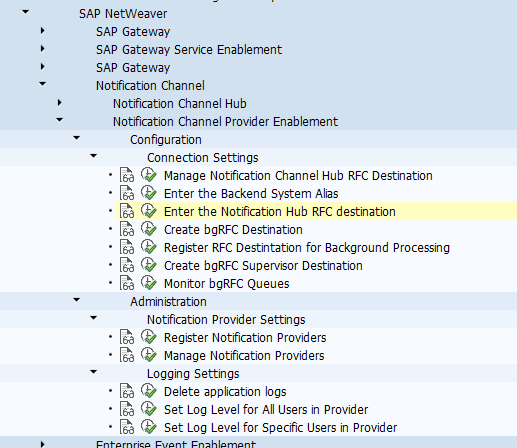
Goto the customizing entry for notification channel configuration. We will set up the scenario for embedded FIORI. If you want to set up notifications for the FIORI gateway as a central step, more activities are required. These are listed at the sap help site.

Start with the Notification Hub RFC destination:

Set the destination to NONE and press execute:

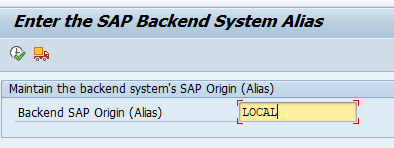
Now set the backend system alias to LOCAL and press execute:

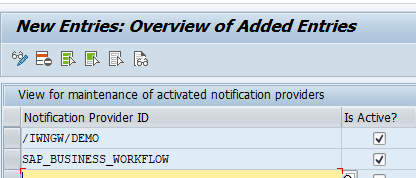
Now goto the menu entry for Manage Notification Providers to activate the desired ones:

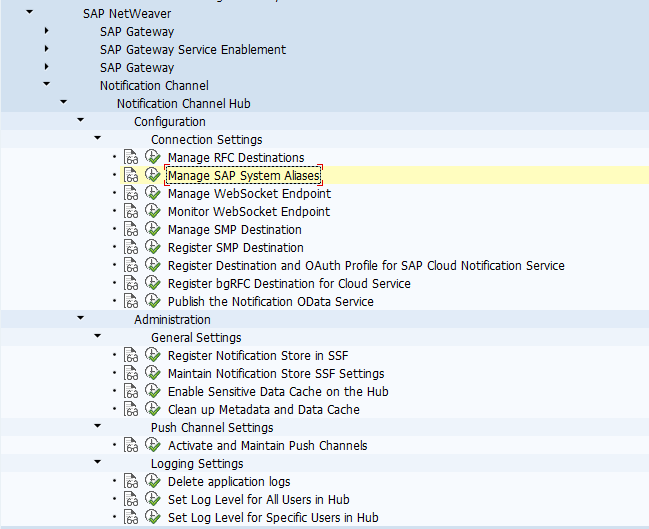
Now we will setup the notification channel hub. Goto this customizing actions:

Start with the action Manage SAP System Aliases and map the LOCAL gateway to RFC destination NONE:

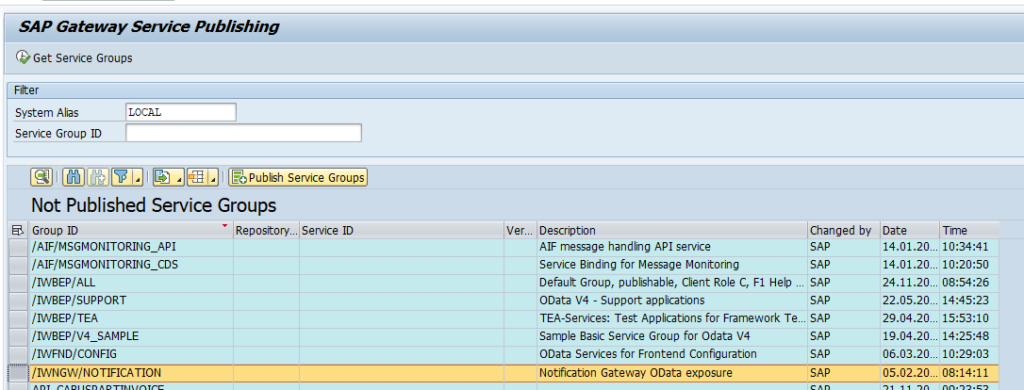
Now select the Publish the Notification ODATA Service entry and make sure the service /IWNGW/NOTIFICATION_SRV is published:

If not done, push the button Publish Service Groups, select LOCAL, press button Get Service Groups and search for /IWNGW/NOTIFICATION_SRV:

And publish it.

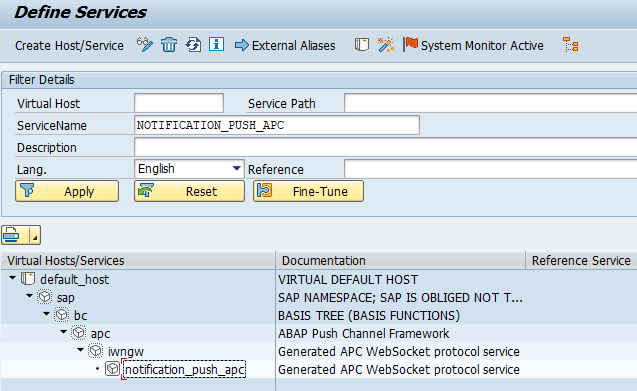
Now check in Manage WebSocket Endpoint that service NOTIFICATION_PUSH_APC is active:

In the customizing entry Activate and Maintain Push Channels, check that the push channels are properly active, and if not activate it:

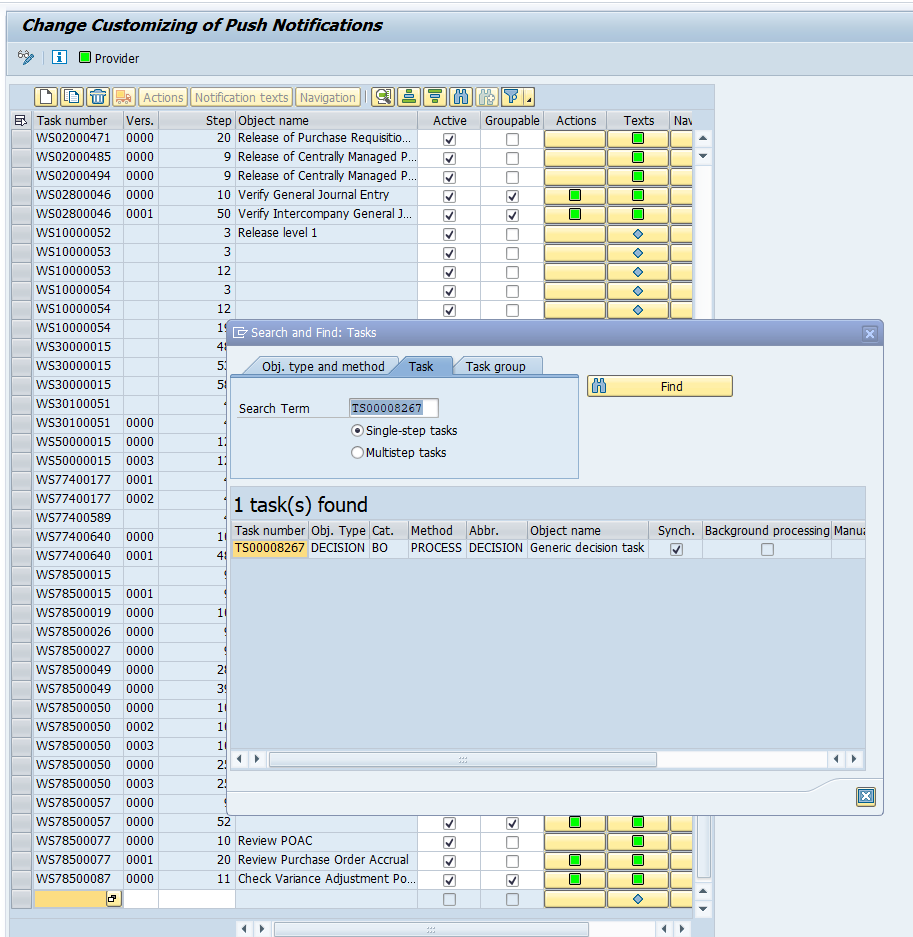
Go to transaction SWF_PUSH_NOTIF1 to add the workflow task for push notifications. We will add task TS00008267 (this is used in the generic workflow verification):

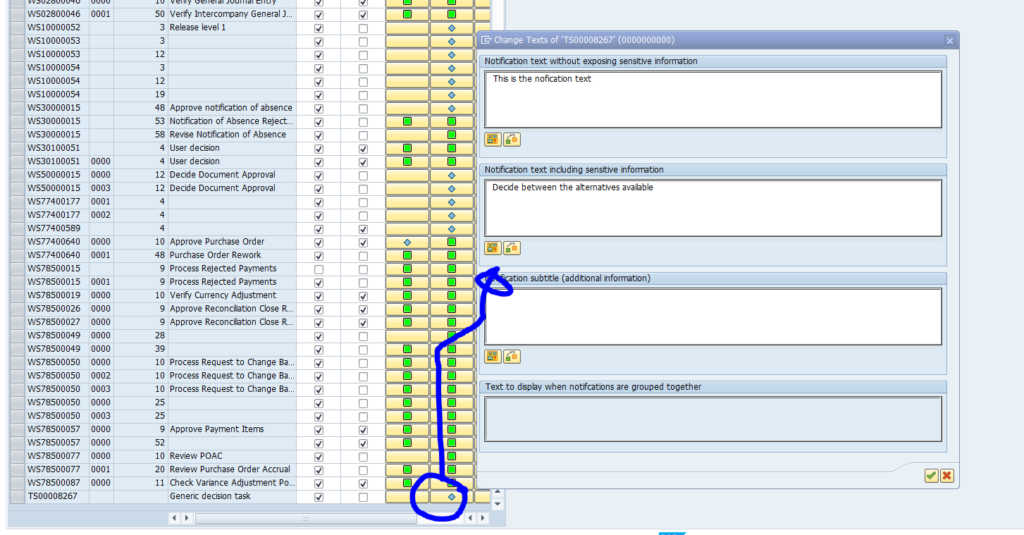
Click on the text icon to maintain the text:

Make sure that in the technical job repository SJOBREPO (see blog) that the jobs for deadline monitoring and push notifications are running:

Testing the push notifications

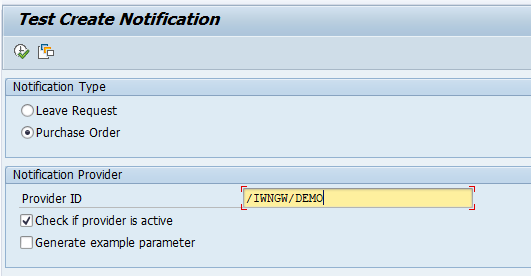
Now you can start the verification workflow in SWU3 (see blog) or start test transaction /IWNGW/BEP_DEMO:

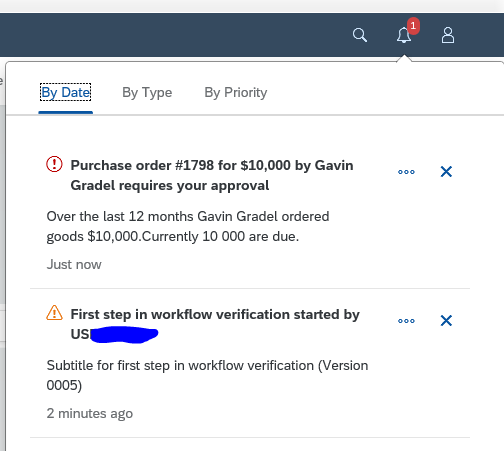
The results can be seen on the FIORI launchpad:

Notification icon not visible on the FIORI launchpad

If the notification is hidden, check the configurations in transactions /UI2/NWBC_CFG_SAP and /UI2/NWBC_CFG_CUST. It can be that an adminstrator has suppressed this function.

Background information

The minimum requirements for FIORI notifications are described in OSS note 2578256 – What is the minimum requirement for Fiori Notification?.

Configuration restrictions are listed in OSS 2729492 – Configuring notifications in Fiori Launchpad and known restrictions.

See this SAP help file on the topic for setup FIORI notifications.

See this SAP help file for notification channel troubleshooting.

See this SAP help file for end user tips & tricks with regards to FIORI notifications.

For custom development of FIORI push notifications, read this SAP blog.

For a very good and extensive full setup description for 1809 FIORI 2.0 description, read this SAP blog.

Formal OSS note for error analysis: 3358966 – Fiori Push Notifications are not created – Help for analysis.

Bug fix notes

FIORI cache refresh

After update of a FIORI app UI5 code you will sometimes face issues that the browser or server still holds components from the old app version. This issue is there for both custom developed and for standard SAP UI5 apps. The root cause is the caching at multiple levels to assure highest performance. There are caches on frontend browser, gateway server and backend server.

Questions that will be answered are:

  • What do I need to do on the browser for refresh?
  • How do I clear the caches on the gateway frontend server?
  • How do I clear the caches on the backend server?

When to perform all the cache refreshes?

The below full procedure of cache refresh at all levels is only to be performed:

  • When upgrading or applying support pack of SAP_UI component
  • When facing severe distortions on the UI that can’s be solved after browser cache

Background: the server cache refresh will invalidate all caches for end users. This means that all end users need to get the download the FIORI app again. Each FIORI app is between 5 to 15 MB large and takes time to download and render on the front end. This will take 10 to 60 seconds, during which the end users gets a full white screen.
Avoid cache refresh to keep happy users.
Only mandatory at support pack or upgrade.

Browser cache refresh

After an update of the UI code best to clear the browser cache. In Chrome also: open the application in chrome and use key combination ctrl + shift + R to perform a hard reload.

Or run in Private or Incognito mode.

Best browser for testing is Chrome.

Gateway and backend server cache clearing

Use the following sequence to clear all caches:

1. Execute /IWBEP/CACHE_CLEANUP transaction in ECC system (or other backend system) as well as Gateway system (this is program /IWBEP/R_MGW_MED_CACHE_CLEANUP) .

2. Execute /IWFND/CACHE_CLEANUP transaction in Gateway system with checkbox checked (this is program /IWFND/R_MED_CACHE_CLEANUP).

3. In the gateway system, you need to do the below steps:

  • Go to transaction SMICM
  • Click on ‘Goto’ menu bar button
  • Select option ‘HTTP Plug-In’ Select option ‘Server Cache’
  • Select option ‘Invalidate Globally’

4. Execute reports /UI2/INVALIDATE_GLOBAL_CACHES, /UI2/INVALIDATE_CLIENT_CACHES, /UI5/APP_INDEX_CALCULATE in front-end gateway system.

For the last program (/UI5/APP_INDEX_CALCULATE) you can do a delta or full for all or for a specific application.

Note on the cache cleanup: 2319491 – How to clean up the cache after applying changes that affect SAP Fiori apps.

Background

More background on caching can be found in OSS note 2626394 – Troubleshooting Fiori Apps Cache issue – how to information.

Other interesting OSS notes:

Bug fix notes:

S4HANA setup FIORI manage KPI tiles

Inside S4HANA there is a very powerful FIORI tile called the Manage KPI and Report function. This blog will explain how to setup this FIORI tile and how to make sure it is working properly.

It is assumed you have already enabled your S4HANA system for FIORI (see this blog).

Note: this blog will only explain the S4HANA 1909 and higher implementation. Previous versions of this functionality have more tiles and setup work.

Activating the Manage KPI and report function

Goto transaction STC01 and select task list SAP_FIORI_CONTENT_ACTIVATION:

In the task list select the business role SAP_BR_ANALYTICS_SPECIALIST:

Now run the task list and wait. If you have issues, please read this blog.

Assign then activated PFCG role SAP_BR_ANALYTICS_SPECIALIST to your user ID.

Checking the KPI and report FIORI tile

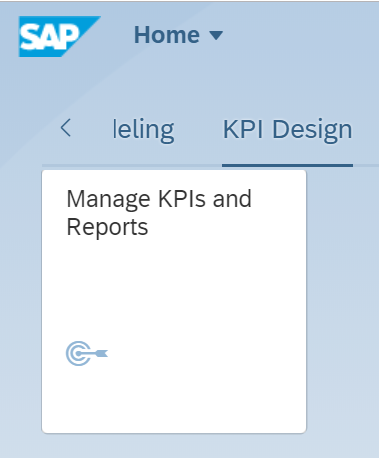
Start the FIORI launchpad (transaction /UI2/FLP) and check that the manage KPIs and Reports tile is now available:

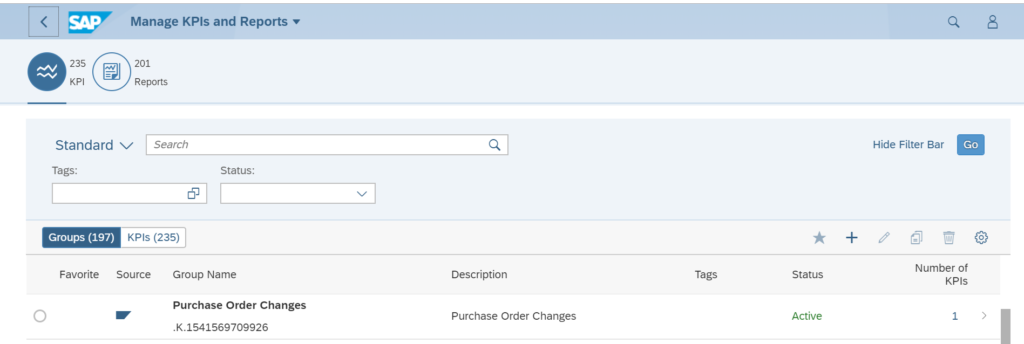
Click on the tile and you come into the first screen. Top left you can choose between KPI and Reports. We will first start with inspecting the KPI. We will use Purchase Order Changes as example:

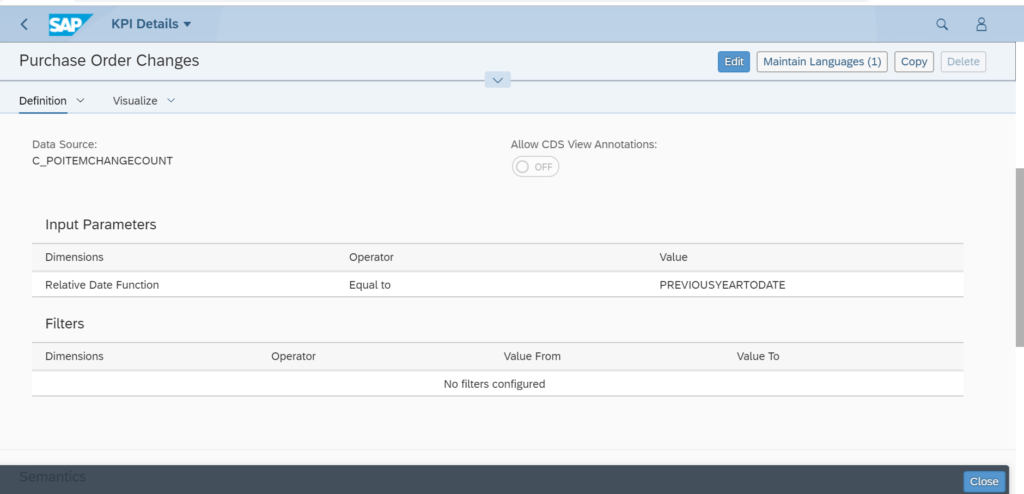
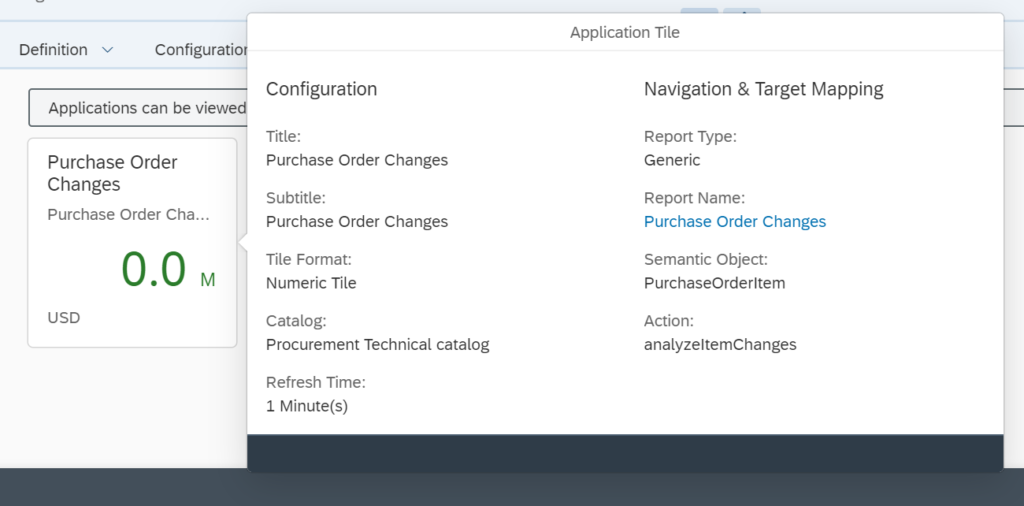
Details of the KPI:

Here you can see the Data source: CDS view C_POITEMCHANGECOUNT.

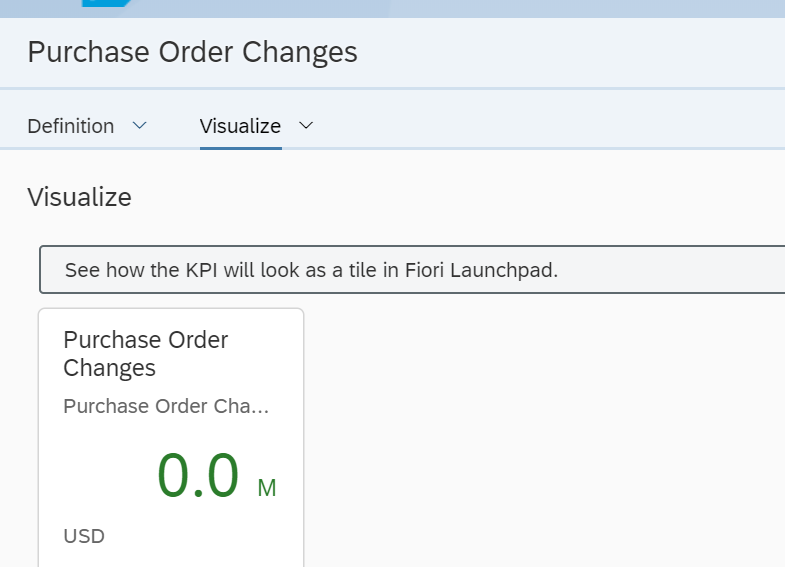
On the visualize tab you can see a preview of the tile:

Now we will inspect the report:

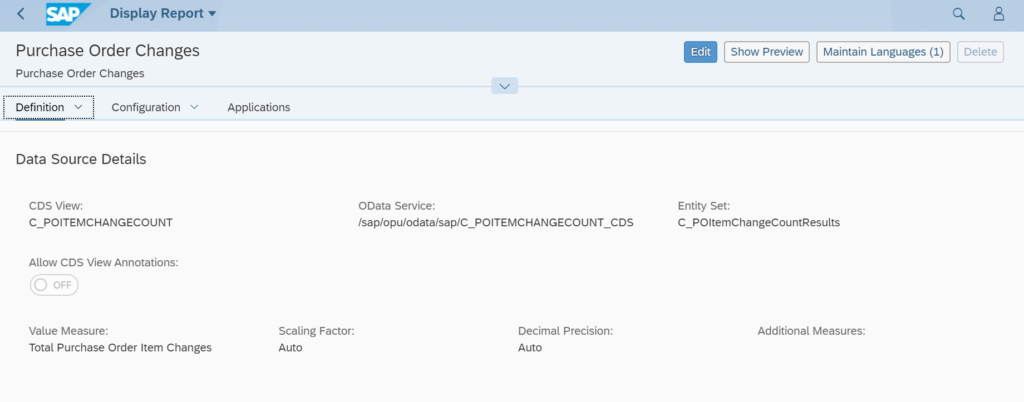
Here you can see it is a Generic Drilldown on the datasource C_POITEMCHANGECOUNT. Click to open the details:

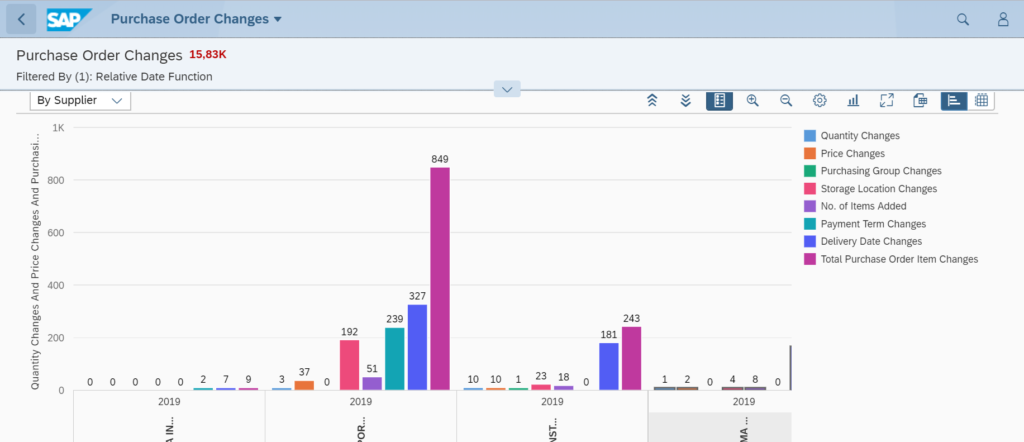
You can push the button Show Preview to get a preview of the report:

In the section application details you can see the details for the tile:

Very important here is the catalog it belongs to. In PFCG assign the correct business role to your user: SAP_BR_BUYER. You can find this role in the FIORI reference library documentation for this tile.

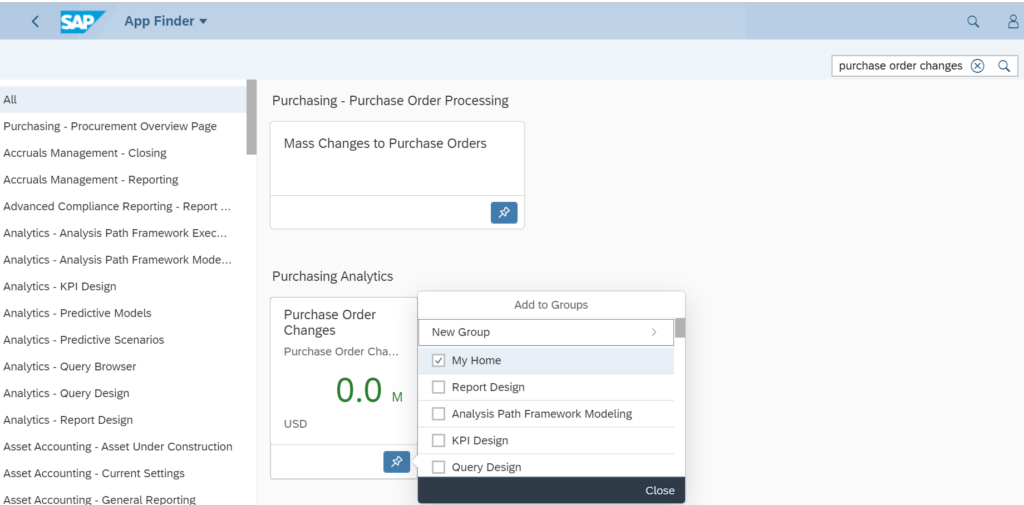
After the role is assigned, start the FIORI app finder and search for the app:

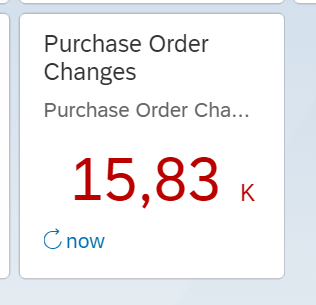
Now this tile should work:

Background information

There is an excellent OpenSAP course on this topic: link.

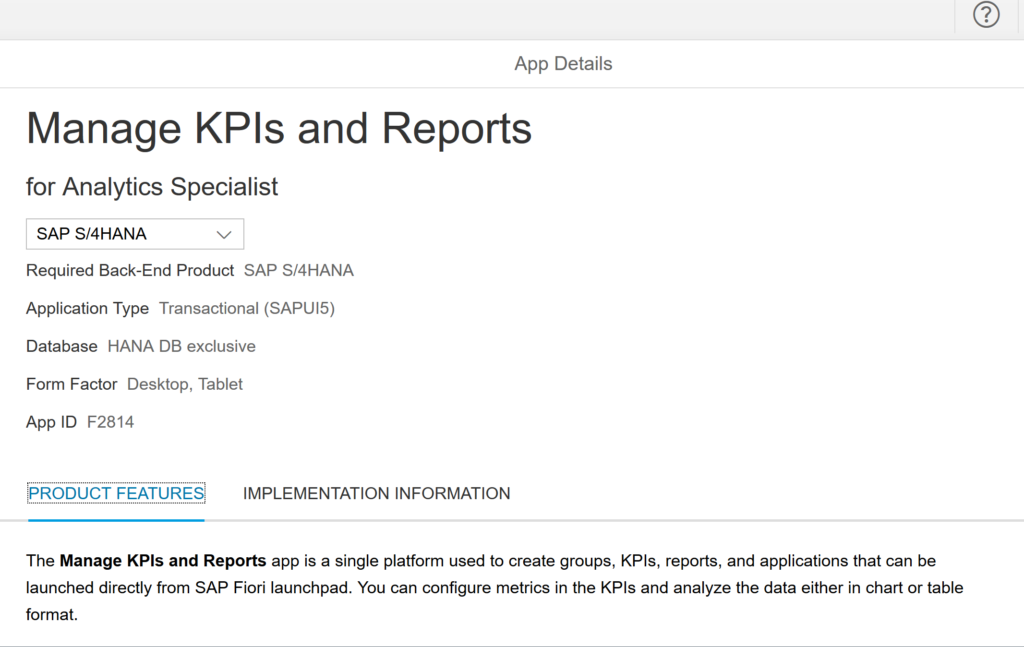
More background information can be found on the FIORI reference libary for the Manage KPIs and Report app:

S4HANA rapid activation of FIORI lighthouse apps

This blog will explain how you can execute a rapid activation of a set of FIORI lighthouse apps.

Questions that will be answered are:

  • Which apps can be used for rapid setup?
  • How to execute the rapid activation of FIORI lighthouse apps?

This blog assumes you have finished the basic activation of embedded FIORI on S4HANA, which is explained in this blog.

FIORI lighthouse apps

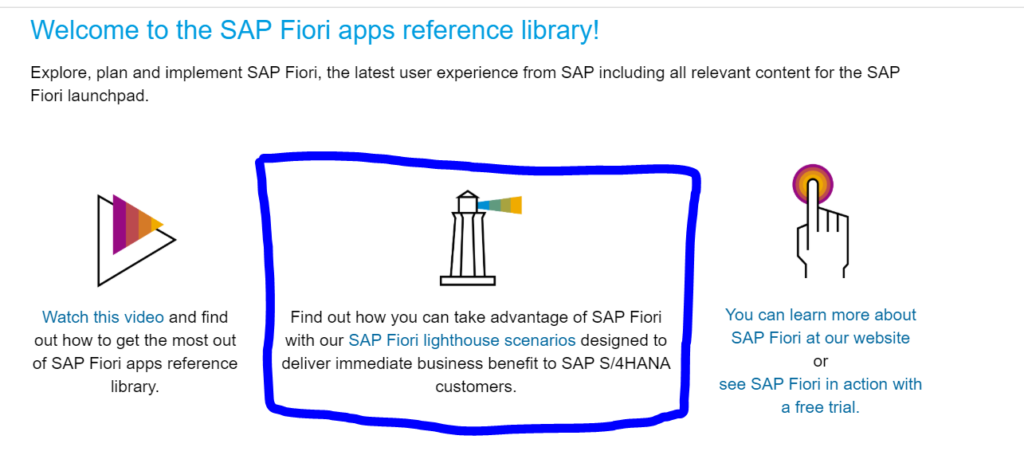
FIORI lighthouse apps are enabled for rapid activation. On the FIORI reference library site click on the Lighthouse scenario link to get a PDF full of all possible apps you can activate:

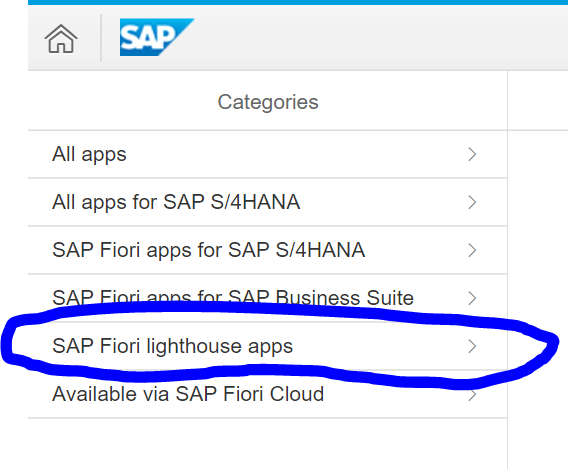
In the app finder you can also search for specific lighthouse apps:

Rapid activation of FIORI lighthouse app

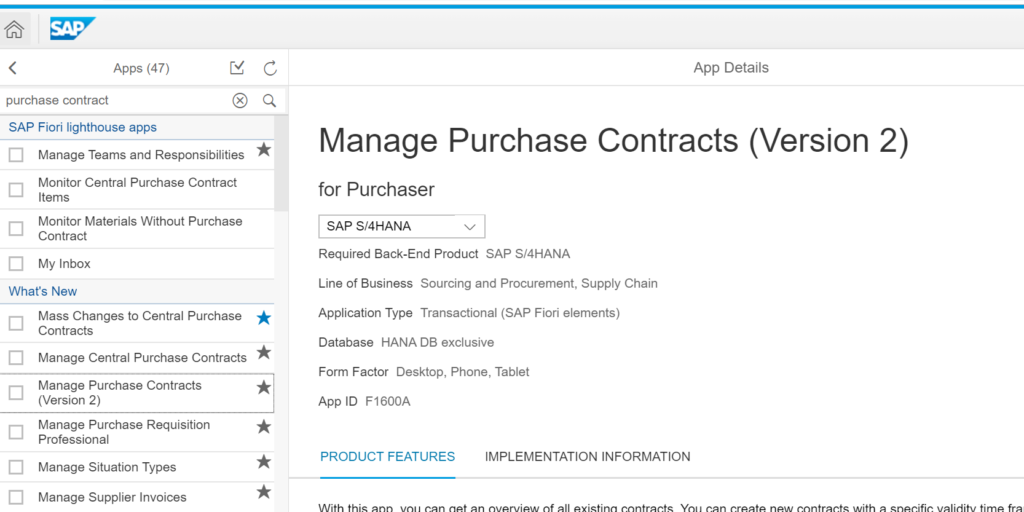
We will take the following app as example to execute the rapid activation: app ID F1600A: Manage Purchase Contracts (Version 2):

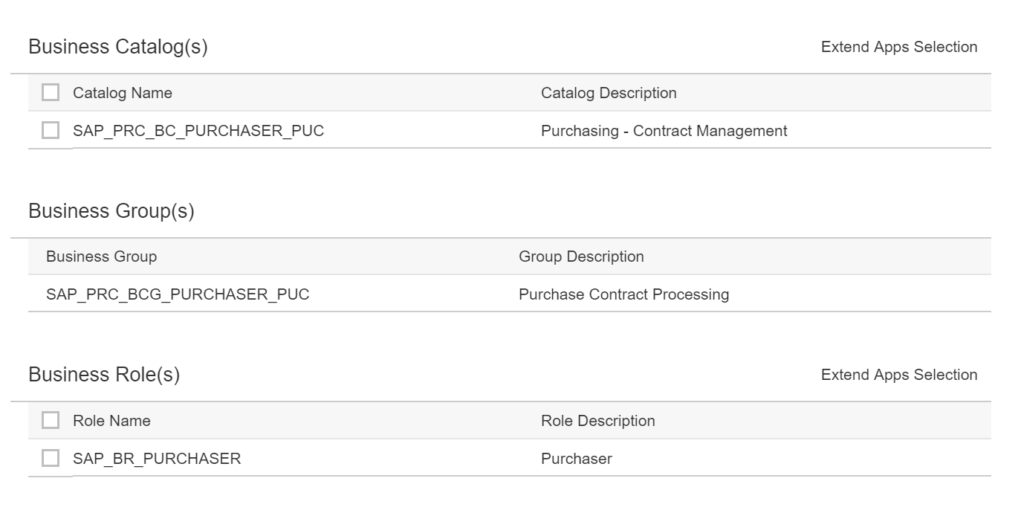
In the implementation information scroll down to the authorization information section:

For now you can ignore the catalog and business group. Important here is the business role: SAP_BR_PURCHASER.

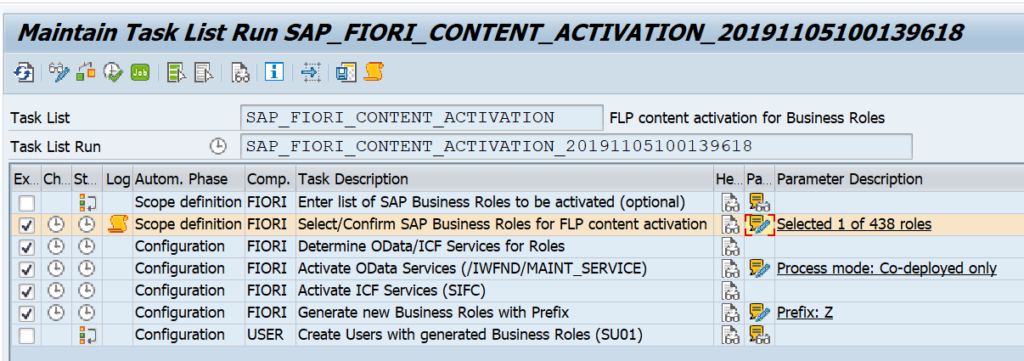
Go to transaction STC01 and select task list SAP_FIORI_CONTENT_ACTIVATION:

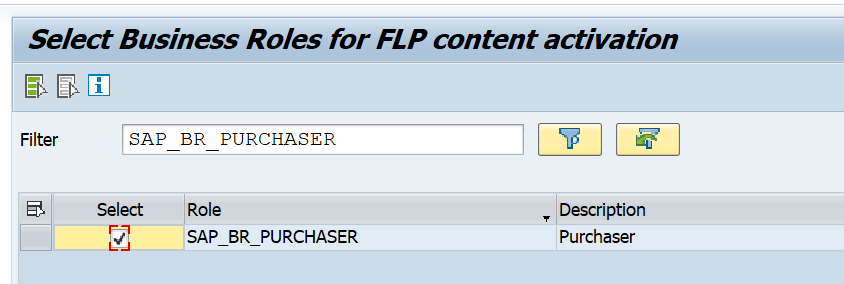
In the scope definition select the needed role SAP_BR_PURCHASER:

In the task list set the mandatory parameters process mode to co-deployment and Prefix to Z. Now start the task list execution and be patient. This might run up to 10 minutes.

This task list will now activate all ODATA services for the app group (not only for this single app, but the complete group!). It will activate all SICF nodes for the app group (yes, again the whole group). And it will generate the PFCG authorization role SAP_BR_PURCHASER.

If the task list is finished, assign the role SAP_BR_PURCHASER to your user ID.

Content activation for catalogs

For some scenarios it might be needed to activate catalog content. To do this, first apply OSS note 3339909 – Fiori Setup: Content Activation for Catalogs. This note delivers STC01 task list SAP_FIORI_FCM_CATALOG_ACTIVATION.

Testing

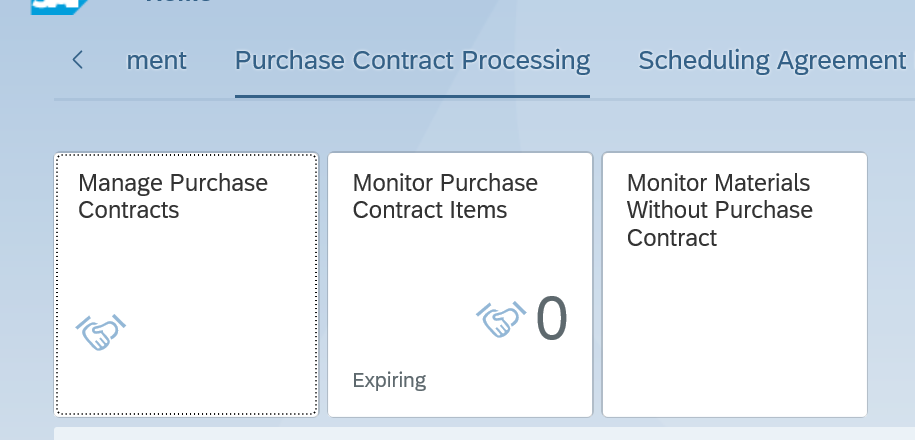
Start the FIORI launchpad (transaction code /UI2/FLP):

You see that the tile Manage Purchase Contracts is visible. Since we activated a complete group, also the other tiles are immediately visible.

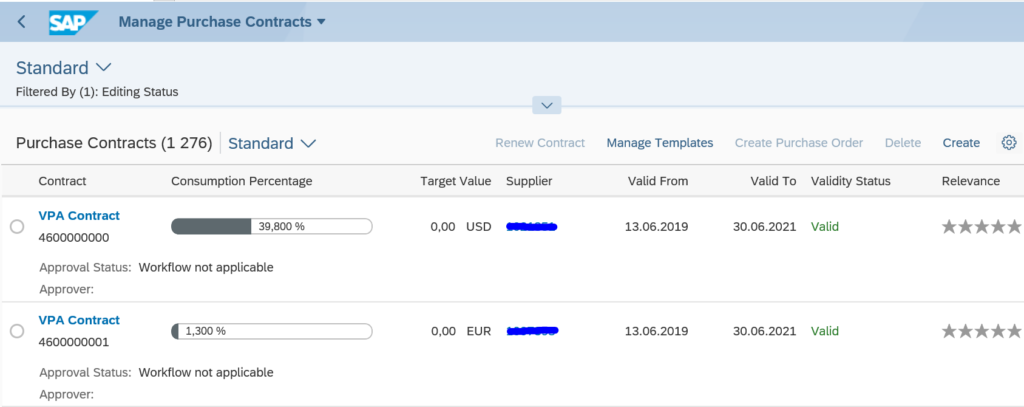
Clicking on the Manage Purchase Contracts tile gives immediate result:

This shows we can activate complete group of apps that immediately work, with minimal effort.

Issue detection

You can use the FIORI app support function to quicly analyze an issue in your newly activated FIORI app. Read more in this blog.
In app extensibility
All the FIORI lighthouse apps are built for in app extensibility. This allows you to change the look and feel of a standard SAP app and to add custom fields to standard SAP app. Read more in this blog.

Transport and activation after transport

After transport everything is present, but in inactive state. You need to perform the activation after transport.

OSS note 2886433 – Fiori Setup: Activation of OData Services in Prod Systems with task lists contains a perfect PDF that describes how to carry out the activation in a productive system using the proper selections in the task list.

Embedded activation and system refresh

If you refresh your sandbox, quality or development system with production copy, read this note 3111069 – Task list clarification post System copy/System Refresh in Embedded deployment on activation of embedded FIORI after the refresh.

OSS notes

Background OSS notes:

Bug fix notes to apply:

S4HANA setup FIORI my Inbox app

If you have followed all the instruction in the blog about embedded FIORI activation in S4HANA, you will find that the my Inbox app is still not working.

This is correct since extra steps are required to setup the FIOIR my inbox app. This blog will answer the following questions:

  • Which extra steps to perform to activate the FIORI my inbox app?
  • Where to find more background information on the FIORI my inbox app?

Basic setup of FIORI my inbox in S4HANA

After you have finished the embedded FIORI activation in S4HANA (see blog), you must follow the extra steps in OSS note 2902673 – Rapid Activation for SAP Fiori in SAP S/4HANA – Overview. This note refers to specific version like 2834415 – Composite SAP note: Rapid Activation for SAP Fiori in SAP S/4HANA 1909. In this note there is a special section on the extra steps to activate the myInbox.

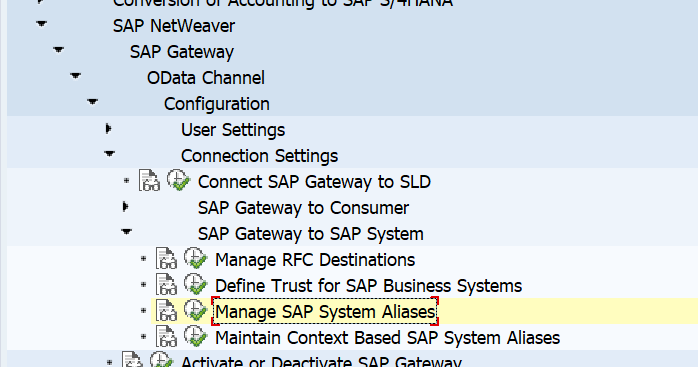
Goto the following customizing tree entry:

Now setup an extra system alias, name can be freely chosen:

It is very important here to notice 2 things:

  1. The local GW (gateway) tickbox must be set
  2. The software version MUST be set to /IWPGW/BWF

In transaction /IWFND/MAINT_SERVICE activate the service TASKPROCESSING version 2 for the system alias you just created.

It is very important to take version 2 and not the version 1.

In SICF activate the FIORI inbox tile itself: CA_FIORI_INBOX.

In PFCG activate role SAP_BR_MANAGER and assign it to your user.

MyInbox app

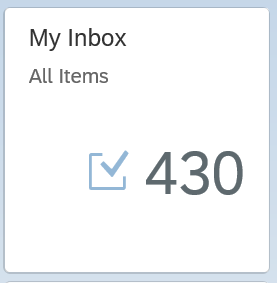
Now goto the FIORI launchpad (/ui2/flp transaction) and the MyInbox tile should be visible with the number showing you the amount of workflows:

If you see the number zero, you might not have any workflows assigned to your user. See the blog on S4HANA workflow activation to make sure the workflow system is properly activated and instruction to generate some test items for you.

Background information

The best source of public information is the SAP wiki on myInbox.

Official SAP note: 2676990 – Release Information note for SAP Fiori My Inbox. (this note contains the list of patch notes for the My Inbox FIORI side).

Release information note, which refers to patch notes: 2221151 – Release Information note for SAP Fiori My Inbox 2.0.

Specific useful notes on how-to OSS note for my Inbox FIORI app :

Activating and using the S4HANA custom code migration FIORI app

This blog will explain about the S4HANA custom code migration FIORI app. Questions that will be answered in this blog are:

  • How to set up the S4HANA custom code migration app?
  • How to run the S4HANA custom code migration app?
  • How do the results of the S4HANA custom code app look like?

Activation of the S4HANA custom code migration FIORI app

The custom code app official specification can be found on the FIORI reference library.

First make sure the basis setup of embedded FIORI in general are done on your S4HANA system. See this blog for background.

And make sure the ATC settings for S4HANA code migration are done. See this blog for background.

All the prerequisite notes for the tool itself are listed in OSS note 2436688 – Recommended SAP Notes for using S/4HANA custom code checks in ATC or Custom Code Migration app.

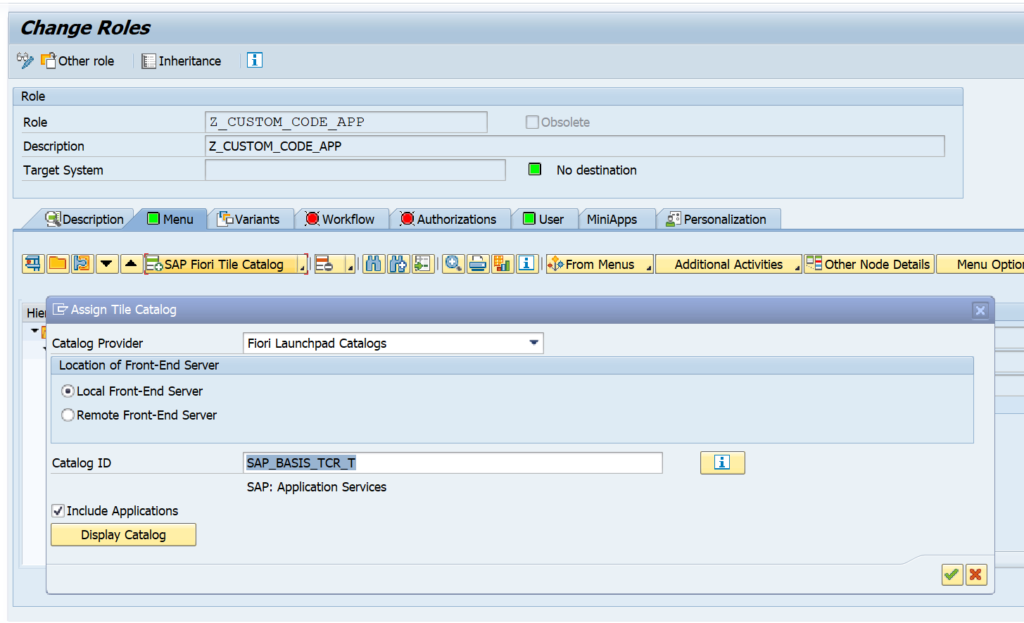
Next step: in transaction PFCG create a new role (for example Z_CUSTOM_CODE_APP). Add catalog SAP_BASIS_TCR_T as a launchpad catalog:

Save and activate the role. Assign the users to the role.

In transaction /IWFND/MAINT_SERVICE add the following services (and activate them):

Component External Technical Name
Custom code migration projects SYCM_APS_C_PROJECT_CDS
Analysis of SAP S/4HANA custom code check findings SYCM_APS_C_ATC_FIND_ALP_CDS
Custom code scoping by request entry points SYCM_APS_C_SCP_BY_EP_CDS

Custom code scoping by packages SYCM_APS_C_SCP_BY_PK_CDS

In transaction SICF activate the following nodes:

NW_APS_CCM_PRJ

NW_APS_EXT_LIB

NW_APS_LIB

The core activation actions are now done.

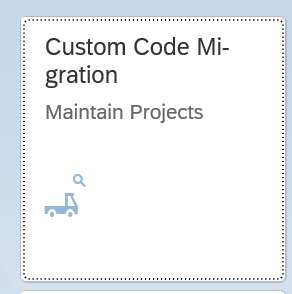
Start transaction /UI2/FLP to start the FIORI launchpad. You will not find the tile. Change the homepage and add the following tile from the catalog:

Before starting, make also sure that in ATC setup the RFC object providers are setup:

You can name the ID, description and group ID the same if you want. Make sure to use RFC destination none.

Creating a project in the app

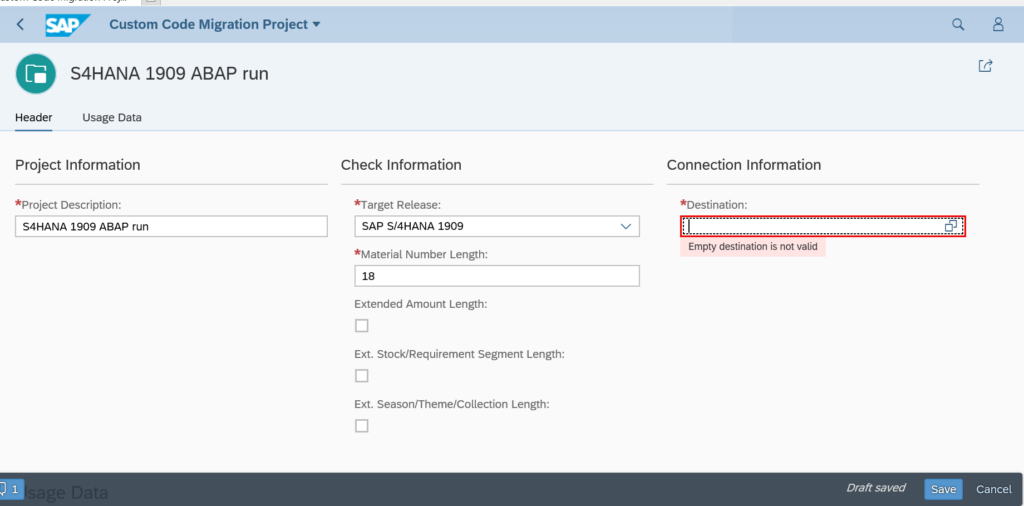
Now you can start creating a project in the app. Click on the + symbol to add a project;

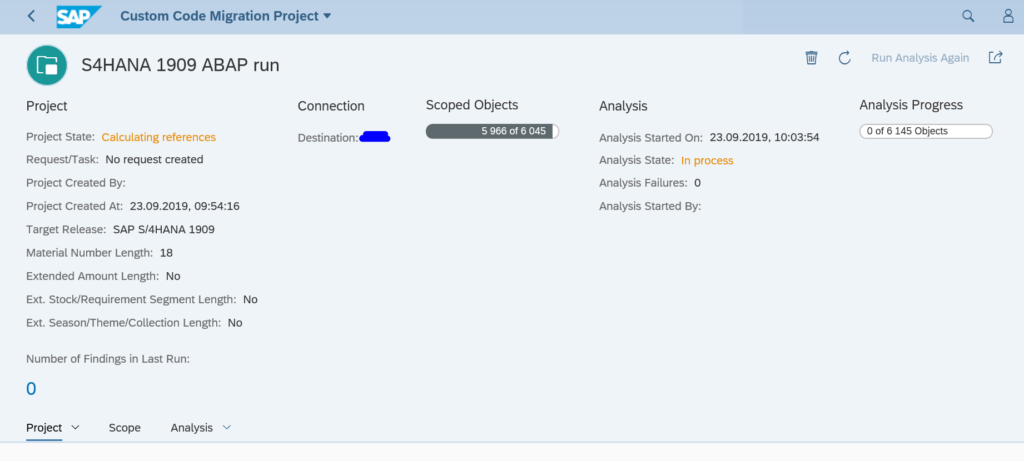
In the destination fill out the system you have put into the ATC object provider configuration. Than save the project and let it run. In the background the full ATC check is now carried out. This can take some time. You can refresh the project to see the status:

Scoping the results

In the scope block you can exclude packages by clicking on the Change scope button:

Packages that might be excluded:

  • Z packages from SAP
  • Z packages from 3rd party tools

Analyzing the results

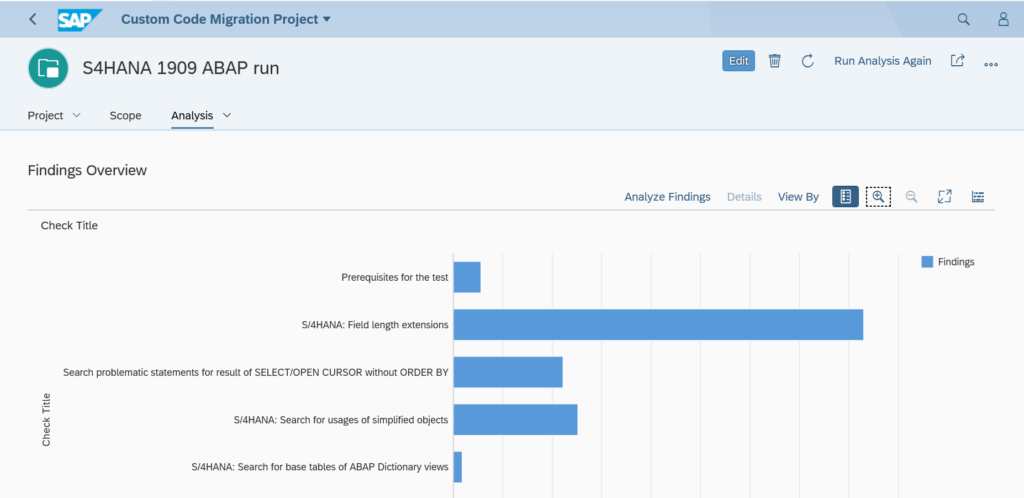
When the run is done, you can now analyze the results on the Analysis tab:

A bit below on the Analysis tab is the burn down chart:

For the burn down chart you need to run the custom code run again on several days. Check for tool issues and solve them. Solving tool issues makes the amount of issues go up as you can see on the sample screen above.

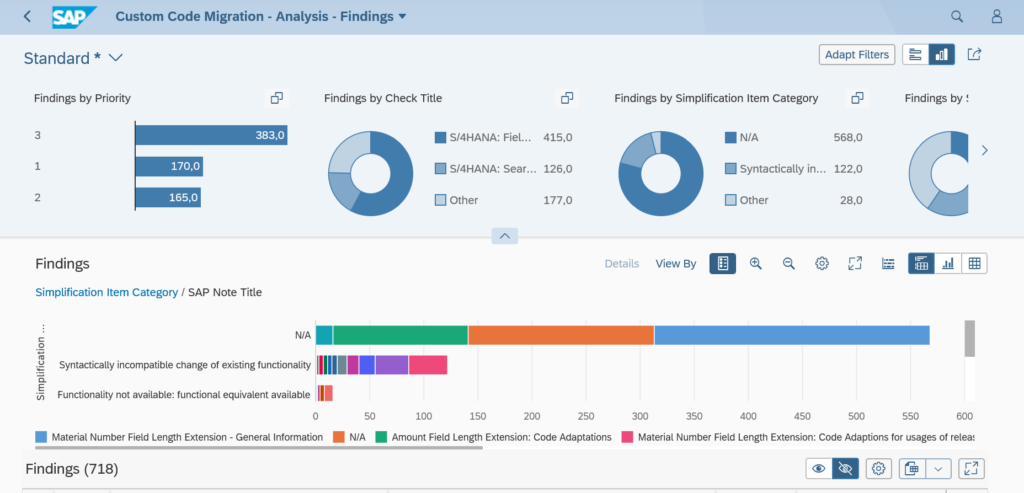
Important here is that you have to press the Analyze Findings button to go into the detailed analysis overview:

On the top are the graphical overviews. In the bottom is the detailed list:

You can use the download to excel button for further processing.

During the custom code clean up you can redo the same project, by rerunning the analysis. Or you can decide to run a new project.

Link to Eclipse

For the link to Eclipse to work, each developer must allow this on his Eclipse settings. Follow the instructions in OSS note 2934945 – “Open in ABAP in Eclipse” in Custom Code Migration APP.

Including usage data from productive system

You can also add actual usage data from a productive system in the custom code management app. See this blog.

Known issues and bug fixes

For UI bugs check OSS notes:

Activating S4HANA embedded FIORI

In S4HANA FIORI tiles are used a lot to replace traditional SAP GUI transactions.

This blog will explain how to setup the basic embedded FIORI activation and how to activate business roles for demo purposes.

Questions that will be answered in this blog are:

  • How to set up embedded FIORI in S4HANA?
  • How to activate business roles and its tiles?
  • Where can I find more background information on the activation?

Basic activation

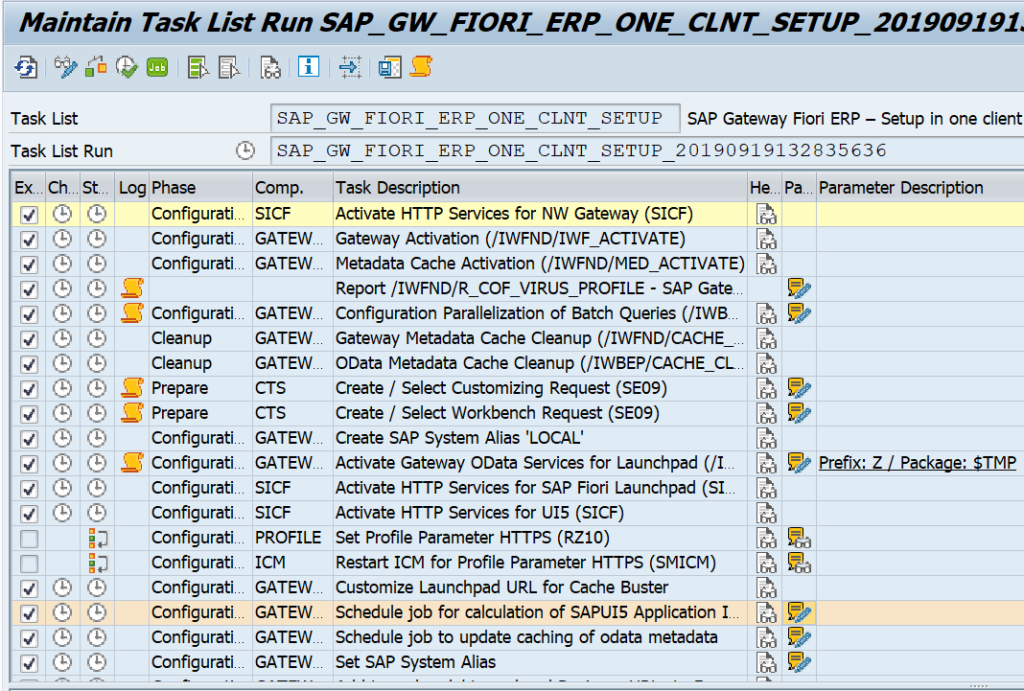
We will start with the basic activation. Start, via transaction STC01, task list SAP_GW_FIORI_ERP_ONE_CLNT_SETUP:

Fill all the parameters and let it run. Fix any issue that pops up.

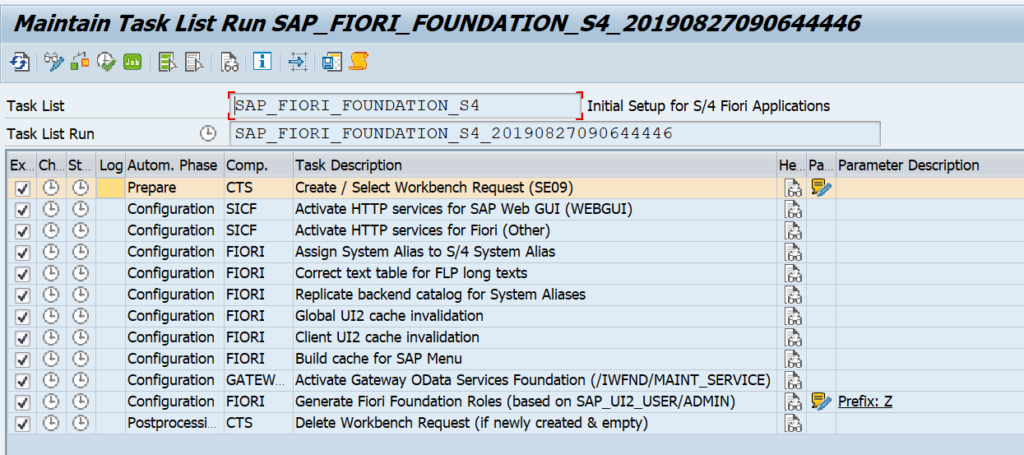
When this is done in STC01 select task list SAP_FIORI_FOUNDATION_S4 (background note of this task list 2712785 – Fiori Setup: Initial Setup for Fiori Applications S/4):

Go into the details:

Fill out the parameters and start the task list. Be patient and let it run.

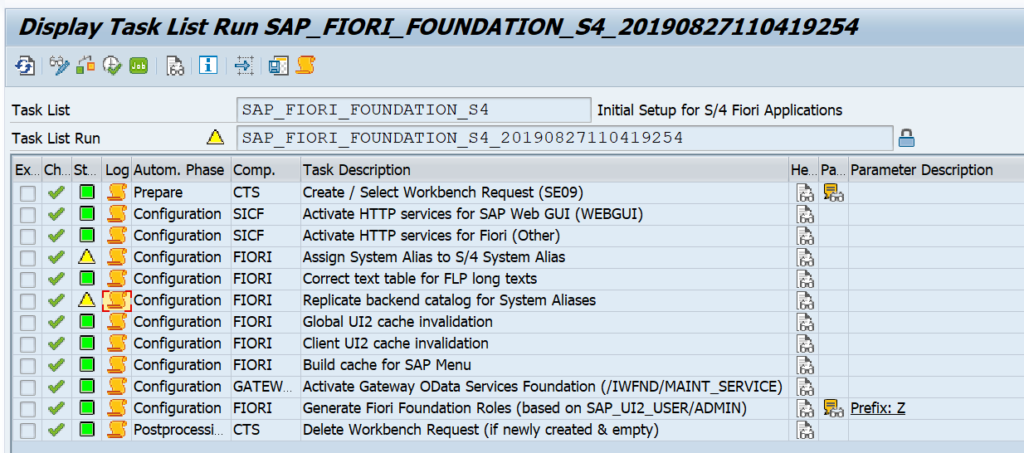
End result should be all green:

Now the basics are done. You can start to launch the embedded FIORI UI with transaction code /UI2/FLP.

If you have issues with login, please check this OSS note 2773732 - Fiori Logon page loads incorrectly in SAP_UI 752 or S/4HANA 1709.

The launchpad will be empty since you have no roles and tiles attached to your user.

Content activation of business roles

In the FIORI reference library you need to search for the role you want to activate.

Before activating roles, please make sure you have enough shared objects memory (RZ11 parameter abap/shared_objects_MB). Otherwise you wait very long to get this error:

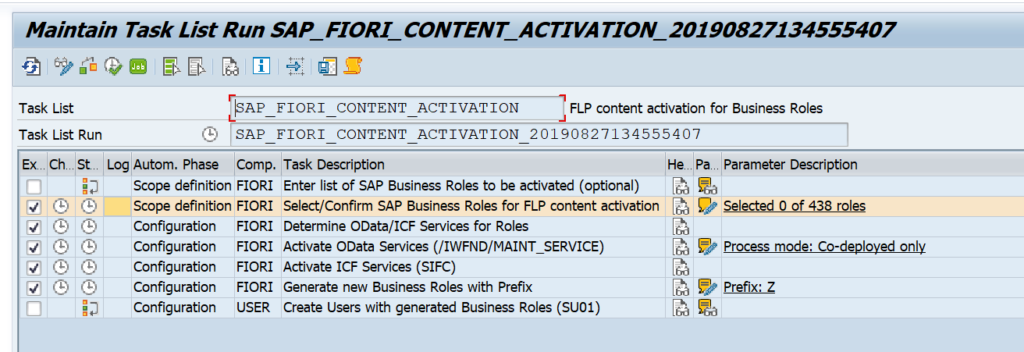
To activate content role start transaction STC01 and select task list SAP_FIORI_CONTENT_ACTIVATION:

Task list look like below:

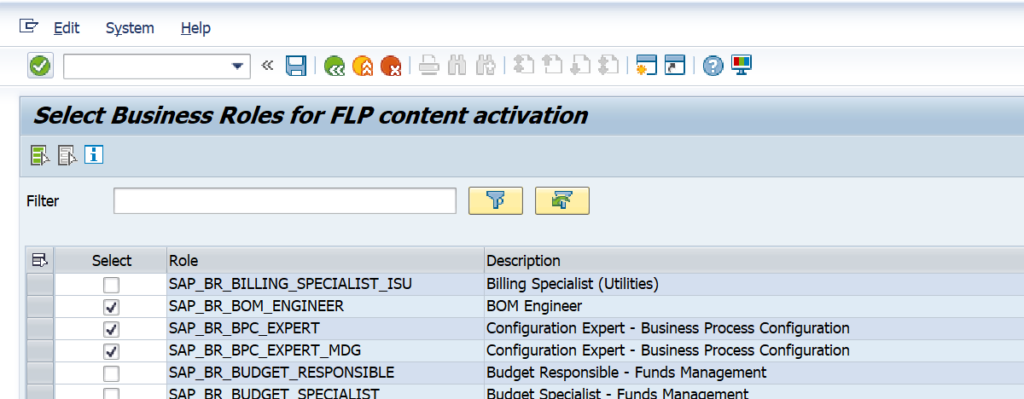
In the select SAP business roles for FLP content activation select the wanted business roles:

You might be tempted to select all or a lot: don't. Only select 2 to 5 maximum each time. The unpacking and activation is an intensive long running process.

Now let the task list run (be patient). If the task list run is completed, assign the generated PFCG BR roles to your user ID. Now start FIORI launchpad with /UI2/FLP and the tiles should be visible and working.

Search setup

Most FIORI apps use the S4HANA embedded search function. See this blog for setup of search.

FIORI notification setup

For setting up FIORI notifications, read this dedicated blog.

FIORI Health Check

Apply OSS note 2925879 – Fiori Setup: Heath Check. This delivers STC01 task list SAP_FIORI_HEALTH_CHECKS. Then run the task list:

Check the red logs for issues.

Background information

Not all tiles will work via this procedure. Some tiles have exceptions or additional work to do. The additional work and generic background information of S4HANA embedded content activation can be found in OSS notes:

Similar notes exist for different older versions. The generic OSS note is 2902673 – Rapid Activation for SAP Fiori in SAP S/4HANA – Overview.

A good background blog on embedded FIORI content activation is this blog.

Other OSS notes:

HTTP/2 support for SAP FIORI

HTTP/2 is the successor of the HTTP 1.1 protocol. It has some performance advantages. The main advantages are the capability of multiplexing and server push. The HTTP/2 protocol was designed for faster page loading even when having longer latency times.

Questions that will be answered in this blog are:

  • Where can I find more background on the HTTP/2 protocol?
  • Are there any pitfalls and prerequisites?
  • How do I switch on the HTTP/2 protocol on my FIORI server?

More background on HTTP/2

More background on HTTP/2 as protocol can be found on wikipedia or on this link from google.

Prerequisites for HTTP/2 protocol

The prerequisite for support of the HTTP/2 protocol for FIORI and other ABAP web applications is a sufficiently high version of the ABAP stack and webdispatcher (if in use): NetWeaver Gateway version 7.51 or higher, Web Dispatcher 7.49 or higher. The HTTP/2 protocol also has higher security requirements and does require COMMONCRYPTOLIB version 8.4.31 or higher.

How to switch on HTTP/2 protocol support?

In the ABAP system parameters RZ11 switch the parameters icm/HTTP/support_http2 to value TRUE. This can be done dynamically. In Google chrome developer tools the UI developer can see the usage of HTTP/2 protocol (on http call right click on the call to show the Protocol field as well).

If you are using web dispatcher set parameter icm/HTTP/support_http2 to value TRUE as well as wdisp/support_http2_to_backend to TRUE.

Kernel patch

The HTTP/2 protocol implementation is done on kernel level. If you want to switch on the HTTP/2 protocol on your systems, do check the OSS notes with the keyword icm/HTTP/support_http2. You might see there are a few kernel patch OSS notes (using component BC-CST-IC) that solve issues in your area that you use. In case of issues in a productive system with HTTP/2: switch the value of icm/HTTP/support_http2 back to FALSE.

Background information

More background information: SAP blog and this SAP blog.

More on FIORI performance

More tips on FIORI performance can be read in this blog.

HANA XS

For HANA XS check OSS note 3086998 – HTTP/2 Support in SAP HANA Extended Application Services.

ANST for webapplications and FIORI

In the blog on ANST we focused on searching notes for ABAP GUI applications. This blog will focus on web application that run ABAP code in the backend (such as FIORI, BSP, webdynpro for ABAP).

Questions that will be answered in this blog are:

  • How do I use ANST for web applications?
  • What do I need to do to prepare my system for this?
  • What do I need to do for using ANST for FIORI back end recording?

System preparation for ANST for web applications

First you need to follow the instructions in OSS note 2286869 – ANST: Trace On/Off error “Dynamic Start and Stop cancelled by user” to get rid of the trace error. Unfortunately this note is not really clear. The short instruction on what to do follows now. Go to transaction FILE and search for the ANST_TRACES_GLOBAL. It should look like this:

ANST delete assignment of paths

Then select the logical file definition and delete the line for Physical path. Should look like this:

Now we are good to go for the web part recording, but not yet for FIORI.

ANST for FIORI

To use ANST for FIORI you first need to install OSS note
2605555 – ANST: Enahcement to support Fiori applications
. Please follow also the manual steps in the note very carefully.

Tip: this note contains a very good PDF attachment as manual for ANST.

Run ANST for web application

Running ANST for web applications is not very much different from running on SAP GUI. Upon start of the ANST tool select your web application (which is bit different per application):

ANST FIORI

After you now start with Execute you get a popup screen to confirm recording start:

ASNT FIORI start

After pressing start your web browser will start and you can perform the actions you want to trace. To stop go back to the ABAP screen and press the Stop Recording button:

ANST FIORI stop

The rest of the ANST processing is the same as usual.

Reference OSS notes

Reference and bug fix notes: