Direct table maintenance versus transport

Some standard SAP tables are delivered by SAP as customizing tables with transports, but which are logically and business wise application tables and are maintained directly in production by business people. Example is the currency exchange rate table.

This blog will explain the option and best practices to overcome this.

Questions that will be answered:

  • What are current settings and how does it work?
  • When and how to de-customize a standard SAP table?

Current settings

Current settings is bit of hidden feature in SAP systems. Per customizing object you can select if it is using the current settings option or not.

To do this, start transaction SOBJ and select the customizing object or table. The current setting flag is indicated on the example picture below for the currency conversion rate table:

Direct table updates Current settings

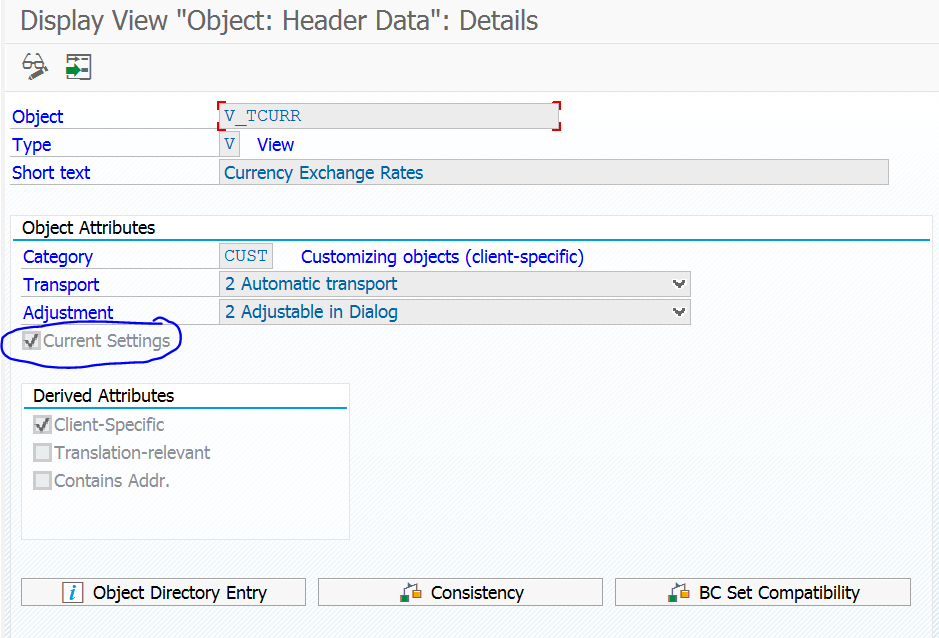
The effect of the Current Settings is as follows: if the system client in SCC4 is set to “Productive” the transport flags are ignored, and the user can directly update the table and save the changes without transport request popup.

On a development or quality system the “Productive” setting is not there and the SAP system will prompt you for transport request. Especially on quality systems this can be quite annoying.

The current settings is therefore only a solution for tables that you and the business want to maintain directly on production, and not on a development and quality system. Background note on this side effect is 356483 – In test system, behavior of customizing objects which are editable in production i.e. Current Settings.

See OSS notes 2336175 – SPRO | modifiable | unwanted, 2442887 – SOBJ | How to assign object attribute Current Settings to a maintenance object or 3138477 – SM30 | SPRO | Client XXX has status ‘not modifiable’ | Client role Production for a full instruction.

De-customizing a customizing table

If you want a customizing table to be maintainable directly on development and quality systems, without transport request, you have to de-customize the customizing table.

Always ask for approval for procedure below and document the tables for which this procedure was applied. Pending on your business security and regulatory requirements more approvals and documentation can be needed.
The de-customization procedure

Step 1 starts with transaction SE11 to call up the table. This you have to doc in the development system. In the delivery and maintenance tab the delivery calls normally shows as type C (customizing).

Direct table updates Before customizing

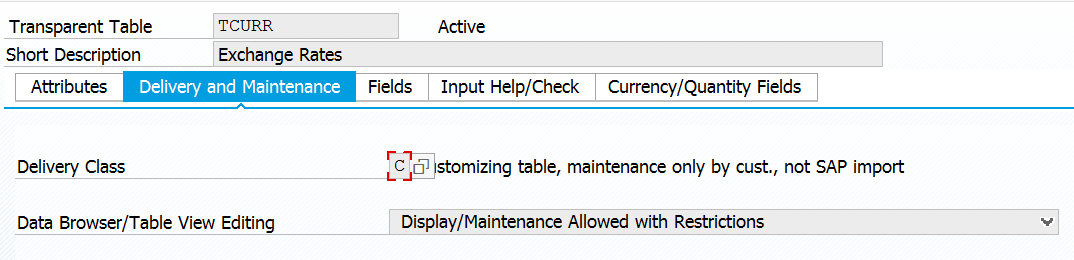
Now edit and change it to type A (application):

Direct table updates After application

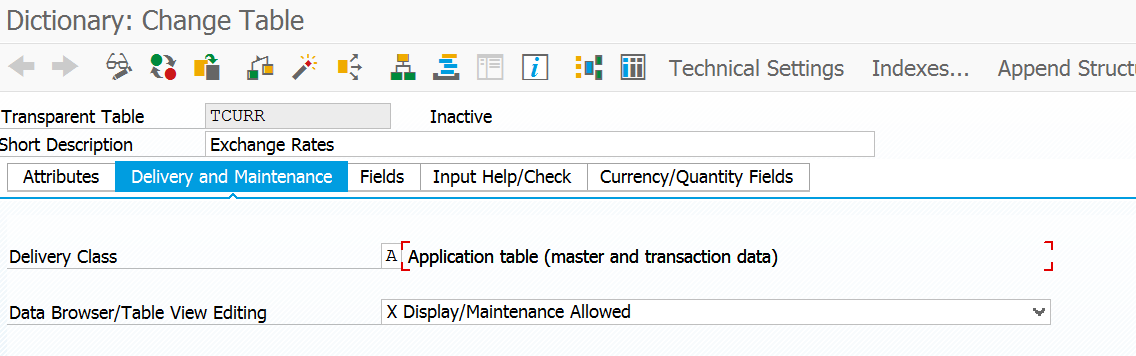
In most cases this will do the trick. The change itself you have to put in a transport request.

Step 2 would be to re-generate the maintenance view and de-activate the recording routine. This should look as shown on picture below:

Direct table updates check recording routine

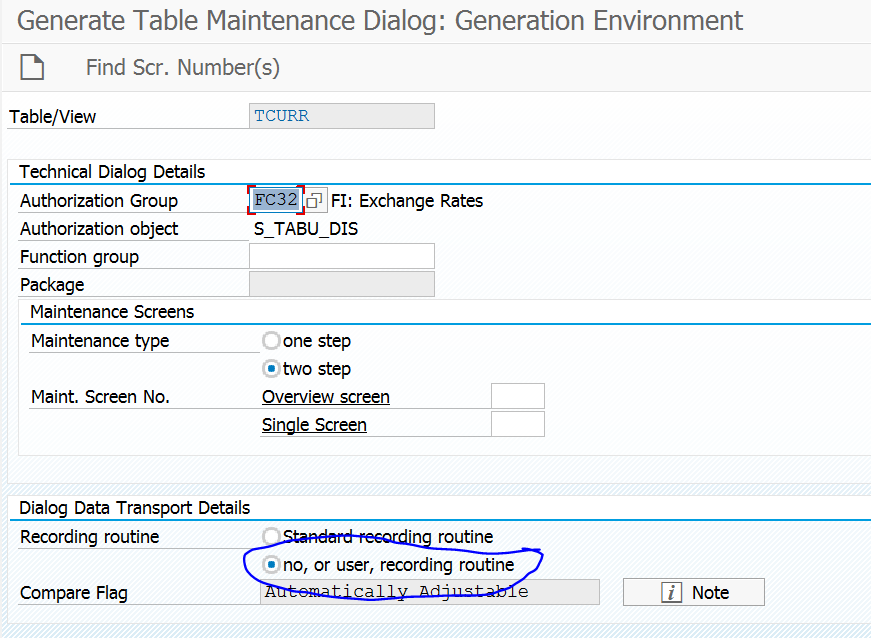
Also this change must be executed on development system and must be put in transport request.

Step 3 is to move the transport request into the quality and later productive system.

See also OSS note 3139583 – SPRO | SM30 | SM34 | SV138 Check maintenance object xxx or update function group xxx.

Special cases

Below is a list of special cases and exceptions.

CO allocation cycles (KSU1 etc)

Via the procedure described in OSS Note 853601 – “ALLOCATION: Deactivating the automatic transport” you can leave all the allocation tables as-is and don’t need to apply the de-customization procedure or current settings.

RSA1 settings to avoid transport popup for BI objects

Some settings in RSA1 like process chain starters you want to set locally per system. Default SAP asks you for a transport. In RSA1 you can overrule this. Select Transport Connection on the left hand side. Then select the button Object Changeability on top. In the popup right click on the Not Changeable and set it to Everything Changeable for the items that you don’t want a transport popup to come.

RSA1 local settings

Save your data.

SAP reference: click here.

Set up custom IMG node

As customer you will sometime have the need to setup your own customizing tables. These tables you create in SE11 and mark them as customizing tables, which means all updates must be done in development system and are put in transport. This own customizing table can then be called from your custom programs, user-exits and enhancement points.

Managing these custom tables becomes increasingly difficult over the years. An elegant solution for this is to create your own IMG customizing setup and corresponding documentation. This way you can easily track which customizing custom tables you have and for which reason.

This blog will answer following questions:

  • How to set up a custom IMG customizing tree?
  • How to link the tree into the real SAP customizing tree?
  • How to link the IMG entry to your customizing table?
  • How to document your custom IMG entry?
  • How to deal with issues in SAP IMG?

Preconditions for Z table

Your Z customizing table must have the following to be easily integrated into a customer IMG:

  1. Table has technical delivery class Customizing table
  2. Log Data Changes option is set to true in Technical Settings of the table
  3. Table maintenance generation has been done and table can be maintained in SM30

Setting up the custom IMG node as part of the SAP reference IMG

SAP has two ways of setting up extra IMG nodes:

  1. Via transaction S_IMG_EXTENSION
  2. Via transaction SIMGH

Best way is via S_IMG_EXTENSION. After an upgrade IMG is renewed and SAP might overwrite your own entries. When using the S_IMG_EXTENSION option SAP puts your entries aside and you can re-merge them after the upgrade.

After starting S_IMG_EXTENSION, you come into an empty screen. First you select the main IMG structure “SAP Customizing Implementation Guide” you want to enhance.

Next you need to create a custom Enhancement ID by clicking on the empty Enhancement ID search help. On the subsequent search screen click the Create button:

Custom IMG create enhancement ID

Attention: put the Enhancement ID generation into a real transport and not into $TMP
Tip: after selection of the IMG structure node put it into your favorites list:
Custom IMG set favorite

On the main screen you now can select the new Enhancement ID. Then pushing the Enhance Structure button will bring you to the change screen of the IMG structure.

In here you select the node position where you want to add. Then select to add a structure node:

Custom IMG create new folder

The node is nothing more than a menu entry. You can add nested ones as well. Give the node a good descriptive name.

After the creation of the node, select it. Now you can add an activity as subnode.

On the first screen of the creation of the subnode you have to give the node an ID and a name. On the assigned documents you also give the document a name.

Custom IMG create new entry first screen

If you push the Create button you go to the maintenance of the IMG node help text:

Custom IMG custom help text for IMG node

This is the place to document the reason of your extra customizing table, how to fill it, and for example list all the user-exits and enhancement spots from which the table is called.

On the Maint.Objects tab we finally can link the real table.

Custom IMG img node to customizing table

In the customizing object enter the Z table (in this example case the Z table is called  ZZCUSTLINK). For maintenance type use SM30.

Save this entry and save the changes to the tree enhancement and you are done.

End result

Start the normal SPRO transaction and you can have a look at the end result:

Custom IMG end result

You can launch your customizing and see your documentation.

Tip: do spend time on listing your tables into chapters and also spend time on the help text. This can save you lots of time. After 6 months, you normally would not remember the peculiar things of this Z table and why it was needed and how it should be used. You are happy then you properly documented it.

Using the custom IMG in into customer generated project IMG’s

Some customers create their own project IMG based on the standard SAP IMG. Initially your custom IMG extension only shows in the standard IMG and not in the customer project IMG. To include the custom IMG into the customer project IMG start transaction SPRO_ADMIN. Go to the Scope section and click the Specify scope button. Now include the newly generated custom IMG objects:

Custom IMG include in customer IMG spro setup

After this is done Generate Project IMG button must be pushed to actually update the project IMG with your changes.

How to deal with issues in SAP IMG?

In some cases SAP IMG has issues. Missing nodes, unexpected entries. In most cases a corresponding OSS note can be found.

A common case is for example after installation of Event Management. Standard SPRO is pointing to SCM in stead of Event management.

In this case (and other cases) you can apply the solution from OSS note 2197261. In the attachment of this note you find program ZSLA_SHOW_REFERENCE_IMGS. Install it and run it.

ZSLA_SHOW_REFERENCE_IMGS

Use the correct TREE_ID in transaction SCUSSEQUENCE to make this one the preferred IMG:

Tcode SCUSSEQUENCE

OSS notes and help

Standard SAP help on enhancing IMG can be found here.

Relevant OSS notes:

SCI: setup custom checks

The SCI tool is great for analyzing custom code based on SAP delivered checks. For specific reasons you might want to built in your own specific checks that cannot be setup using the out-of-the-box SCI tool.

This blog will answer following questions:

  • When to setup custom check and when not?
  • How to setup custom check?
  • How does my check show up in the SCI and ATC results?
  • How to document the checks so it really fits into the standard framework?
  • How to influence the behavior of the checks and the settings for the checks?

When not to set up a custom SCI check?

If you want to do one of the following things, don’t set up custom check:

  • Change the priority outcome of a check (example from warning to error): use the option to change message priorities for this.
  • Search for specific string: use the Search functions options in SCI (they can even search trough comment blocks)

How to set up a custom SCI check?

Setting up the new category

First thing to do is to setup a new category. This will act as a placeholder for your checks.

To do this goto SE24 and copy the example class CL_CI_CATEGORY_TEMPLATE to your own Z implementation.

Custom SCI copy category

In the copy go to the CONSTRUCTOR method and adapt the description to your needs:

Custom SCI category change constructor

Important here is not to forget to double click on the 000 message and to create the message text: from here the framework will read the description. The quoted description is just for yourself to be able to read the code better.

Implementing the check

Per check you want to have, you need to have an implementation. There are two options here:

  1. Copy one of the two templates (CL_CI_TEST_ROOT_TEMPLATE or CL_CI_TEST_SCAN_TEMPLATE)
  2. Copy one of the existing SCI checks (they all start with CL_CI_) that already resembles the check you want, and modify where needed to make it your own check

The second option is easier to start with.

Hint: first take a good look at the Attributes of an existing check. Some have none (simple check), some have a few tick boxes, and for some you can have a full multiple selection as input. By using a multiple selection which you can fill in the SCI tool, you can avoid hard coding of your checks.

After the copy is done you have to go to the CONSTRUCTOR of your own check:

Custom SCI check change constructor

Important here is not to forget to double click on the message and to create the message text: from here the framework will read the description. The quoted description is just for yourself to be able to read the code better.

The CATEGORY has to refer exactly to the category class you have already created.

On the class level attributes make sure the always present attribute C_MY_NAME has the initial value of the class name of the check you have made.

Custom SCI check attribute fields

Depending on the source class check of template you have copied more constant attributes need to be checked or changed.

The actual implementation of the check is to be done in the RUN method. The advantage of copying template or existing check will be obvious in this part, since the complex coding of scanning through source code or fetching other elements like table attributes is already there. You just need to modify when you want a check to fire.

Firing a check happens within the RUN method by invoking the INFORM method. This can be invoked as many times as needed. If not invoked then the check is passed (result zero).

The inform will pass the following to the SCI report tool:

  • Name of the test (your Z test set in the C_MY_NAME constant attribute you set above)
  • Point to the code line and statement where your check fired off
  • Severity level (error, warning, information)
Activating your category and check

To activate your category and check go to transaction SCI and select the menu Code Inspector / Management of / Tests.

Your test will be fully at the bottom since they are Z checks.

Activation of both category and check will not work in one shot.

First activate the category by selecting it and pressing Save. Next activate the custom check by selecting it and press Save.

Custom SCI check activation

The text in the description is taken from the text element in the DESCRIPTION that you have made in the CONSTRUCTOR.

Testing the check

After the activation the test is available in SCI. You can make new SCI variant for testing your check. Write a small test program where you are sure the check will fire off. Then run the SCI tool with your check variant to see that your check fires off properly. Now solve the issue and rerun the SCI tool to make sure the check does not fire off any more.

Embedding in SCI and ATC

If your tests all have passed, don’t forget to activate your check in your global SCI variant.

By updating the global SCI variant used in the ATC tool, your check is automatically done as well in the ATC global and local runs.

Finalizing the checks by proper documentation

To make your check look like standard SAP ones you need to spend some time on online documentation of the checks.

First start to document your custom check. To do this start transaction SE61 to create the help text. Switch the Document Class field to Class attribute. Then in the document field put in your Z class for the custom check and for attribute fill out 0000.

Custom SCI help text creation screen

Press create and enter your specific help text:

Custom SCI help text for detailed check

Hint: copy text from standard SAP help text that you like: this saves you lot of time in the lay-outing

Save and activate and your help text is done.

Now you can setup the help text for you own category.

The basic principle of help text is the same, but now you want to hyperlink in the category text to the detailed check help text. This is bit tricky if you don’t know how. To do this select the menu entry Include / Link. The following screen will appear where you can search the referenced check and set up a text for the description:

Custom SCI help text insert link to previous

The end result in the editor is bit ugly since the above nice input screen is translated into technical terms:

Custom SCI help text for complete checks class

In the category help text you can list now all you checks in this way.

End result in the SCI tool help icon will look like this:

Custom SCI help text end result

The detailed check appears light blue like hyperlink: and it is! If you click it you jump from the category help text straight to your custom check help text.

How to activate the attributes?

You can have attributes for your own check which you can fill out on the SCI screen, and that will be passed to your test.

For this feature to work, you must do following:

  • Set the HAS_ATTRIBUTES flag to true in the CONSTRUCTOR
  • Implement the IF_CI_TEST~QUERY_ATTRIBUTES method to define the attributes (tick boxes, fields, multiple selection options) and the text of the attributes
  • Implement both the GET_ATTRIBUTES and PUT_ATTRIBUTES methods
Hint: by copying right SAP SCI check class that resembles your wanted check, you also will also copy the elements above. Just need to modify it to your own needs.

OSS notes

Oss notes relevant for custom SCI checks:

ATC: managing your complete custom code base

This blog will explain you the ATC tool to manage your complete custom code base. The name ATC is bit misleading: officially the name is ABAP Test Cockpit, but the tool has nothing to do with test management. It is a code profiling tool.

This blog will answer questions like:

  • How do I scan my complete custom ABAP code base for issues?
  • Can I scan custom ABAP code for a complete project?
  • What is my state of quality of my complete ABAP code base?
  • The SCI SAP code inspector is nice, but how can I enforce it?
  • How can I use ATC in the peer review process?
  • How can I prevent an ABAP workbench from being released if the coding is not ok?
  • Does the ATC tool replace a peer review?
  • How do I organize the implementation of the ATC tool in my organization?
  • How is ATC used in S4HANA migration?

Setting up the ATC tool

Setting up the ATC is quite simple. Just launch transaction code ATC:

Then choose the Configure ATC entry on the screen.

The ATC tool runs on top of the SAP code inspector (SCI). This must be setup first. Choose the variant you have created here as Global Check Variant.

To enable peer review set ATC exemptions to Yes.

If you want to integrate ATC with transport system: set the behavior on Release to either information or error. Be aware that if you set this setting to Error, the transport mechanism will run the ATC tool and will completely block release and transport if any prio 1 or 2 item is found! Only when the issues are solved or exempted, the transport will be released.

This is a great feature for enforcing code standards, but do not switch it on after you have some experience with the ATC tool and your developers are used to the process. Switching it on should also be clearly communicated to basis team and all consultants working on the system. They should be aware of the block coming when releasing transport in SE10 (the description of the block is bit cryptic):

Running the ATC tool

The ATC tool can be run in two different modes:

  • Globally by development lead for complete custom code base
  • Locally by developer for one or more of his objects
Running ATC tool globally

To run the ATC tool on all custom code you need to select the Schedule Runs in the ATC tool menu.

Before you can run the tool, you have to create a Run variant. In the setup of this variant it is very important to select the right packages. For custom code only put in Z* in the package selection. If you have projects doing development in separate packages, it is possible to setup a dedicated project variant for that Z project package only.

If you have chosen to use the exemptions and allow pragma’s to be used by the developers, do check the help text in Handling of pragma’s carefully before making a selection.

After the variant has been created, you can now select is and press the Schedule button:

In the next screen before hitting execute, please make sure you have checked the number of processes versus your system hardware. The default value of 10 is pretty aggressive and is assuming a large development system. Use transaction SM50 to check the amount of dialog processes on your system. Don’t fill in more than half the amount of DIA processes than your system has. If you do you might find an angry basis admin at your desk asking you why you are completely filling up your system….

After the executing starts a batch job is triggered, which will fire off as many dialog processes as you have indicated. The amount of time the job takes depends on:

  • Amount of Z code in your system and selected in your variant
  • Amount of processes chosen and infrastructure power you have
  • Using HANA or not (complete code base scanning on HANA runs amazingly fast: full code base of 1000 Z objects with 10 parallel processes can finish under 10 minutes. Running same on slow non-HANA system can run over 8 hours in the night.)

You can use the ATC run monitor to see if your run has finished:

Result of ATC run

When the run is finished go to the Manage Results entry in the ATC menu.

Here you can see the results and the statistics of the results of your run.

If you are working in an agile devops environment this overview screen is very nice. If you run the ATC tool daily or weekly, this can immediately provide you with the needed code quality KPI statistics for the ongoing sprint.

If you select the run results you get a list sorted by priority. Selecting one of the findings will give you the details of the finding (code positing, explanation of reason of the finding):

Double clicking on the object name will immediately jump you to the code program point where the finding is found.

Running the ATC tool locally

The other option is to run the ATC tool locally. In each editor you can call Program/Check/ABAP test cockpit to run the ATC for you specific program.

If you work in Eclipse, you can also run ATC by selecting Run/Run as/Abap test cockpit.

Fixing ATC issues

The easiest way of fixing ATC is simply taking away the root cause. In some cases this simply isn’t possible. Reason can be: you have to select data without full key and ATC is detecting this as error. If agreed upon, you can use the corresponding pragma to suppress the finding in the results. Best practice here is to add a comment line why the pragma was used.

Another sample program:

REPORT zpragma.

DATA: zgs_mara TYPE mara.

* need all for demo, suppress with pragma
SELECT MATNR FROM mara INTO zgs_mara. "#EC CI_NOWHERE
ENDSELECT.

The corresponding ATC result looks like this:

As you can see the error for having no selection clauses is not shown. It is suppressed with the #EC CI_NOWHERE pragma.

The ATC is still throwing issues: there is no check on SY-SUBRC. If needed the ATC tool suggests to use the #EC CI_SUBRC pragma.

Practical use of pragma’s

If you want to allow the pragma’s or not is up to you. The ATC result list can be configured to simply ignore the pragma’s. Best practice is to allow the use of pragma’s, but to demand comment line with explanation. Some pragma’s (like the previous example of not checking sy-subrc) you might suggest not to use at all.

Apply OSS note 3088590 – ATC: Offer default option to handle pseudocomments and pragmas to set default options for pragma handling.

Use of exemptions

If the issues in ATC cannot be solved by changing the code or using the pragma, the last resort it to request an exemption.

This can be done on the detailed screen of the ATC finding:

Upon requesting the system will ask you to fill out why the exemption is needed:

The approver need to be configured in the ATC overview screen. Only the exempters in that list will be shown here.

Unfortunately the ATC tool forces you now to enter a fixed name here. You cannot send the exemption to the group of approvers.

Judging the exemption

If the admin allows to setup mail on your development system you are lucky and get a mail (if configured in the ATC main configuration screen). If not, you either have to check regularly or ask the developers to tell you if they have submitted and exemption.

In the ATC main screen select the Exemption Browser select the exemptions for which you are the approver:

You get a list of items for you to approve, reject or return to the requester.

Again here: if you don’t have mail system, send a signal to the requester that you did an action.

Dealing with old ABAP code

If you have to perform a change to ABAP code that is created before you implemented the ATC tool, the tool might highlight a lot of issues that are in the old section of the code. Should you fix these issues as well? This depends on the size of the coding and the organizational agreements you make. Typically if the coding is very small (user exit with 20 lines) it is common just to fix it. If the coding is large, best practice is to ignore the findings of the ‘old’ code: it is simply too dangerous and too much work to fix it. Or you can work with the baseline option (see this dedicated blog).

ATC tool versus peer review

The ATC tool does not replace a peer review. It is a tool to speed up the peer review, since the tool takes away the burden of the more technical checks like naming conventions, checks of use of SY-SUBRC, are hard coded text replaced by text symbols etc.

Peer review tasks that cannot be done by the ATC tool:

  • Judgement if the development itself makes any sense
  • Judging use of comment lines (sufficient?)
  • Judging if the coding is structured in readable way: future maintenance can be done easily
  • Correct use of pragma’s
  • ….

Implementation of the ATC tool in your organization

The ATC tool can be implemented in every organization.

Steps to do:

  1. Organize your code standards: have them documented and approved. This is the basis for the setup of the SCI variant you want to run in the ATC tool.
  2. Deploy the SCI tool in your developer community and make sure they understand and run the tool consistently. This is also the time you can fine tune the outcomes of the SCI tool.
  3. Now setup the ATC tool without Exemptions and without transport block. First run the tool globally only yourself to see and understand the ATC tool results and statistics. This will get you a feeling on how long the tool runs on your system and how many exceptions it will report.
  4. Consider if you want to use the pragma’s fully, partially or not.
  5. Set up the Exemption users and organizational agreements (like dealing with old code).
  6. Start to communicate the use of the ATC tool to your developers. If you didn’t think about the pragma’s and the exemption process you will very soon receive many questions from the developers.
  7. If the ATC process with exemptions is running stable, if you want you can now turn on the transport block to avoid any bad code from being released.

From step 1 to step 7 can take several months depending on the speed you can organize, agree and communicate the usage of the standards and tools. Don’t rush it without having the proper communication and organization.

Reorganization of ATC data

If you have large custom code base and run ATC often, the results table SATC_RT_RUN_EXE might get large and your system admin might complain to you about it. If this is the case you can schedule clean up program SATC_AC_REORG_REPOSITORY on weekly basis.

Running ATC central for more systems or against older versions: remote ATC

If you want to run ACT centrally for more development systems, or against an older SAP version not yet enabled for ATC: please read this blog on remote ATC.

ATC settings logging

The ATC setting changes are not logged. The logging is needed if you have a large crew of ABAP developers and apply the rules strictly (for example if you use the option to give an Error on transport release with ATC). To achieve this, switch on table logging for table TRCHECK.

Scope of ATC

ATC is capable of analyzing ABAP code.

For analyzing Smartforms, please make sure you have implemented the OSS notes listed in note 2715684 – Smartforms are not being checked by ATC.

For analyzing Adobe forms, please make sure you have implemented the OSS notes listed in note 2617401 – ATC: Enable ATC Checks for Adobe Forms.

It cannot analyze AMDP code. See OSS note 3086517 – AMDP method not checked by ATC.

S4HANA custom code migration

The ATC tool is a cornerstone tool in the S4HANA custom code migration. For more information, read this dedicated blog.

Running ATC on standard SAP or addon

For running ATC on standard SAP or on an addon, follow the instructions in this blog.

Running ATC on a transport

Running ATC on a transport is explained in OSS note 3250073 – How to perform ATC check of transport request.

ATC explanation notes

ATC explanation notes:

ATC bug fix OSS notes

ATC bug fix OSS notes:

SCI: SAP code inspector

SAP code inspector is a SAP delivered tool to quickly inspect your custom built ABAP code.

This blog will answer following questions:

  • Why use SAP code inspector?
  • SAP code inspector versus other source code scanner tools
  • How to setup SAP code inspector?
  • Which SCI checks are recommended in general?
  • Which SCI checks are a must do for S/4 HANA readiness?

Why use SAP code inspector?

SAP code inspector can be used by both ABAP developer or customer who has outsourced ABAP development. The SAP code inspector will check custom ABAP code for:

  • Potential performance issues
  • Potential usability restrictions
  • Robust programming checks
  • Use of ABAP code naming conventions
  • Scan for certain statements if wanted

The code inspector has been given big boost last few years by SAP, since has become primary tool to prepare custom ABAP code for S/4 HANA.

SAP code inspector versus other source code tool scanners?

Several major IT parties have setup their own custom build source code inspector tool. In the past these tools could deliver source code scanning functions that SAP did not provide in SCI.

With the improvements done last years on preparing ABAP code for S/4 HANA the SCI tool is now so mature that there are almost no checks missing any more.

The setback of other source code tool scanners is their lack of integration with the SAP development tools (SE38, SE80, SE24, SE37, Eclipse ADT, etc).

How to setup SAP code inspector?

Setting up SAP code inspector is quite straightforward. Start transaction SCI and you come to the main SCI screen.

In this main screen goto the part for Check Variant. Give it a name and make sure that the icon next to Name is switched to global variant as is shown in the screenshot:

Now press create and the empty variant screen is shown.

By clicking on the i icon you can get detailed information on the checks.

By default no checks are active and you have to select which checks are relevant for you.

Let’s go over a few important ones.

Make sure the performance checks are on:

Under Syntax Check make sure the classical SLIN extended program checks is switched on:

In the robust programming section switch on the SY-SUBRC handling. Here you have to take care (as do some other checks) to fill out the details (click on the green multiple selection symbol):

Finally (this is optional) you can also set the ABAP naming conventions:

Setting the variant as DEFAULT SCI variant

If we want to run the SCI tool from code editor the variant DEFAULT is used. This is different variant then we just created. To set the variant for SCI tooling for our own created variant, goto tcode SE16 and edit the contents of table SCICHKV_ALTER:

In the CHECKVNAME_NEW enter the name of the created SCI variant.

Running the SCI tool

The SCI tool can be run from different places. You can run it from tcode SCI itself by entering object or transport there. Or you can run it from code editor and selecting the menu Program/Check/Code Inspector.

Let’s use this sample program:

REPORT zscidemo.
 
 DATA: zlt_vbak TYPE TABLE OF vbak.
 DATA: zls_vbak TYPE vbak.
 
 SELECT * FROM vbak INTO TABLE zlt_vbak.
 
 LOOP AT zlt_vbak INTO zls_vbak.
   WRITE: / zls_vbak-vbeln.
 ENDLOOP.

And now we run code inspector. Results:

The result shows 3 aspects:

  1. Use of SELECT * on large table
  2. SY-SUBRC is not handled after the read: this is correct and should have been done
  3. Naming conventions of variables are not according to settings

After the run the developer can repair the items and rerun as much as needed.

SAP SCI will determine the severity of the found issue into Critical (error/red), Warnings (yellow) and Information (green).

Fine-tuning the SCI message priority

For several reasons you want to fine-tune the SCI message priority. Some check you regard as less important than SAP and some check you regard as more important then SAP is rating them in the SCI standard settings.

If you are in the main SCI screen choose the menu entry Code Inspector/Management Of/ Message Priorities, you come to the screen to adjust and fine-tune the priorities:

The example show is the increase of the check from warning to error (yes, it is still the German Fehler) for the omission of SY-SUBRC check after direct database update.

SCI tool and S/4 HANA migration

When you are in the process of migrating or thinking to migrate to S/4 HANA, then the SCI tool checks play a central role in preparing the custom ABAP code.

In oss note 1912445 – “ABAP custom code migration for SAP HANA – recommendations and Code Inspector variants for SAP HANA migration” SAP explains the details in the 2 newly delivered SCI variants.

You can run these new variants specifically, but it is best to already incorporate these checks into your existing SCI main variant. Even if you don’t plan to upgrade, the checks are good anyhow.

Most important highlights:

  • Mandatory use of ORDER BY or SORT BY (this check is vital: if not done it can even cause functionality issues!)

  • Unsecure use of FOR ALL ENTRIES (if not checked if table has entries, ALL database entries will be read, which causes both functional issues and kills performance)

  • Don’t use SELECT * (code will work, but in HANA this is a performance killer)

  • Checking for database hints (you rarely see this in custom code, but if done code will not properly work after migration)

This last check is bit hidden: open the multiple selection and in the details make sure Native SQL and DB hints are checked on.

For more details see the blog on S4HANA readiness 2.0 and the blog on setup of S4HANA custom code adjustments.

Checking your complete Z code base

If you want to check your complete Z code base or a larger block for a project, you can use the ATC tool. The ATC tool uses the SCI checks to analyze large blocks of Z code.

Check variant update

In SCI use the menu option Utilities and Import Check Variants to update your check variants. More background in OSS note 2948146 – SCI/ATC check variant is different between systems.

Checking addons and standard SAP

To check standard SAP code or addon ABAP code, follow the instructions in this blog.

Extra custom checks

If you need extra checks in SCI, you can use ABAP code to build your own custom checks. Please follow the instructions in this blog.

Running SCI on standard SAP and addons

If you need to run SCI on standard SAP and/or addons, you will find this is not possible (see OSS note 1986391 – Using SLIN/SCI to check SAP standard objects)

. Follow the trick in this blog to have it done anyhow.

Explanation OSS notes

Notes with extra hints and explanation:

Bug fix OSS notes

List of bug fix OSS notes: