SWLT performance tuning worklist

This blog explains how to use the SWLT performance tuning worklist to find poorly performing Z code by combining SQL monitoring data from production and ATC results.

Questions that will be answered are:

  • How to setup the SWLT performance tuning worklist tool?
  • How to analyze the results from the SWLT performance tuning worklist tool?

Preparations

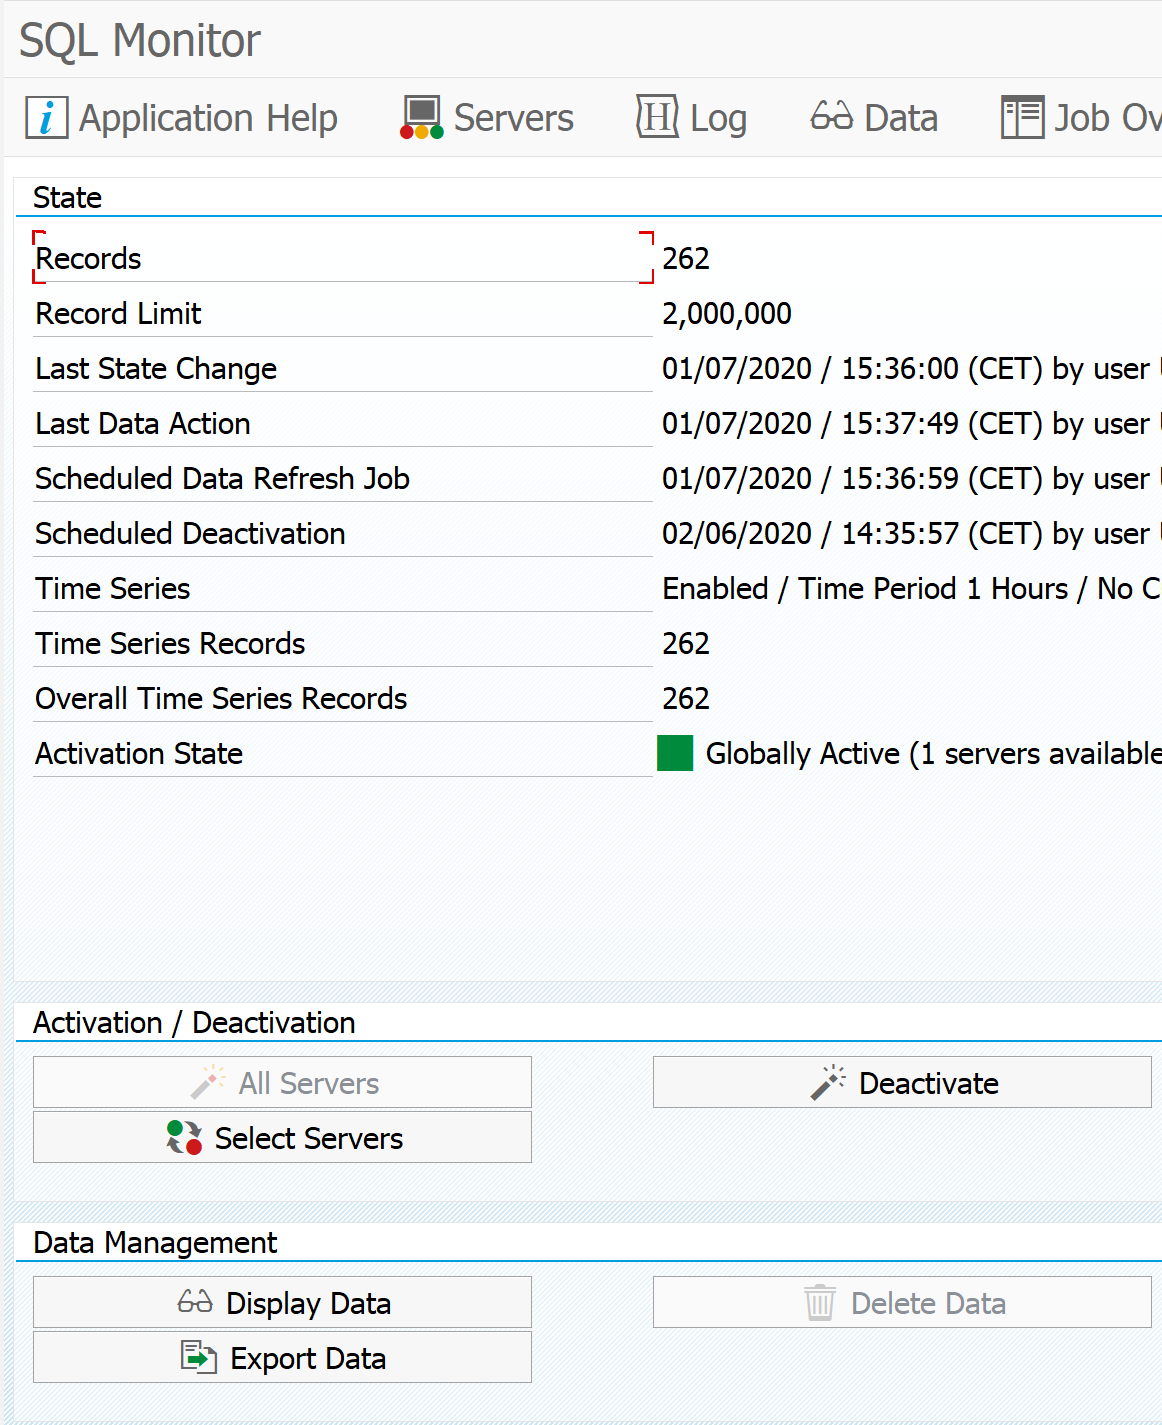
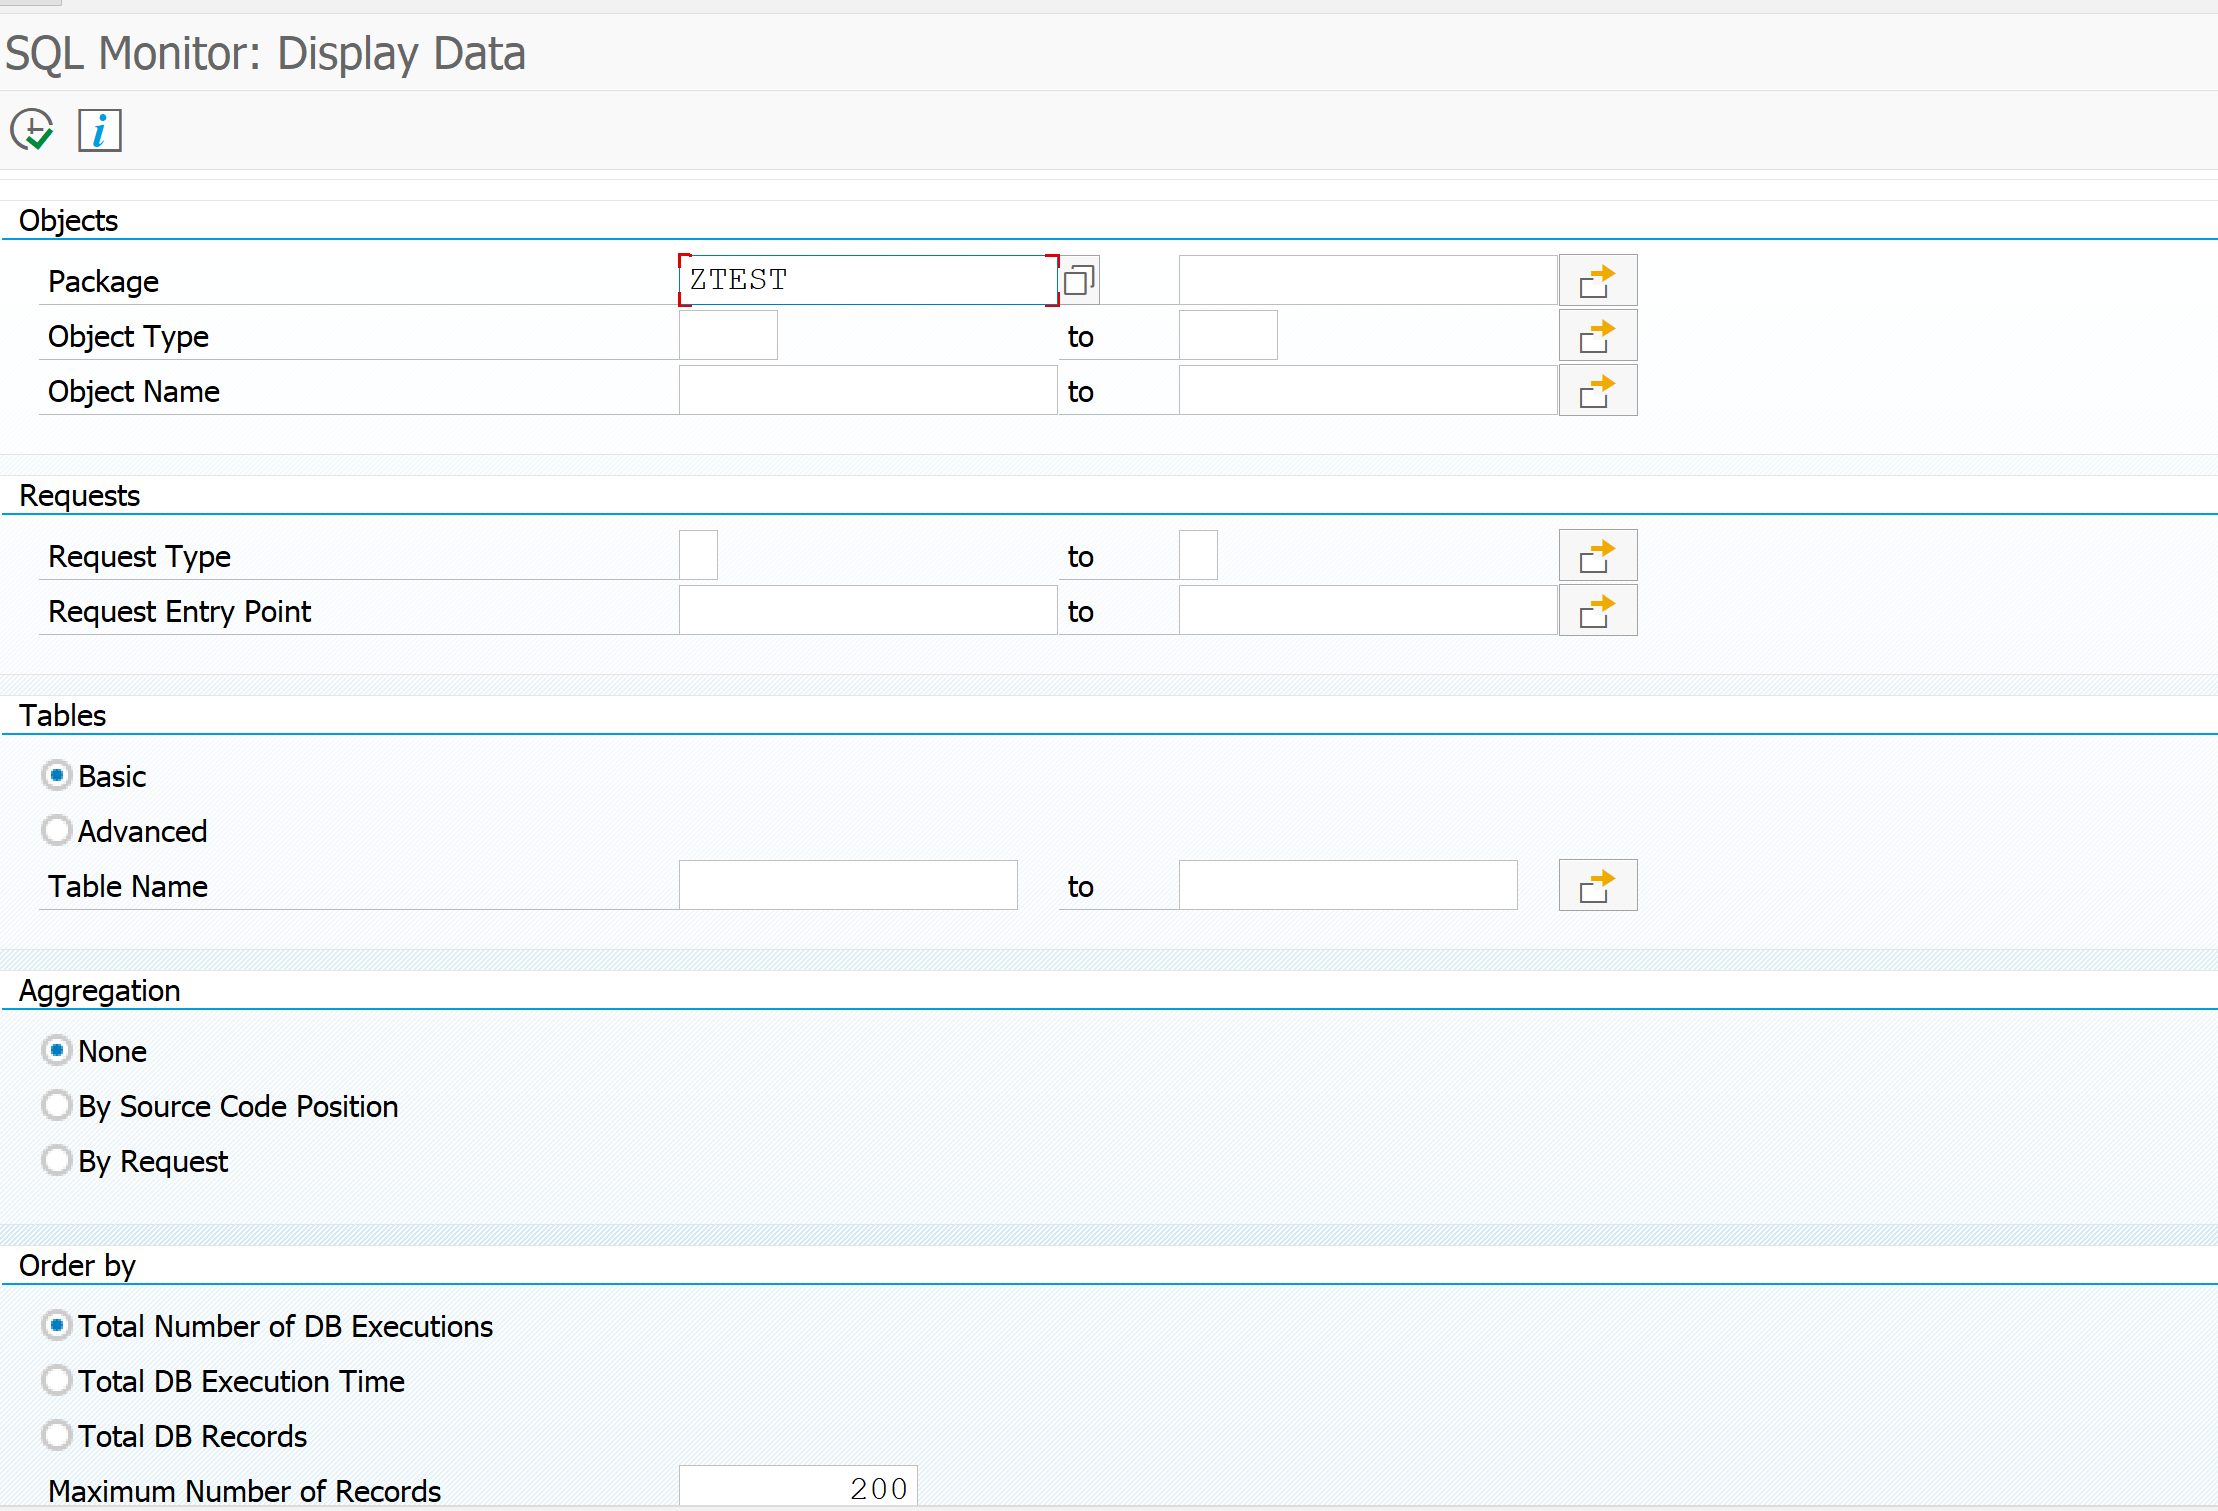
As preparation for the SWLT tool you must have run the SQL monitor in a productive system and created a snapshot of the data. This snapshot you can export and import in a development system (see note 2700312 – How to import SQL Monitor (SQLM) extracted data). In the development system you configure and run the ATC code check tool.

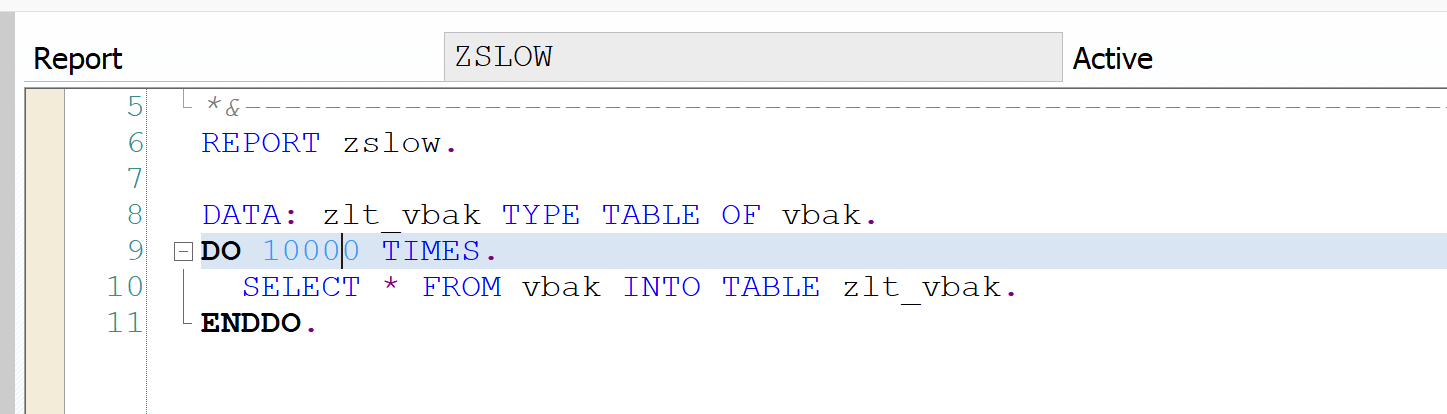
The SWLT performance tuning worklist tool will combine these results. As example we will use this poorly written Z code:

Running the SWLT tool

Start transaction SWLT:

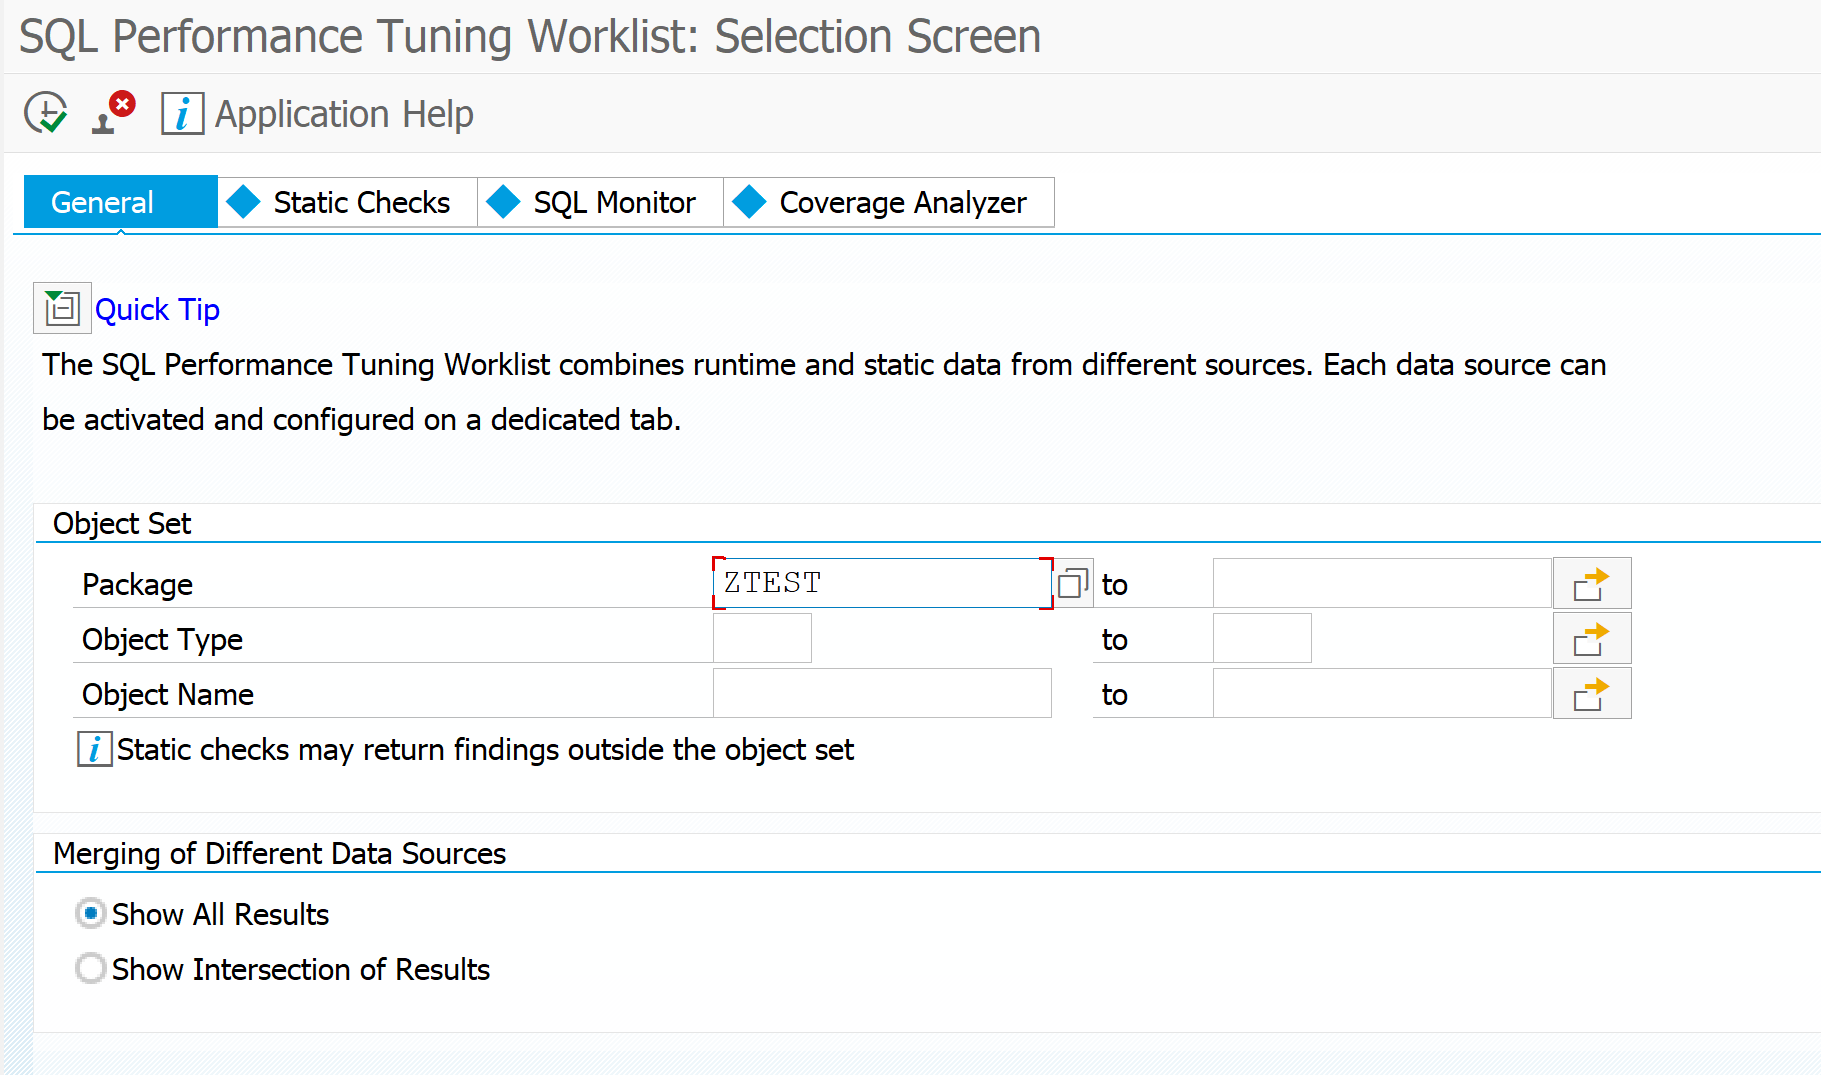
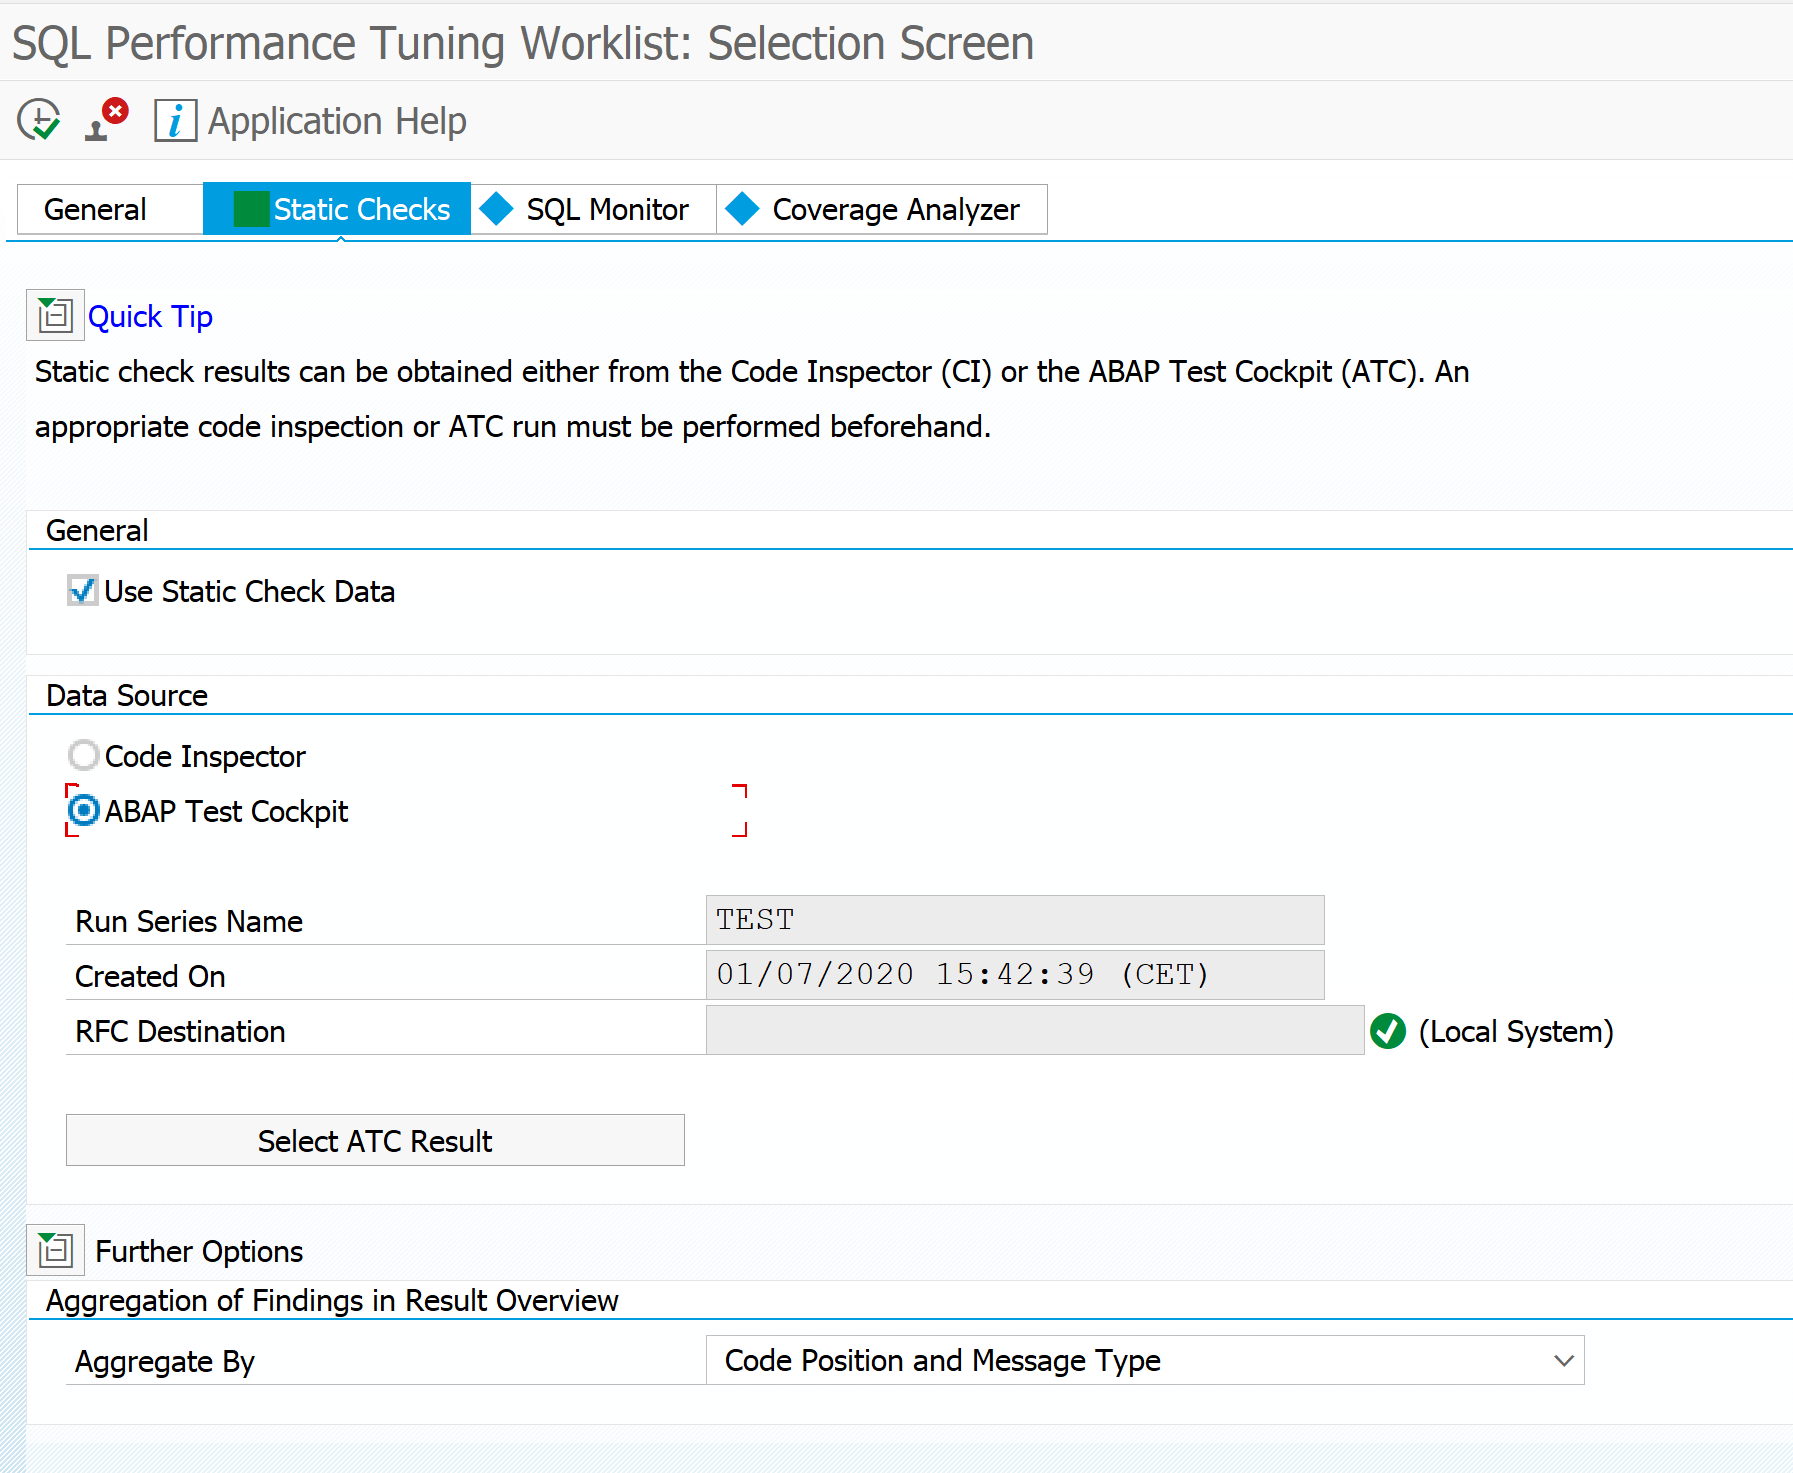
You can reduce the scope by just taking the needed Z packages. Goto the tab Static Checks to select the appropriate result of the ATC run (for more on ATC read this blog):

Now select the SQL monitor tab to select your SQLM data snapshot you took from your productive system:

Now that all data is loaded, you can hit the execute button to start the SQL performance tuning worklist.

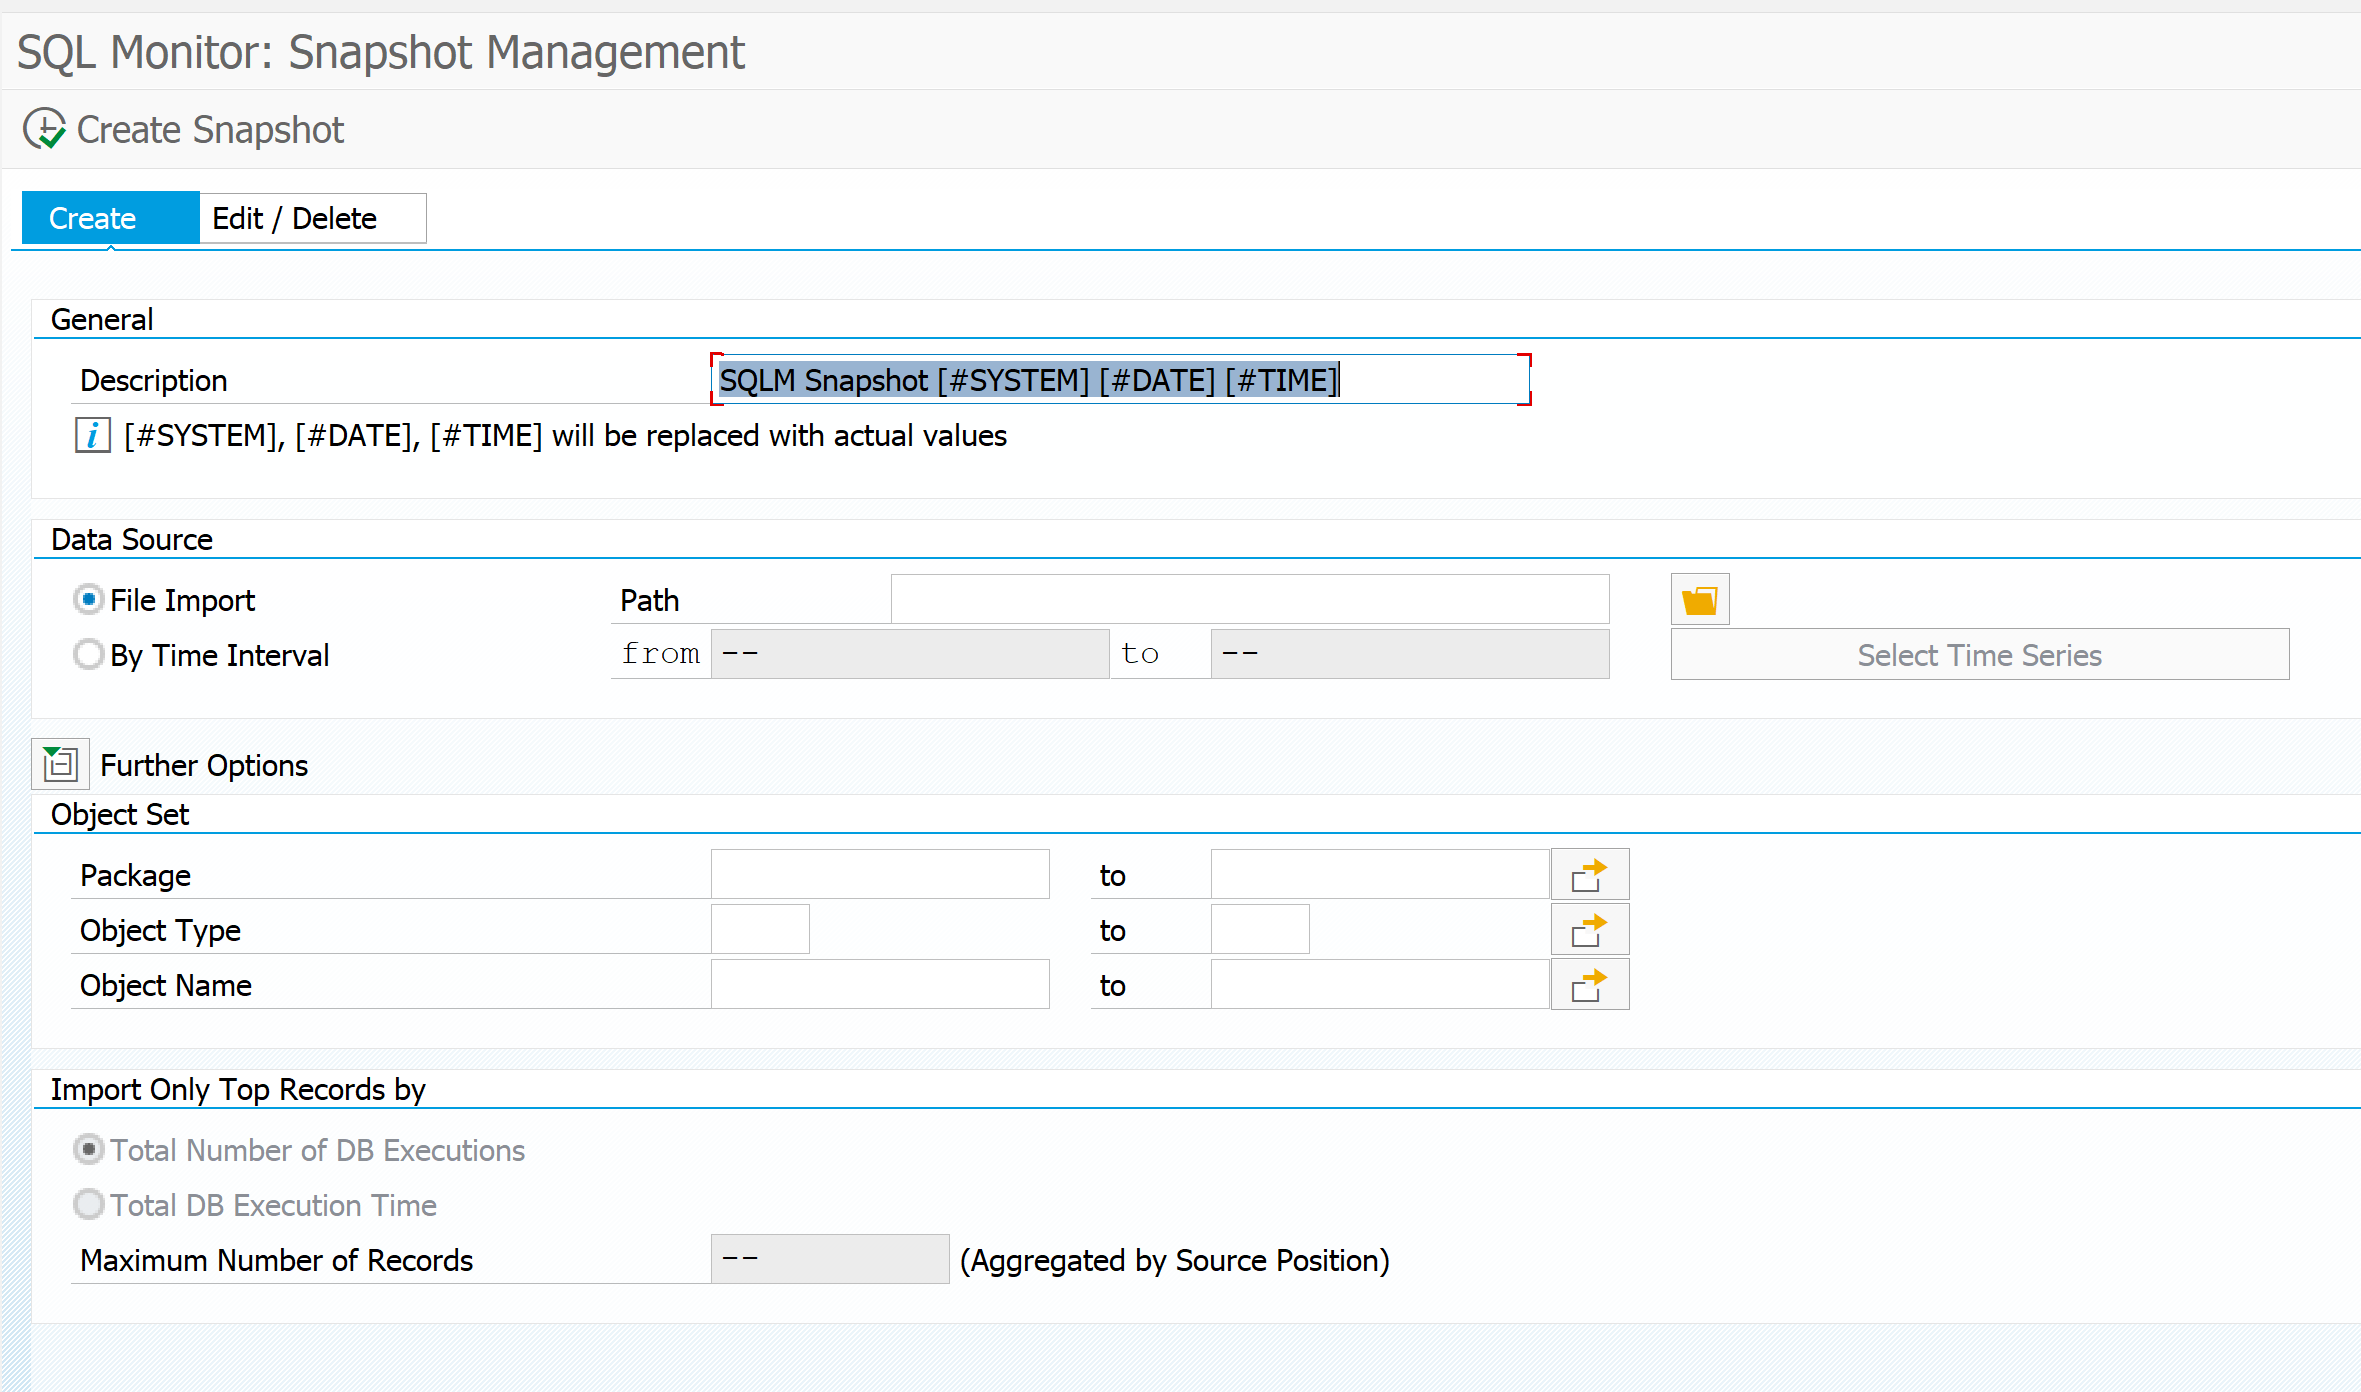
It might be you don't see the SQLM snapshot in SWLT. In that case create a new snapshot from SWLT directly.

The tool will now start to merge the results. In the example above you can see the following result:

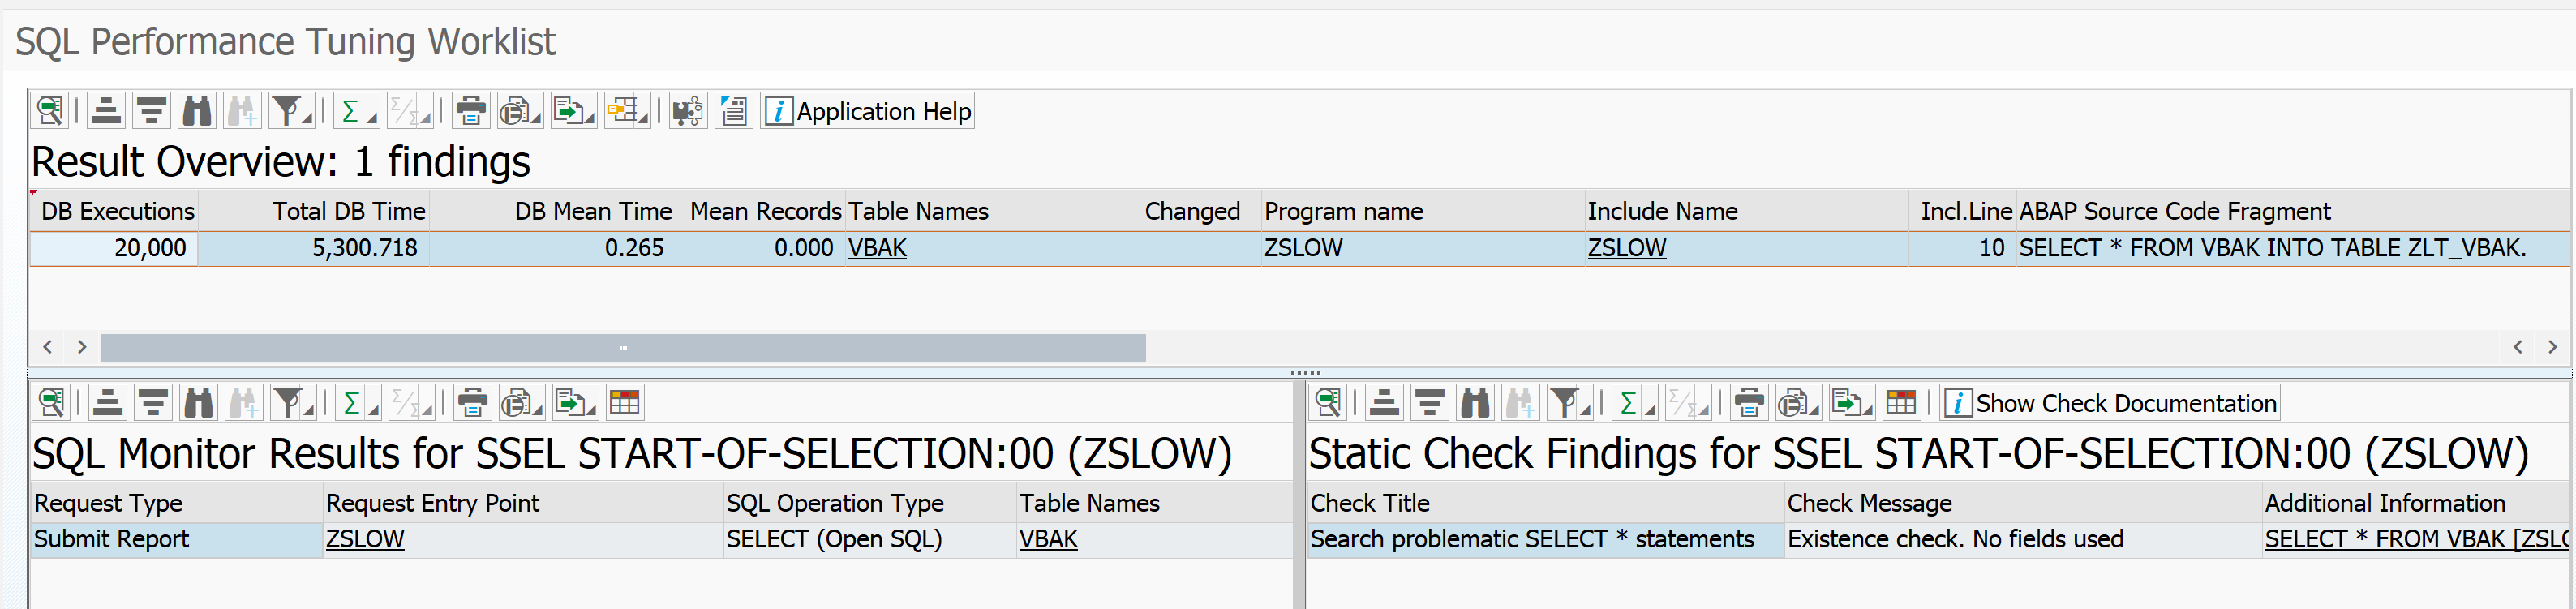
In the total result select a line. On the bottom left you can see the SQL monitor results. Bottom right you can see the ATC check result. Clicking on the underlined program or SQL statement will bring you to the poorly performing ABAP code point.

Bug fix notes

3060630 – Runtime error RUNT_INTERNAL_ERROR while fetching SQLM data (e.g. via SWLT)

SQLM SQL monitor

This blog will explain about the SQLM tool to monitor expensive SQL statements in a productive environment.

Questions that will be answered are:

  • How to start and configure the SQLM tool?
  • How to analyze the results?

Configuration of SQLM tool

The SQLM tool does not require specific configuration or installation if you have a bit modern SAP system. To activate it start transaction SQLM and click on the Activate button for All Servers:

The trace is active now until the given time frame.

Example use of the SQLM transaction

First we start by writing a very bad performing Z program:

This program is really inefficient. After activation of the SQLM monitoring we run this program a few times.

Now we goto the SQLMD transaction (or from SQLM and then press display data button) to display the SQL monitoring results:

Selection can be done on total number of executions, execution time, amount of records. Result:

You see now the impact of our badly written program. Double click on the line will jump to the ABAP code point.

Creating snapshots

At the bottom of the SQLM start screen there are the buttons to create snapshots:

This results into the Snapshot screen:

You can create a snapshot here for later re-use. You can also download the snapshot to a different system by using these buttons: first export to file:

When you have the file, goto the target system and start SQLM and press create snapshot. Now use the option Create with Data Source File Import.

It is common practice to capture data in production by a basis administrator who exports it. Then the data download is handed over to an ABAP developer using the data as upload in SQLM database in the development system to improve poorly performing Z code. The developer can use the SWLT tool (see blog) to combine the SQLM data with the static code review data taken from the ATC tool (see blog).

Follow up use in SWLT

The SQLM data can be used as input in the SWLT tool: SQL performance worklist tool. This tool combines the SQLM data with the ATC tool results. Read more about SWLT in this blog.

Background information

More background information can be found in OSS note 1885926 – ABAP SQL monitor and 3242700 – ABAP SQL Monitor: Implementation Guide and Best Practices.

Useful blog (which is start of blog series on SQLM): link.

Impact on performance and memory is minimal. Description is fully documented in OSS note 3100598 – Memory Requirement and Performance Impact of the SQL Monitor.

OSS notes

Relevant OSS notes:

Solution manager demo system

This blog will explain about the free available SAP solution manager 7.2 demo system. If you are looking for a Cloud ALM demo system, read this blog.

Questions that will be answered are:

  • How can I access the free available SAP solution manager 7.2 system?

SAP solution manager 7.2 demo system

To promote the use of SAP solution manager 7.2 SAP has made a system available for everybody to test drive.

Follow this link to go to the main page. Then scroll down to the access link:

This will bring you to the launchpad by using one of the roles (with user ID and password on the site):

After logon you reach the launchpad, for that specific role (example here is Business Process Expert):

This will enable you to test drive the new functionality for Solution documentation:

This is just one of the examples. You can also test drive Focused Build and Focused Insights functionality. Both are free to use as of 1.1.2020 (see blog).

The system that SAP offers does have regular updates and resets of data. Read the SAP blog for the actual dates.

I18N internationalization

This blog will explain about the I18N internationalization transaction.

Questions that will be answered are:

  • How can I see which languages are installed in my system?
  • How is my system configured for internationalization?

Transaction I18N

Almost all internationalization topics in SAP are centrally maintainable from transaction I18N:

In the menu on the left you can select all the topics and tools. More background on the transaction itself can be found in OSS note 848036 – Transaction ‘I18N’ (Internationalization).

Installed languages

By selecting the installed languages tool you can see which languages are installed in your system and which ones are allowed for logon:

Current internationalization configuration

By selecting the troubleshooting tool Current I18N system configuration, you can list all the related current system settings:

Time zones

For internationalization of time zones read this dedicated blog. For daylight saving, read this dedicated blog.

Webservice message monitoring

This blog will explain about webservice message monitoring.

Questions that will be answered are:

  • How can I display webservice messages?
  • How can I set the deletion retention timing for webservice messages?

This blog assumes that you have correctly activated the basic SOAP webservice runtime. See separate blog on this topic.

Webservice message monitoring

You can start the webservice message monitoring with transaction SRT_MONI. In the selection screen fill out filtering parameters are per need:

Result will look like:

By clicking on the message itself you can see the content in XML format.

Monitoring OSS notes:

Web service error log

Use transaction SRT_ELOG to go to the web service error log.

Setting retention period of webservice message deletion

Webservice messages will get deleted automatically in the SAP system. The default value is one week. You might need to keep the messages longer. The setting that controls this retention period is quite hidden. To change the setting, you need to start transaction SXMB_ADM and then select the option Schedule Delete Jobs:

Then you change the retention settings as per need:

Web service tracing

Web service tracing can be activated in transaction SRT_UTIL.

Be careful when switching the trace to on, on a productive system: it can generate a lot of load. Do apply and read OSS note 3084970 - SRT_UTIL: Show disclaimer when enabling tracing for URIs.

Payload trace is explained in OSS 3195367 – ESI – How to use the SRT_UTIL Payload Trace.

OSS notes for tracing and SRT_UTIL:

Generic search frame work

SAP has create in S4HANA 2020 extra search framework. Transaction code SRT_MONI_GSF starts up a specialised search frame work:

To get this new framework you need to apply these 4 OSS notes:

Bug fix OSS notes

SAP buffers and buffer refreshes

This blog will explain the SAP buffer setup and the SAP buffer refresh process.

Questions that will be answered are:

  • What is the use of table buffers?
  • Which tables are buffered?
  • How can I check on my productive system which buffered table is using a lot of memory?
  • How to force a buffer refresh in general?
  • How to force a buffer refresh for a specific table?
  • How to force a buffer refresh on a specific application server?

Background of table buffers

The primary reason of a table buffer is pretty simple: performance improvement.

SAP has a 3 tier setup of:

  1. Front end GUI
  2. Application server
  3. Database server

If data is read from the database server it is processed on the application server. This data is buffered on the application server. If a user asks the same data twice, the application server already has the data. Also very frequently read tables (like company code and plant data) are buffered on the application server.

In transaction SE11 in the technical settings of a table you can see if a specific table is buffered or not, and the type of buffering. Example is for table T000, which is fully buffered:

When to set buffering?

Buffering is extremely useful on small and infrequently changing tables, which have a lot of read access. For these tables buffering will help a lot. That is why a lot of customizing table have buffering activated. You can do the same for your Z tables if they are used for customizing like purposes.

How to check buffering in productive system?

Read this blog to understand and use the new advanced table buffer analysis program.

Old method:

Follow the instructions from OSS note 2806927 – Remove table buffers to check table buffering in production.

Go to transaction AL12:

Then select menu option Monitor, Buffers, Table buffer, All Generic tables. Then sort by size:

How to reset table buffers?

In some specific case you might want to force a buffer reset.

For this reason you can enter specific commands (enter same way like transaction code or the famous /h for debugging):

/$TAB – Resets all the table buffers on the application server

/$TAB <table name> – Resets the TABLE buffers on the application server for that specific table (also consider program TOUCHTAB after transporting a table definition)

/$SYNC Resets the buffers on the application server

/$CUA Resets the CUA buffer of the application server (the CUA buffer is not for central user admin, but holds screen elements like menus, buttons, etc)

/$DYN Resets the screen buffer on the application server

/$ESM Resets the exp/imp shared memory Buffer on the application server

/$PXA Resets the program (PXA) buffer on the application server

/$OBJ Resets the shared buffer of the application server

ST02 buffer overview

You can use transaction ST02 to get an overview of the buffers:

By clicking the button Current parameters you get an overview of the currently set relevant parameters:

Explanation notes:

Other buffer and caching resets

There are other buffer and caching resets:

  • User buffer reset: go to transaction SU53 and select menu Authorization Values / Reset User Buffer
  • User role combination refresh: transaction PFUD, see dedicated blog.
  • FIORI buffers, see dedicated blog.

Security patch day

This blog will explain more on the SAP security patch day.

Questions that will be answered are:

  • What is security patch day?
  • Where can I find the recently released security OSS notes?
  • Where can I find more background information on security patch day?
  • Where to find more information on the CVSS scoring mechanism?
  • What is a practical approach to security patch day and security OSS notes?

Security patch day

Security patch day is every second Tuesday of each month (for more on security patch day itself, you can read the FAQ). The actual OSS notes as summary can be found at the Security response at SAP support security notes page. The patch days themselves are planned and published on this page.

The wiki pages also include a suggested process for dealing with the security patch day OSS notes.

SAP uses the CVSS scoring mechanism to determine the risk a security leak. The scoring mechanism is explained in this blog.

SAP solution manager system recommendations

If you setup SAP solution manager system recommendations, than you will get an always current overview of security notes. With the system recommendations you can mark notes as reviewed, so they don’t appear any more. Applied ABAP notes will be automatically be removed by the tool. Newly released security notes and updated are added to the overview. For setup information on SAP solution manager system recommendations, read this blog.

SAP Focused Run configuration and security validation

SAP Focused Run configuration and security validation can be used to check the application of security notes in your system landscape. For more information, read this blog.

Practical approach to security notes

A pragmatic approach for security notes is the following:

  • Every 6 to 12 months update your SAP kernel
  • Apply every 3 month the ABAP OSS notes which can be done automatically (don’t look at the score, just apply them). Leave them on your test and/or acceptance system. This will normally make sure you have no negative side effects. Then move them to production.
  • Apply every 3 month the ABAP OSS notes with manual actions for the processes you use and for CVSS score you deem high enough to justify the effort of the manual actions

Feel free to increase the frequency of the above proposal.

ABAP update administration

This blog will explain about the ABAP update administration. Questions that can be answered are:

  • How to check if the ABAP update process is active?
  • How to check and fix update errors?

Update administration

You can use transaction SM14 to goto the ABAP update administration:

SM14 overview screen

Update errors

The update errors can be seen with transaction SM13 (do take care to have the right date selection):

SM12 update processing errors

Double clicking on the line will give you more information:

SM13 update processing error detail

Double click again on the error for more information. This information can be used to find the OSS note to fix the issue in case of standard SAP failure. In case of Z code failure, you will have to go to you own ABAP developer to fix it.

Reprocessing

Reprocessing is sometimes possible, and in most cases not. After you have captured the information on a update failure you can delete it.

When reprocessing is possible, check first with the user. He might have posted the data already in a different way. Only when he did not post in different way, you can try to reprocess the failed update.

Alerting

You can set parameter (RZ11) rdsip/vbmail to 1 to activate mail sending. Parameter rdisp/vb_mail_user_list contains the mail addresses (separation by comma).

Automatic deletion

By setting parameter rdisp/vbreorg to 1 the automatic deletion of failed updates is activated. Parameter rdsip/vbdelete is the amount of days the SM13 entries are kept.

Background OSS notes

S4HANA blacklist

With S4HANA SAP has deprecated some parts of their old code. In some weird cases this old code might still be required.

This blog will explain on the S4HANA blacklist. Questions that will be answered are:

  • How do I see a dump is caused by the S4HANA blacklist?
  • Where to find more background information on the S4HANA blacklist?

The S4HANA blacklist dump

If for whatever reason the S4HANA system gives an ABAP dump with the error SYSTEM_ABAP_ACCESS_DENIED, this is a S4HANA blacklist dump. See note 2476734 – Runtime error SYSTEM_ABAP_ACCESS_DENIED. Or a reference to OSS note 2295840 – Outbound / Inbound calls from external to RFC FM are blocked when the FM is blacklisted and the UCON-Check is active.

Blacklisted RFC calls

When calling a blacklisted RFC from an external application you can get similar dump with reference to OSS note 2295840 – Outbound / Inbound calls from external to RFC FM are blocked when the FM is blacklisted and the UCON-Check is active. This note itself is old and refers to newer OSS note 2416705 – Outbound / Inbound calls from external to RFC FM are blocked when the FM is blacklisted using Blacklist Object. You can run program RS_RFC_BLACKLIST_COMPLETE to see which function modules are blacklisted:

2259818 – RFC enabled Function Modules with incompatible signature change compared to its version in ERP are blocked from external access.

What to do when you hit a blacklisted item?

The best approach is to avoid doing what you did and look for the functional alternative provided by SAP. Search for the correct simplification item OSS note. In almost all cases SAP provides a solution.

Activating a blacklisted item

OSS note 2249880 – Dump SYSTEM_ABAP_ACCESS_DENIED caused through Blacklist Monitor in SAP S/4HANA on premise, contains the procedure to activate a blacklisted item. For the RFC calls follow the instructions of OSS note 2408693 – Override blacklist of Remote Enabled Function Modules.

Please make sure you have both the clearance from SAP and the system owner in writing before executing this procedure. Support can be lost and system upgrade in the future can be facing severe blocks. Only execute as last resort after explicit approval.

S4HANA setup FIORI manage KPI tiles

Inside S4HANA there is a very powerful FIORI tile called the Manage KPI and Report function. This blog will explain how to setup this FIORI tile and how to make sure it is working properly.

It is assumed you have already enabled your S4HANA system for FIORI (see this blog).

Note: this blog will only explain the S4HANA 1909 and higher implementation. Previous versions of this functionality have more tiles and setup work.

Activating the Manage KPI and report function

Goto transaction STC01 and select task list SAP_FIORI_CONTENT_ACTIVATION:

In the task list select the business role SAP_BR_ANALYTICS_SPECIALIST:

Now run the task list and wait. If you have issues, please read this blog.

Assign then activated PFCG role SAP_BR_ANALYTICS_SPECIALIST to your user ID.

Checking the KPI and report FIORI tile

Start the FIORI launchpad (transaction /UI2/FLP) and check that the manage KPIs and Reports tile is now available:

Click on the tile and you come into the first screen. Top left you can choose between KPI and Reports. We will first start with inspecting the KPI. We will use Purchase Order Changes as example:

Details of the KPI:

Here you can see the Data source: CDS view C_POITEMCHANGECOUNT.

On the visualize tab you can see a preview of the tile:

Now we will inspect the report:

Here you can see it is a Generic Drilldown on the datasource C_POITEMCHANGECOUNT. Click to open the details:

You can push the button Show Preview to get a preview of the report:

In the section application details you can see the details for the tile:

Very important here is the catalog it belongs to. In PFCG assign the correct business role to your user: SAP_BR_BUYER. You can find this role in the FIORI reference library documentation for this tile.

After the role is assigned, start the FIORI app finder and search for the app:

Now this tile should work:

Background information

There is an excellent OpenSAP course on this topic: link.

More background information can be found on the FIORI reference libary for the Manage KPIs and Report app: