SAP interfacing: REST

The SAP ABAP stack can also interface using REST protocol. To support this interface protocol SAP has developed special classes in the ABAP stack.

Questions that will be answered in this blog are:

  • How do I create a REST interface in ABAP stack?
  • How do I test a REST interface in ABAP stack?
  • Which tools to use to developer REST interface?

REST in ABAP

SAP delivers in the ABAP netweaver stack the ABAP REST library. The full specification can be found on the SAP help portal. The help portal also contains a small tutorial. Next to the pre-delivered REST library classes there are no tools for you available to faster develop REST in ABAP. It is coming down to SE24 and SE80.

Good reference blog is the SAP blog on usage of REST in Netweaver 7.4. This also explains the generic REST architecture implementation in ABAP.

Creating REST service in ABAP

We will create a simple Hello World REST service in ABAP. There are 2 main classes in REST ABAP: the application class handling the URL and the resource class where the logic is.

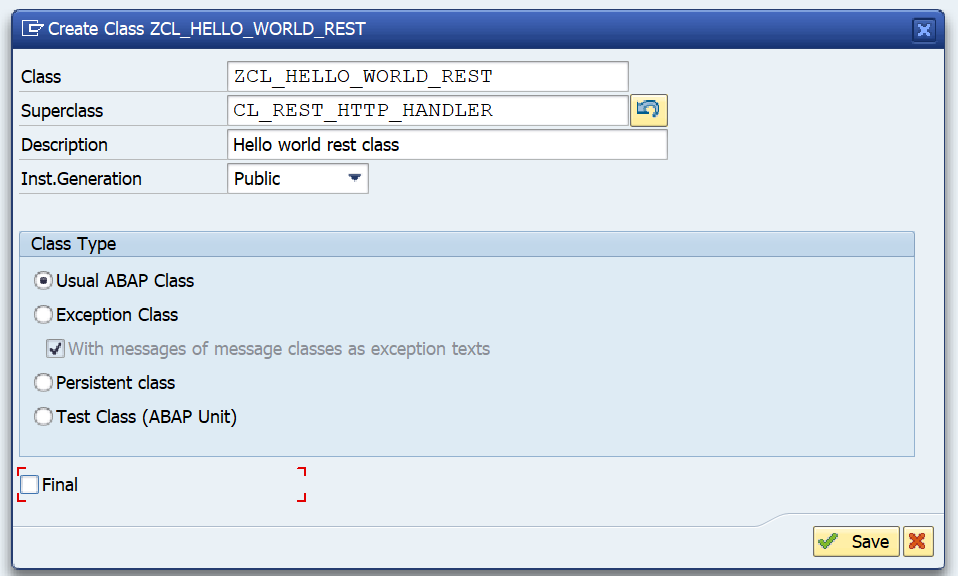
Start transaction SE24 and create a new class inheriting from the SAP delivered class CL_REST_HTTP_HANDLER:

REST create class

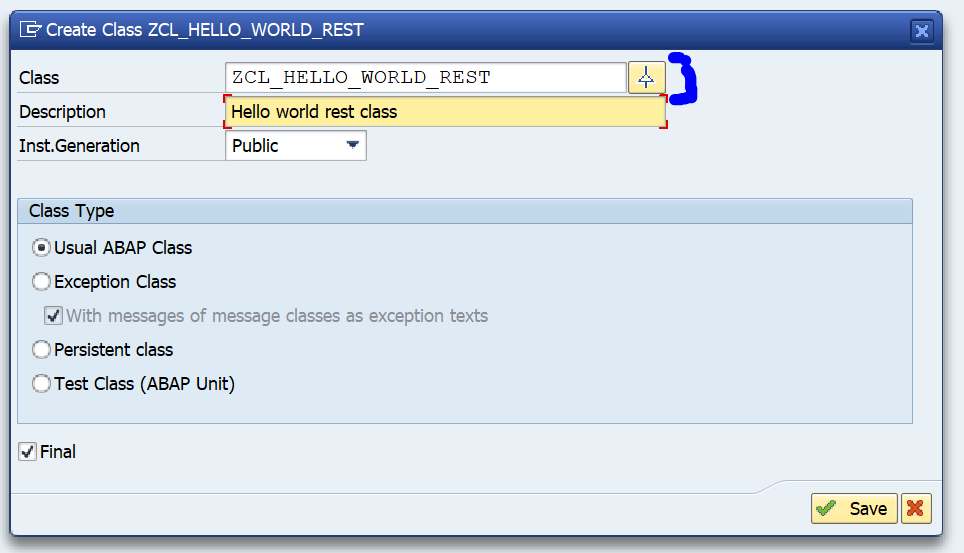
important here to press the inheritance button! Fill out CL_REST_HTTP_HANDLER as superclass:

REST create class as inheritance

It is mandatory to redefine the GET_ROOT_HANDLER method:

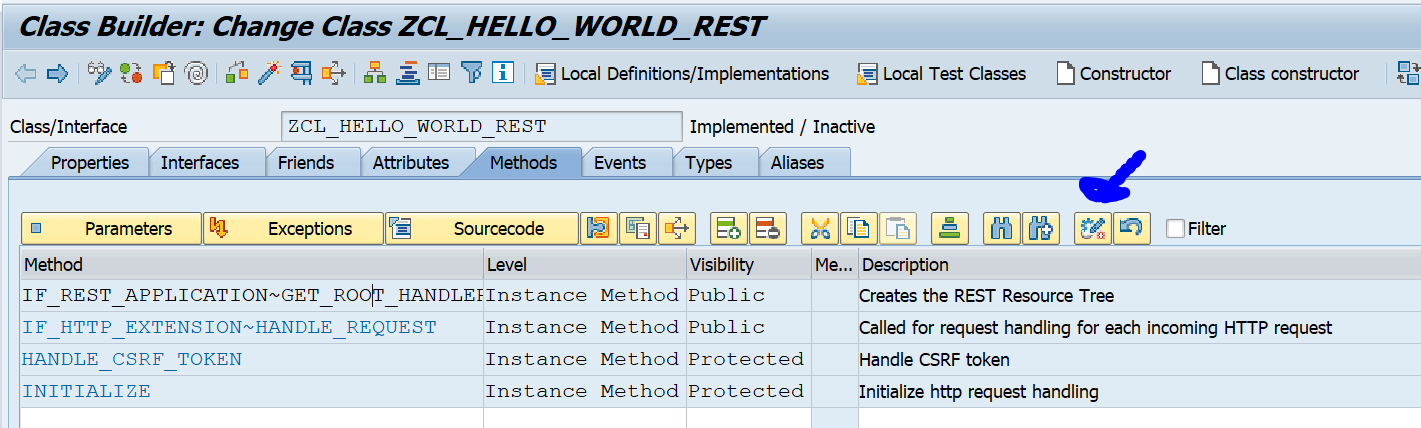
For now just leave the method empty. Save and generate.

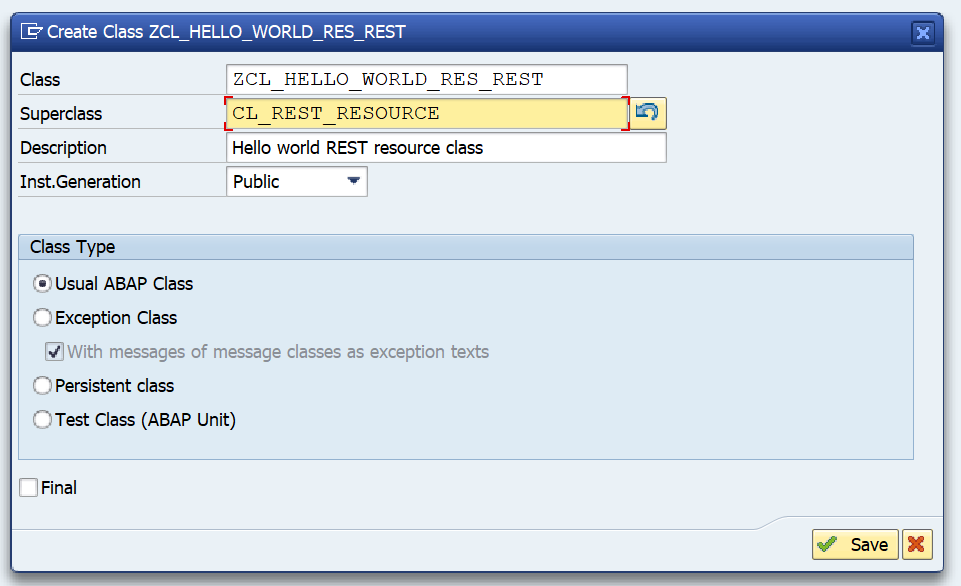
Now create the REST resource class based on inheritance of CL_REST_RESOURCE:

REST define resource class

Now redefine the GET method:

REST resource class redefine GET method

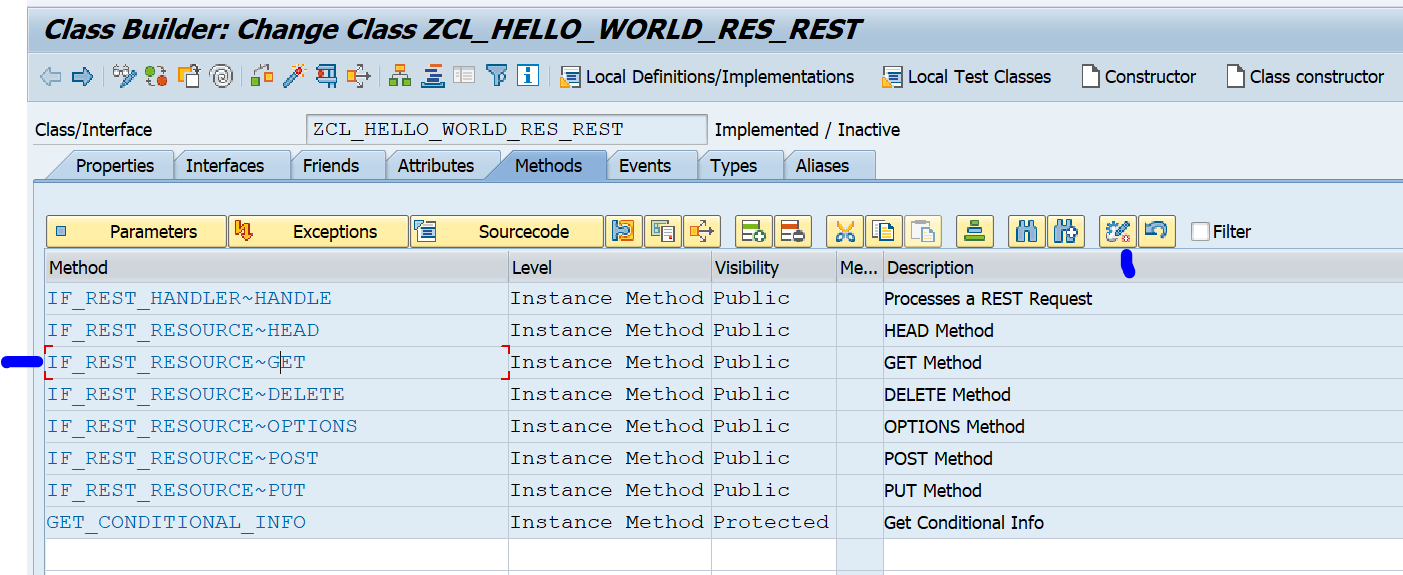
No we add a simple implementation by simply adding the text ‘Hello World’:

REST resource class GET method implementation

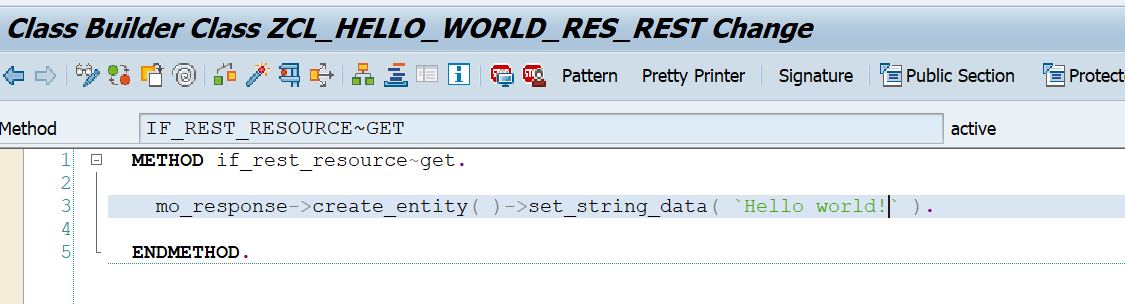
Save and activate this class.

Now we go back to the previous class: the application class. In here we now edit the GET_ROOT_HANDLER implementation we left empty earlier:

REST implementation of root handler

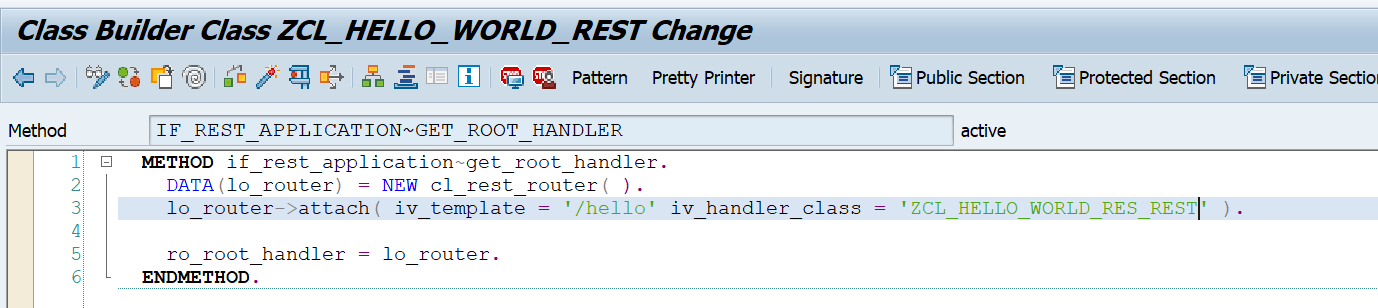
If the URL is getting the input /hello then the handler class (our resource class) ZCL_HELLO_WORLD_RES_REST is called. This class will return the string.

Save and activate again. The coding work is done.

Runtime implementation

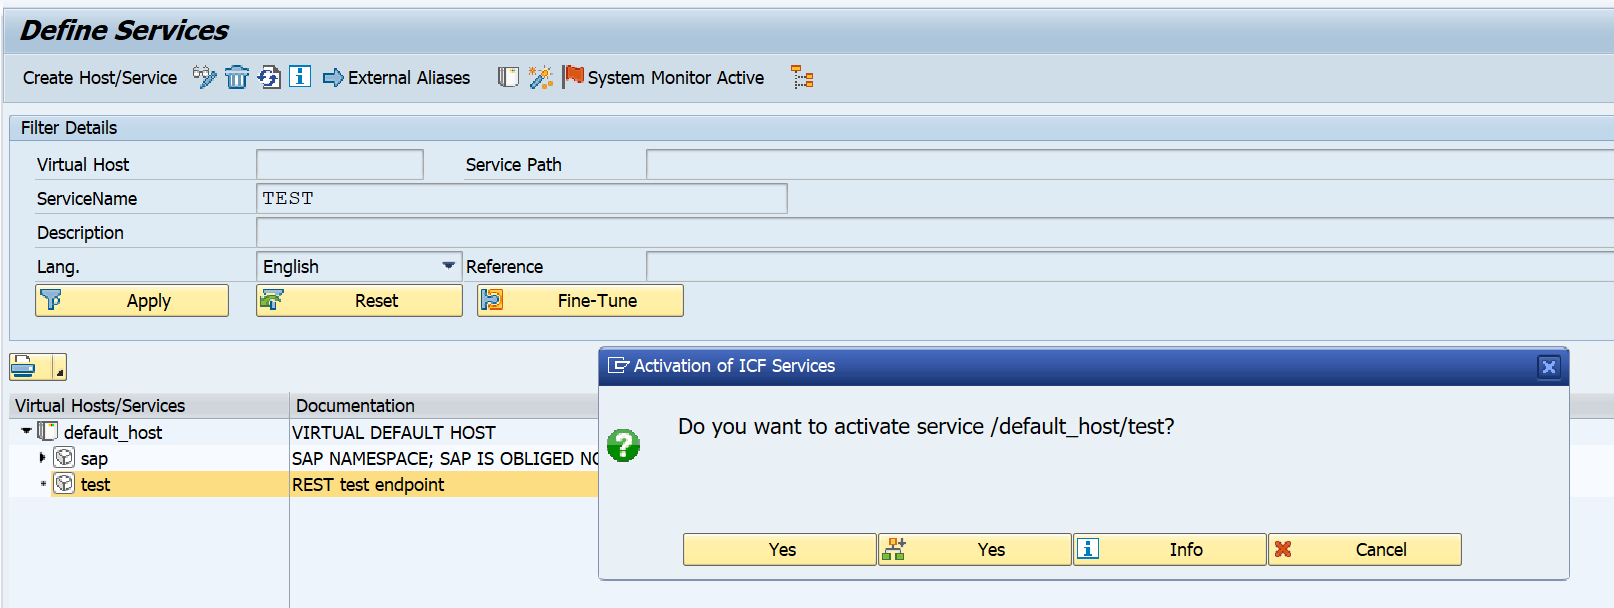
Now we need to make a runtime implementation. Goto transaction SICF and select the main node default_host first. Then select from the menu Service/Host the option Create Service:

REST SICF create service

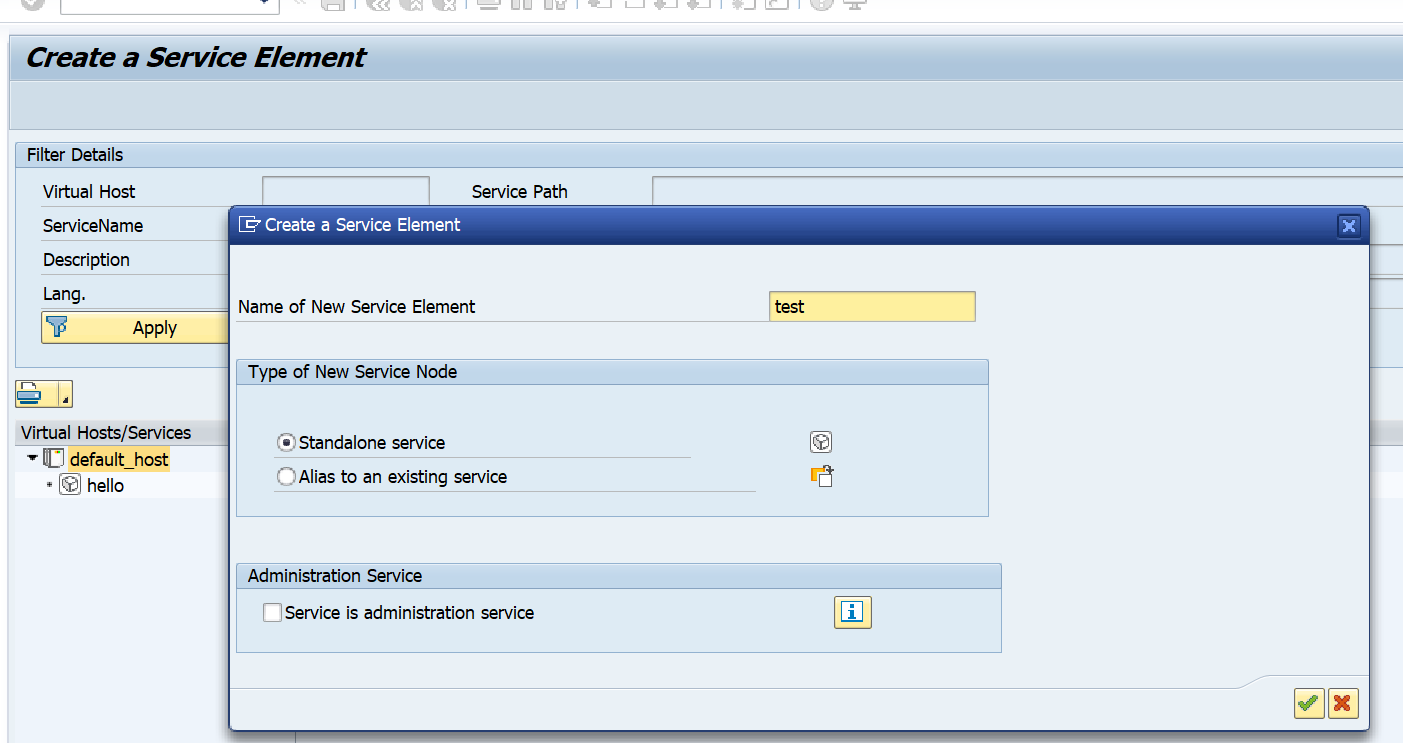
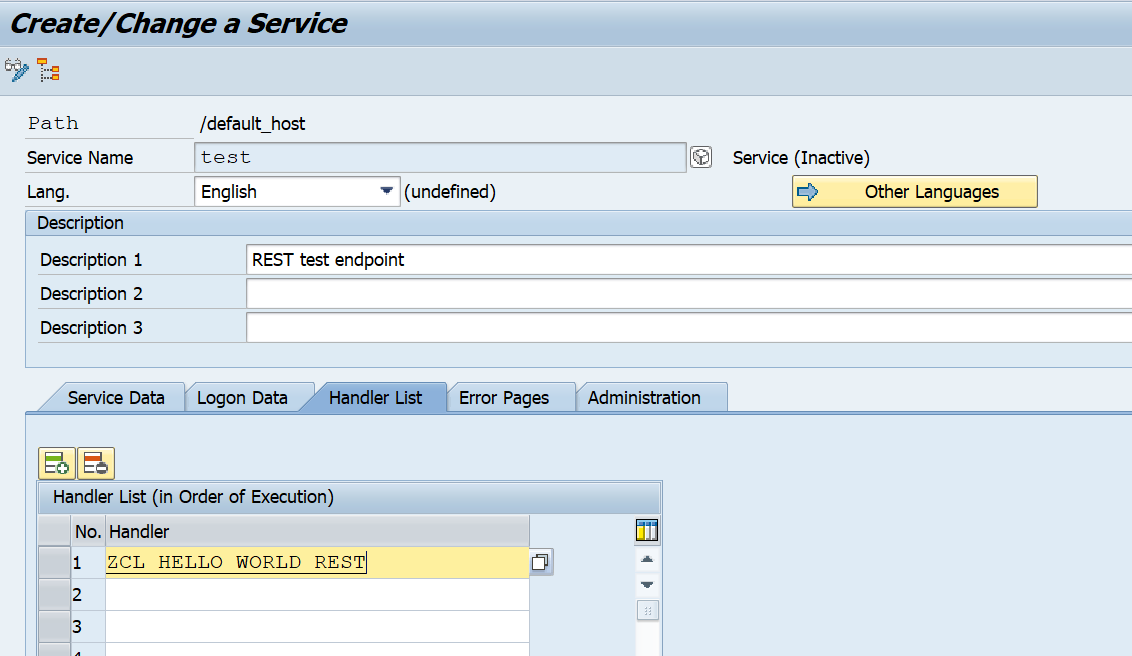
Fill out the name of the service and click ok. In the next screen give a description and in the Handler List section refer to the application class ZCL_HELLO_WORLD_REST:

REST SICF handler

Save the service. The service is created but not active. To activate right click on the service and select Activate:

REST SICF activate service

Testing the service

From the previous SICF screen right click the service again and select the option Test Service. A screen will come that says “No suitable resource found”. Now modify the URL by adding /hello after the test in the URL, and press enter again:

REST SICF test service

The URL build up: the test is the name defined in SICF. The /hello was defined in the application class.

Authorizations and security

The REST library has no specifics about authorization and security. So you have to take care your self.

Business authorization security: has to be built in via AUTHORITY-CHECK statements at the correct spots.

Technical security is provided in the Logon Data tab on the SICF node. Here you can set requirements for the technical logon method and if you only allow https.

REST versus ODATA

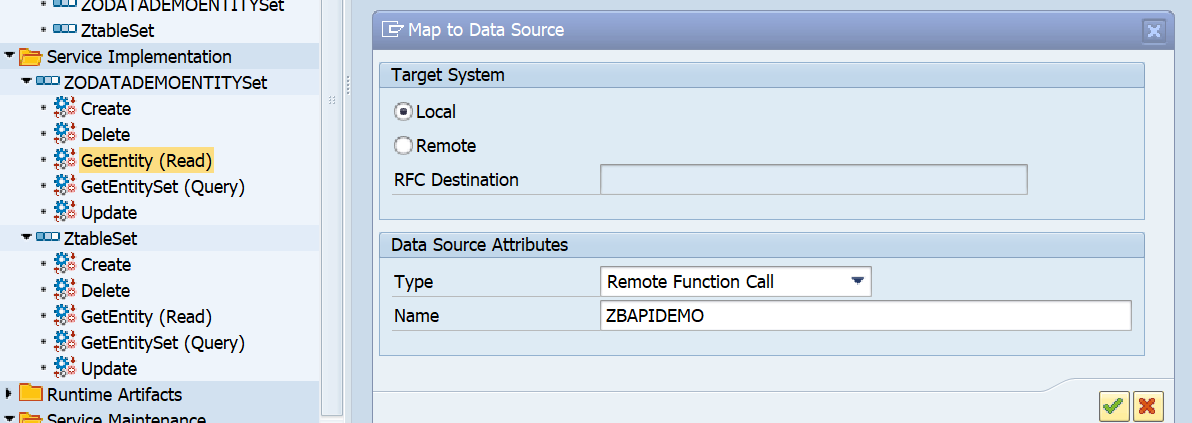
ODATA is based on REST and has more features. If you have a choice, you best use ODATA. ODATA exposing is described in this blog.

In SAP REST is supported, but you have to code a lot, and limited tools are available. For ODATA much more development and monitoring tools are available.

SAP interfacing: ODATA

In the previous blog we have setup RFC enabled function module. If you want to expose this function module as ODATA service you can use the wizard in transaction SEGW. This blog assumes the basis ODATA basis activation has been performed (see this blog).

Questions that will be answered in this blog are:

  • How do I generate an ODATA service based on a RFC function module?
  • How do I test if the ODATA service is properly working?

Set up of the ODATA service

Start transaction SEGW and create a new project:

Now start the RFC import wizard by right clicking on Data Model and selecting the option Import and then RFC/BOR interface:

Now select the data parameters:

And enter which field is key field:

After pressing finish the wizard will generate the needed classes.

Save your work and press the check button to validate if everything is ok:

Now we need to map the implementation to the RFC module. Right click on the GetEntitySet below ZODATADEMOENTITYSet and select Map to Data Source:

Now map the fields (you can use drag and drop):

Now you need to map the data fields correctly and press check.

Save your work.

Generation of objects

You can see that the Runtime Artifacts section is still empty.

Now press the button Generate Runtime Artifacts:

Wait for the generation to finish:

Now the runtime artifacts are generated, but the service maintenance is not done yet. Open the section Service maintenance and double click on the system:

Now press the Register Service button:

Accept settings and assign package for transport:

Now the registration status is green.

Testing the ODATA service

Press the button SAP Gateway Client (or start transaction /IWFND/GW_CLIENT directly, and then enter the correct service):

The test client starts:

Enter the correct inputdata: /sap/opu/odata/SAP/ZODATADEMO_SRV/ZODATADEMOENTITYSet(‘1’)

And check the output:

Attention points

The example above seems simple, but you will face more issues in real live implementation when you need to add tables and more complex structures. In those cases additional configuration and many times extra coding in the methods of the generated classes is required.

Nice blogs to start with:

ODATA security

The user calling the ODATA service needs a special right in SAP to be allowed to call the ODATA service.

Start transaction PFCG and create a new role. On the menu tab select the option Authorization Default. Then select type Tadir and object type IWSV gateway business suite enablement. Now you can finally search for our own developed and activated ODATA service:

Now save the role and assign it to the user(s) needing to call this ODATA service.

The application security relies on the function security authorization check inside the RFC function module.

ODATA V2 and V4

SAP is now moving from ODATA V2 towards ODATA V4. Read more on ODATA V4 activation in this blog.

SAP interfacing: exposing web services

In the previous blog we have created a test RFC module. We now will expose this test RFC module as web service. This blog assumes the basic SOAP web service runtime has been done according to the manual in this blog.

If you are looking for information on how to consume a web service in the ABAP stack: read this blog.

Questions that will be answered are:

  • How can I generate a web service design time based on an RFC module?
  • How do I activate the web service runtime via SOAMANAGER?
  • How do I test my web service?

Creating the web service based on RFC module

Goto transaction SE80 and search for the test BAPI:

Now right click on the name ZBAPIDEMO function module and select the option Create / Enterprise Service:

Fill out the name for the service definition and the description. Press Cont. to continue to the next screen:

Press Cont to go to the next step:

Press Cont. to go to the next screen:

Fill out your package and transport request.

Important here: on a sandbox you might want to use a local object ($TMP). In a development system, NEVER use the local option. A lot of data structures and coding will be generated. If you later try to move the objects from $TMP to a real package, you will be faced with a lot of issues. See note  886682 - Proxy inconsistencies on the use of repair programs SXIVERI_PROXY_HASHID_CHECK and SXIVERI_PROXY_HASHID_CHECK_70. After the cumbersome and painfull repair you will not make the mistake again... 

Press Cont. to goto the last screen:

On the screen you can already see the next action after completion: SOAMANAGER. But first press Complete to start the generation of the objects.

After the generation, do not forget to Activate the objects!

Activation success message:

Setting up the runtime with SOAMANAGER

To setup the runtime, start transaction SOAMANAGER. It is assumed that the basis team has performed the initial SOAP runtime setup. If not done, ask the basis team to follow the steps in this blog.

On the SOAMANAGER start screen choose the option Web Service Configuration:

In the next screen search for the design time object we created and activated in the previous section (if you forgot the activate, you will not find it now…):

Select the service and on the next screen press the button Create Service:

Fill out the definition details:

Press Next and define the security settings:

Remark: in the newer versions, the default security is set to high. If you need lower security, go back to SE80 definition in the tab configuration to change the security profile (save and regenerate!):

Press next and define the SOAP protocol settings:

On the last screen of the wizard press finish:

Wait for the runtime generation to finish.

The screen returns to the generated runtime artifacts:

The most important artifact is WSDL file which you can open from here.

Testing the service

Go to transaction SE80 and select the Enterprise Services Browser (if not visible go to menu path Utilities/Settings and add the tool):

Now open your service by clicking the Open Object button and search for the service in the second tab:

Check that the WSDL file is properly showing:

If ok, press the test button (F8) to start the test tool:

On the next screen first press the XML editor button to allow the content to be changed:

Now press execute to test. The result:

Web service security

The functionality security of the web service is the same as for the generic RFC handling (see blog on this).

The technical security of web services is mainly driven from the security settings in SOAMANAGER. There you can set the transport protocol security and you can indicate if you want simple user ID / password security or work with additional certificates for server to server authentication.

The user calling the SAP web service must have the authorization object S_SERVICE. In S_SERVICE you can define the specific web service it needs to be able to call.

Troubleshooting web services security issues

For troubleshooting web services note 2321968 – SOAP Web Service Security Troubleshooting refers to a very extensive SAP site for web service security issues troubleshooting.

Monitoring web services

For monitoring web services messages, read this dedicated blog.

To validate if the web services is correctly accessible, you need a small Z program as described in this blog.

SAP interfacing: RFC

SAP has many different ways to interface. The RFC (Remote Function Call) protocol is one of the most wide used.

This blog will explain best practices around secure and correct setup of custom built ABAP RFC function modules.

Questions that will be answered are:

  • How to setup RFC enabled function module?
  • How to setup proper RFC error handling?
  • How to setup security in RFC enabled function module?
  • How strict is the S_RFC authorization handling?
  • Why is SAP_ALL not sufficient for RFC handling?

Creation of test RFC enabled function module

In SE37 you can setup an RFC enabled function module just like a normal function module. First create a function group. Activate that function group in SE80. Now you can create the function module. We will call our test module ZBAPIDEMO:

Important here in the first tab is to set the processing type to Remote-Enabled Module.

For testing we setup import and export tabs:

RFC export tab

Important here with RFC: set the Pass by value tickbox.

For tables use a suitable table type:

And setup the correct exceptions:

Here you can see 2 very important error messages that should always be implemented:

  1. An extra authorization check
  2. An error message when no data is found

Now we can implement the following simple source code:

   DATA: zls_coms_gen_textline TYPE coms_gen_textline.
 
   AUTHORITY-CHECK OBJECT 'S_CDMC'
   ID 'CDMC_AREA' FIELD 'A'
   ID 'CDMC_ROLE' FIELD 'U'.
   IF sy-subrc EQ 0.
 
     CASE zimport.
       WHEN 1.
         zexport = 'Hello world'.
       WHEN 2.
         zls_coms_gen_textline-entry = 'Hello world table 1'.
         APPEND zls_coms_gen_textline TO ztable.
         zls_coms_gen_textline-entry = 'Hello world table 2'.
         APPEND zls_coms_gen_textline TO ztable.
       WHEN OTHERS.
         RAISE not_found.
     ENDCASE.
 
   ELSE.
     RAISE not_authorized_business.
   ENDIF. 

What is important here in this source code:

  1. The authorization check is implemented and raises an error
  2. If no data is found the NOT_FOUND error is raised

With the SE37 test suite you can test diverse scenario’s now.

Calling RFC function module from another ABAP system

If you call this RFC function module form another ABAP sytem you have to make sure you have set and check the following exceptions:

  exceptions
      not_authorized_business = 1
      not_authorized          = 2
      system_failure          = 3
      communication_failure   = 4
      not_found               = 5
      OTHERS                  = 6.

There are 2 exceptions from the BAPI definition:

  1. NOT_FOUND (nothing found)
  2. NOT_AUTHORIZED_BUSINESS (our own implemented business authorization check)

4 exceptions should be implemented as part of the RFC framework:

  1. NOT_AUTHORIZED: this is the RFC authorization, which will be explained next chapter
  2. SYSTEM_FAILURE: the coding has caused a dump and the system returns and error message (see OSS note 2484377 – Error Message: “RFC Exception SYSTEM_FAILURE Raised; No More Memory Available to Extend an Internal Tab” Upon Executing a Data Extraction Run as an example)
  3. COMMUNICATION_FAILURE: the call to the other system fails. Most likely if you go to SM59 to the RFC destination and perform a connection test you will get a failure.
  4. OTHERS: something else went wrong

The developer should take proper care of these error situations.

Dear ABAP developers: the basis team member are also humans. They will make RFC configuration errors, they rely on the authorization team to assign the correct roles and they rely on infrastructure providers to make sure systems are up and running. Also the basis team will need to perform patching and upgrades to the system, which you as ABAP developer, are calling. So please don't blame the basis team for these exceptions, but please be a good developer and implement proper error handling. If you didn't implement proper error handling, and something went wrong on basis side, that caused your code to go wrong, think twice before putting blame on basis if your code is not handling the situation properly.

For reference: OSS note 1371131 – Correct error handling of RFC calls.

Security of RFC calls

Security of RFC calls is consisting of 2 layers:

  1. The RFC layer
  2. The business application code

You should always implement both layers!

The RFC layer is protected by authorization object S_RFC:

Here you can choose between a function group or even allowing per function module. Personally I would protect by function module. Background: create, change and display BAPI’s will normally be developed inside same function group.

There is a common misunderstanding that if you give SAP_ALL to a (background) user, this would solve the RFC authorization issues. This is not true. SAP_ALL does not contain the S_RFC rights. You have to hand them out separately.

Best practice 1: you might want to start with broad authorizations at the beginning of a development to rule out authorization issues. But you must definitely limit the rights before you make the development go productively live.

Best practice 2: as first statement inside each and every RFC function module, program a relevant business authorization check statement. This is an extra safety measure that is needed to protect important business data from authorization consultants that have handed out * authorizations in object S_RFC (* means all).

Best practice 3: check in transaction SM59 that the RFC callback protection is activated. Read this blog how a hacker can easily misuse if not properly setup.

Best practice 4: be careful on the RFC setup to avoid that hackers misuse the RFC jumping option. Read more in this blog.

More on checking the basis RFC security: read this blog.

Generic S_RFC check handling at basis level

The behavior of the S_RFC check is driven by the settings of RZ11 profile parameter auth/rfc_authorithy_check. Please make sure it has a setting of 6 or higher. Best is 9. A system with 5 or lower can be considered as insecure!

Background OSS note: 2216306 – S_RFC check and profile parameter auth/rfc_authority_check.

Setting up trusted RFC connections

Set up of trusted RFC connections are explained in this blog.

RFC performance

Check if you can use the RFC fast serialization option. This option is available for a lot of modern SAP systems. It is not activated by default. Read more on the fast serialization option in this blog.

Running SCI and ATC on standard SAP and add-ons

SCI and ATC are very powerful code scanning tools (see blog and blog). Unfortunately you cannot apply it to standard SAP and add-ons.

Analyzing standard SAP code is the responsibility of SAP, and they take good and secure code (since they provide good code, it is weird they don’t allow everybody to scan their code…). Unfortunately a lot of add-on providers do not.

The blog will explain how to scan code of standard SAP and mainly on add-ons.

Questions that will be answered are:

  • What is the background on not being able to scan standard SAP and add-on code?
  • Can I truly scan the code of a new OSS note 7 days?
  • How can I work around these restrictions and still scan the code of an add-on?

Background

The background of not being able to scan standard SAP code is explained in OSS note 1986391 – Using SLIN/SCI to check SAP standard objects. This note also explains you can scan OSS notes and transports for 7 days. After that time it is no longer possible. Unfortunately this rule also applies to add-ons.

Why run SCI on add-ons?

Why would you want to scan add-ons? Add-ons come with various quality levels. Ranging from very well written with much attention to performance and security. Some add-ons are full of performance issues and full of security leaks. Some are even allowing full dynamic read SELECT and UPDATE statement without any authorization check. This is heaven for a hacker!

The below method is meant for scanning these poor add-ons using the SCI tool for performance, robust coding and security.

ATC checks on non-SAP addons

First apply OSS note 2215288 – ABAP Test Cockpit: Analyzing Objects Using Arbitrary Prefix Namespaces.

For ATC checks, now run program SATC_AC_INIT_NAMESPACE_REG to add the namespace as registered for ATC.

See note 2439348 – SATC_AC_INIT_NAMESPACE_REG list is empty, if you get empty list.

See OSS notes: 2141202 – FAQ – ATC/CI: Analysing Objects with Custom Prefix Namespace ‘/MYSPACE/’ and 2313169 – ATC checks and ABAP Unit tests for objects in producer namespaces not possible

How to run SCI on SAP standard?

When you run the SCI tool on an add-on by selecting package or development object, you get the message that it does not contain any objects:

This is because your selection is first scanned for standard SAP and add-on objects. These are removed. So the result set is empty.

Goto transaction SE24 and select class CL_CI_OBJECTSET. Now select method BUILD_TADIRSET and display the code:

Put a break-point as statement if ENABLE_CI ne ‘X’.

Now start the SCI tool again. If the debugger stops at this statement, use debug and replace to change the content of ENABLE_CI to ‘X’. Now the skipping of SAP and add-on objects is not done. SCI will scan the code. It will still not use SLIN. But these are minor checks.

Bug fix OSS notes

Bug fix notes:

Webdynpro unified rendering updates

Webdynpro for ABAP and SAP GUI for HTML use the unified rendering framework as enabler for high performance. Bugs and issues in this framework are solved in unified rendering updates. Also new functions are deployed in this way.

Questions that will be answered in this blog are:

  • How do I find my current versions for the unified rendering framework?
  • How to see if there are new patches for the unified rendering framework?
  • How to execute patches for the unified rendering framework?

Current version of unified rendering framework?

You can get the current version information of the unified rendering framework by starting program WDG_MAINTAIN_UR_MIMES. Then click on the option Show Extended Info:

In newer versions (pending on support package, see OSS note 2257042 – Support Information in SITSPMON) you can also the versions directly in the ITS monitoring transaction SITSPMON:

OSS note 2936178 – How to check the UR version used by applications and custom themes is describing this process as well.

Patch information

The main note for unified rendering for all technologies are 2500800 – UR: General information about cumulative patches for Unified Rendering and 2090746 – WD ABAP: Unified Rendering Update with TCI – Instructions and Related SAP Notes.

This note refers to the collective note for SAP GUI for HTML (2504011 – SAP GUI for HTML: Unified Rendering Update – Instructions and Forecasts) and the note for Webdynpro for ABAP (2090746 – WD ABAP: Unified Rendering Update with TCI – Instructions and Related SAP Notes).

Applying the updates

In case of a webdynpro for ABAP update, you will have to apply the corresponding OSS note from the previous section via the TCI update procedure (see blog on TCI notes). After applying the note, run program WDG_MAINTAIN_UR_MIMES to check the consistency.

The SAP GUI for HTML patches are delivered on kernel level.

Background OSS notes

Installing ADT Eclipse frontend

This blog will explain the installation of the ABAP development tools (ADT) on the laptop or workstation.

Activation of the ABAP development tools needed on the backend is explained in this blog.

Questions that will be answered in this blog are:

  • Where can I find the software downloads?
  • Which Java version do I need?
  • What is the installation sequence?

Java version

As of February 2021 Java version 11 is mandatory. See OSS note 2949356 – Java 11 is mandatory for ADT in February 2021.

Software download of ADT tools

Software can be downloaded from the SAP public site: https://tools.hana.ondemand.com/ .

Click on the ABAP part:

Download here the Eclipse version needed and check carefully the JAVA instructions. Pending on your local system a JAVA JRE might already be there or forbidden by your windows administrators. Check note 3035242 – Remove bundled JRE from Eclipse packages if needed.

Installation

Make a directory on your local machine called C:\ADT\.

Do not use spaces and special characters in the installation directory. This is a main cause of issues. 

Extract the files:

Now in the the directory Eclipse, you can launch Eclipse by double clicking on the executable:

This will now launch Eclipse. If this works ok, skip the launch issue below and proceed to Installation inside Eclipse.

Launch issue

Depending on your JAVA installation and settings a Eclipse launch code might appear:

If this happens, most likely Eclipse can’t find a proper JAVA installation. In the previous step you have downloaded the SAP JVM files and extract them as well to the C:\ADT\ folder.

Now we need to edit the Eclipse.ini file:

Edit the file and add the line to point to the SAP JVM:

-VM

C:/ADT/sapjvm_8/bin/javaw.exe

This has to be inserted at exactly the designated spot. Save the file and re-launch Eclipse.

Installation inside Eclipse

After first initial launch of Eclipse:

  1. In Eclipse, choose in the menu bar Help > Install New Software…
  2. Add the URL https://tools.hana.ondemand.com/latest

After this install is done Eclipse needs to restart.

Now you can open the ABAP perspective in Eclipse:

ABAP Eclipse OSS notes

There might be bugs in Eclipse. In SAP OSS search for component BC-DWB-AIE to find bug fixes or explanations on specific functions.

Or look for the search term “quick fix” to find bug fix notes for the Eclipse quick fix function.

Clean ABAP Eclipse plug-in: ABAP cleaner

To speed up clean ABAP in practice, you can install the clean ABAP cleaner plug-in for Eclipse. Read this blog on how to do this.

SWLT performance tuning worklist

This blog explains how to use the SWLT performance tuning worklist to find poorly performing Z code by combining SQL monitoring data from production and ATC results.

Questions that will be answered are:

  • How to setup the SWLT performance tuning worklist tool?
  • How to analyze the results from the SWLT performance tuning worklist tool?

Preparations

As preparation for the SWLT tool you must have run the SQL monitor in a productive system and created a snapshot of the data. This snapshot you can export and import in a development system (see note 2700312 – How to import SQL Monitor (SQLM) extracted data). In the development system you configure and run the ATC code check tool.

The SWLT performance tuning worklist tool will combine these results. As example we will use this poorly written Z code:

Running the SWLT tool

Start transaction SWLT:

You can reduce the scope by just taking the needed Z packages. Goto the tab Static Checks to select the appropriate result of the ATC run (for more on ATC read this blog):

Now select the SQL monitor tab to select your SQLM data snapshot you took from your productive system:

Now that all data is loaded, you can hit the execute button to start the SQL performance tuning worklist.

It might be you don't see the SQLM snapshot in SWLT. In that case create a new snapshot from SWLT directly.

The tool will now start to merge the results. In the example above you can see the following result:

In the total result select a line. On the bottom left you can see the SQL monitor results. Bottom right you can see the ATC check result. Clicking on the underlined program or SQL statement will bring you to the poorly performing ABAP code point.

Bug fix notes

3060630 – Runtime error RUNT_INTERNAL_ERROR while fetching SQLM data (e.g. via SWLT)

SQLM SQL monitor

This blog will explain about the SQLM tool to monitor expensive SQL statements in a productive environment.

Questions that will be answered are:

  • How to start and configure the SQLM tool?
  • How to analyze the results?

Configuration of SQLM tool

The SQLM tool does not require specific configuration or installation if you have a bit modern SAP system. To activate it start transaction SQLM and click on the Activate button for All Servers:

The trace is active now until the given time frame.

Example use of the SQLM transaction

First we start by writing a very bad performing Z program:

This program is really inefficient. After activation of the SQLM monitoring we run this program a few times.

Now we goto the SQLMD transaction (or from SQLM and then press display data button) to display the SQL monitoring results:

Selection can be done on total number of executions, execution time, amount of records. Result:

You see now the impact of our badly written program. Double click on the line will jump to the ABAP code point.

Creating snapshots

At the bottom of the SQLM start screen there are the buttons to create snapshots:

This results into the Snapshot screen:

You can create a snapshot here for later re-use. You can also download the snapshot to a different system by using these buttons: first export to file:

When you have the file, goto the target system and start SQLM and press create snapshot. Now use the option Create with Data Source File Import.

It is common practice to capture data in production by a basis administrator who exports it. Then the data download is handed over to an ABAP developer using the data as upload in SQLM database in the development system to improve poorly performing Z code. The developer can use the SWLT tool (see blog) to combine the SQLM data with the static code review data taken from the ATC tool (see blog).

Follow up use in SWLT

The SQLM data can be used as input in the SWLT tool: SQL performance worklist tool. This tool combines the SQLM data with the ATC tool results. Read more about SWLT in this blog.

Background information

More background information can be found in OSS note 1885926 – ABAP SQL monitor and 3242700 – ABAP SQL Monitor: Implementation Guide and Best Practices.

Useful blog (which is start of blog series on SQLM): link.

Impact on performance and memory is minimal. Description is fully documented in OSS note 3100598 – Memory Requirement and Performance Impact of the SQL Monitor.

OSS notes

Relevant OSS notes:

S4HANA blacklist

With S4HANA SAP has deprecated some parts of their old code. In some weird cases this old code might still be required.

This blog will explain on the S4HANA blacklist. Questions that will be answered are:

  • How do I see a dump is caused by the S4HANA blacklist?
  • Where to find more background information on the S4HANA blacklist?

The S4HANA blacklist dump

If for whatever reason the S4HANA system gives an ABAP dump with the error SYSTEM_ABAP_ACCESS_DENIED, this is a S4HANA blacklist dump. See note 2476734 – Runtime error SYSTEM_ABAP_ACCESS_DENIED. Or a reference to OSS note 2295840 – Outbound / Inbound calls from external to RFC FM are blocked when the FM is blacklisted and the UCON-Check is active.

Blacklisted RFC calls

When calling a blacklisted RFC from an external application you can get similar dump with reference to OSS note 2295840 – Outbound / Inbound calls from external to RFC FM are blocked when the FM is blacklisted and the UCON-Check is active. This note itself is old and refers to newer OSS note 2416705 – Outbound / Inbound calls from external to RFC FM are blocked when the FM is blacklisted using Blacklist Object. You can run program RS_RFC_BLACKLIST_COMPLETE to see which function modules are blacklisted:

2259818 – RFC enabled Function Modules with incompatible signature change compared to its version in ERP are blocked from external access.

What to do when you hit a blacklisted item?

The best approach is to avoid doing what you did and look for the functional alternative provided by SAP. Search for the correct simplification item OSS note. In almost all cases SAP provides a solution.

Activating a blacklisted item

OSS note 2249880 – Dump SYSTEM_ABAP_ACCESS_DENIED caused through Blacklist Monitor in SAP S/4HANA on premise, contains the procedure to activate a blacklisted item. For the RFC calls follow the instructions of OSS note 2408693 – Override blacklist of Remote Enabled Function Modules.

Please make sure you have both the clearance from SAP and the system owner in writing before executing this procedure. Support can be lost and system upgrade in the future can be facing severe blocks. Only execute as last resort after explicit approval.